

One of the most common problems for InDesign users who need to print on a commercial press is “bleed” — the fact that colors or images must span not just to the edge of a page, but beyond it. (Learn more about bleed here: “InDesign Basics: Working With Bleeds in InDesign.”)
If you have a frame with a colored fill, it’s really easy to make it bleed: you just extend it out to the bleed guides, or a bit on to the pasteboard. But images are different — if the edge of the image is already up against the edge of the frame, then making the frame larger doesn’t help… there’s no image there!

But InDesign’s GenAI features make fixing this a breeze.
First, make the graphic frame bigger than the image. For example, in the image above, the image goes to the edge of the page, but I’ve expanded the frame out to the bleed guides.
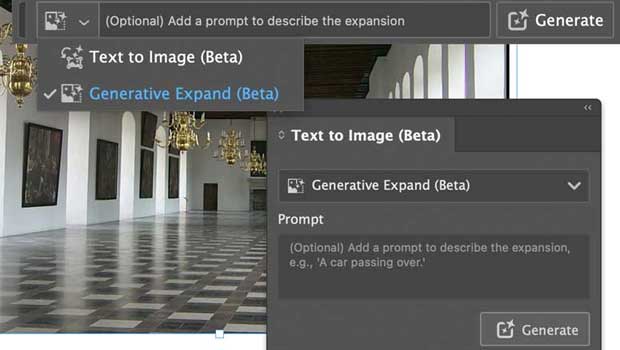
Next, in the floating Context panel (Window > Contextual Task Bar) or the Text to Image panel (also from the Window menu), click Generate:

InDesign uses its Firefly GenAI tools (which, as far as I know, require you to be connected to the internet) to expand the image — adding new data where the frame is empty. It gives you three variations you can choose from, but because this is all going outside the page edge, it rarely matters which one you choose. The result is an excellent bleed, out to the edge of the frame:

It’s almost too good to be true. This is probably one of the most boring but actually incredibly practical uses for GenAI ever!
- It only works when you start with a JPG or PNG file. It won’t work with placed PSD, TIFF, PDF, HEIC, AI, EPS, etc.
- The expanded image is an embedded RGB JPG. In other words, your InDesign layout will no longer be linked to the original placed file.
- Any embedded color profile in the original image will be lost (the new JPG will be untagged).
- Transparent PNGs will be flattened.
- If the JPG file was CMYK, it will be converted to RGB.
- The InDesign file size will increase.
- The resolution of the image may change.
- Your image is replaced with the new GenAI image. For that reason, it may be better to clone your image (create a duplicate of the image), then select the bottom image and expand that one. That way, the original image will sit on top of the expanded one.
This article was last modified on July 29, 2024
This article was first published on July 23, 2024
Commenting is easier and faster when you're logged in!

Recommended for you

Pasteboard Notes
These days everything has a running commentary alongside. Shouldn?t your InDesig...

Getting the Right Bleed in Print PDFs
As a prepress operator, one of my responsibilities is to check artwork supplied...

How to Set Up Your Documents So That Your Printer Won’t Hate You
I work for a large commercial printing company (see my bio below for details) an...