
Using the Book Panel in InDesign
Learn how to use the Book panel to make any long-document project more manageable—not just books!

This article appears in Issue 12 of CreativePro Magazine.
An InDesign Book is just a bunch of separate InDesign INDD files that are collected in the Book panel. Associating separate files this way gives you the benefits of breaking up one large file into smaller pieces while still allowing you to number the pages continuously between files, create a single PDF from all the files, and perform other crucial tasks.
The typical way designers use the Book feature is to create a multi-chapter book, with one chapter per InDesign file. But Book files can be useful for any long document that contains logical sections that can be laid out as separate files.
What Is a “Book?”
When you choose File > New > Book, an INDB (InDesign Book) file is created and the Book panel appears on the screen. Then, you can add InDesign files from anywhere in your local file system, including a network server, to the Book panel, either by clicking the + icon at the bottom and selecting one or more InDesign files or by dragging files into the panel from the macOS Finder or Windows File Explorer.
An INDB file is small, because it contains only pointers to each InDesign file in the book, as well as information about the order of the files, page numbering options, and a few other items. In other words, the Book file doesn’t contain any of your layouts, it just points to the component INDD files that comprise the book (Figure 1).

Figure 1. An INDB file contains only pointers to the locations of the InDesign files that comprise the Book, not the contents of the files themselves.
So if your INDB file is deleted or becomes corrupt, you won’t lose much. You can create a new Book file and reconfigure it with its component INDD files with minimal effort.
Why Split a Document Into Multiple Files?
Why not just keep things simple and put all the content for your document in a single InDesign file? I can think of four reasons.
- Do you really want to commit all the content in a large project to a single InDesign file? What if the file becomes corrupt, can’t be opened, or something else goes wrong? If you break a document into multiple files, it’s unlikely that they would all become corrupted at once.
- Splitting a project into multiple files allows several people to work on the project at the same time. One person can work on one chapter, while another can dig into a different chapter. In fact, if you store the INDB file and the INDD files on your server, InDesign allows multiple people to open the same INDB file simultaneously. In that case, the Book panel has a rudimentary feature that will tell you when someone else has one of the chapter files open (Figure 2).

Figure 2. A lock icon next to a chapter file in the Book panel indicates that another user has that file open, preventing you from opening it at the same time.
- One InDesign document can be a part of multiple Book files, which can help maintain a single INDD file for shared content. Suppose you’re working on a series of user guides for power tools, where one chapter of each guide contains the same safety information as the other guides. If you set up each user guide as a multi-chapter Book file, you quickly could add a single InDesign file that contains the safety information to all of the user guide Book files.
- InDesign generally handles long documents quite well. But depending on your layout, the features you’re using, and the total number of pages, you may start bogging down. In that case, you might need to break your file into smaller files and collect them into a Book file.
When you break a document into multiple files, you’ll invariably run into difficulties in three primary areas:
- Keeping styles, text variables, parent pages, and other items in sync between the chapter files
- Packaging, preflighting, and printing your chapter files and exporting them all into a single PDF file
- Numbering pages, chapters, figures, and other items across multiple files
Thankfully, these are the three primary things that InDesign’s Book feature was designed to help you with.
Synchronizing… the Power Feature
When you decide to split a large project into multiple files, you quickly encounter a huge problem: When you make a change to the attributes of a paragraph style in one chapter, InDesign doesn’t automatically make that change in the project’s other chapters.
I really wish InDesign offered some sort of external, linked-style feature. Lacking that, the Book panel provides the next best thing through its synchronization features, which let you broadcast style changes from one chapter to all the rest of the chapters in a Book file.
In fact, you can synchronize much more than just paragraph styles between chapters of a Book file, including:
- Paragraph, character, table, cell, object, and TOC styles
- Swatches
- Parent pages
- Text variables
- Named numbered lists
- Conditional text settings
- Cross-reference formats
- Trap presets
How to synchronize
Briefly, here’s how synchronization works.
- Designate the file that contains the latest version of the styles, swatches, parent pages, or other items that you want to synchronize as the style source. To do so, click in the column to the left of the name of the file that you want to be the source (Figure 3).

Figure 3. The icon in the left column indicates that the “Requirements of speech” document is the style source for this Book, and its styles and other selected items will be used to update the other Book documents—but only when the Book is synchronized.
- Choose Synchronize Options in the Book panel, menu and select the items you want to synchronize. (Checked items will be synchronized; the rest will remain untouched.)
- Click OK.
- Select the files that you want to synchronize in the Book panel file list, or click in the empty area at the bottom of the panel to deselect all the files (Figure 4).

Figure 4. To deselect the files in the Book panel, you need to make the panel long enough to display one or more empty rows, and then click in that area.
- Choose Synchronize Book or Synchronize Selected Documents in the Book panel menu. Now, InDesign will quietly and invisibly open each file and synchronize the items you selected in step 2.
What does it mean, exactly, to synchronize the items? Here is how it works for styles (the feature varies slightly depending on what type of item you’re synchronizing).
- Each style is copied from the style source to the target file. If the style exists in the target file, it is overwritten. If the style doesn’t exist in the target file, it is added.
- Styles that are in the target file but not in the style source document are left as is (Figure 5).
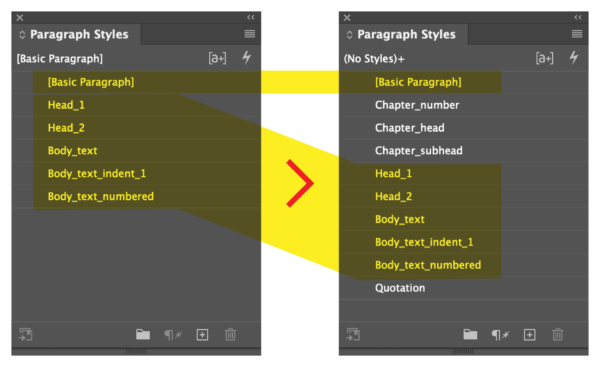
Figure 5. Only the styles in the style source (left) are copied to each of the target files (right) overwriting any styles with the same names that already exist in the document. The styles named Chapter_number, Chapter_head, Chapter_subhead, and Quotation, which are unique to the target file, remain untouched by the synchronization process.
Synchronization is always one-way, meaning that items are copied only from the style source to the other documents in the Book—never the other way around.
The Synchronize command has no Undo. Synchronizing a book requires you to have a solid understanding of how paragraph, character, table, cell, object, and TOC styles function and to be very methodical and organized in your work. It is easy to make a mistake that causes inadvertent changes to hundreds or thousands of pages with this powerful feature, so be sure that you have backup copies of your files tucked away somewhere safe before synchronizing. Or, open all the documents and save before syncing. Then, give them a thorough post-sync inspection before saving and closing. That way, you can revert and undo the damage if necessary.
Synchronization oddities
When it comes to synchronization, you should be aware of a few oddities.
- As of this writing, a nasty bug will allow color swatches to be synchronized even when you specify in Synchronize Options that they shouldn’t be.
- Color groups can’t be synced. The color swatches within the groups are synced, but the groups aren’t retained.
- Cross-reference formats are synced, but you will still need to choose Update All Cross-References in the Book panel menu to update all the cross-references in a Book.
I avoid using Style Groups in Book documents. With Style Groups you have another set of synchronization rules to keep track of, depending on whether Smart Match Style Groups is checked in the Synchronize Options dialog box. For more details about how Style Groups affect synchronization, see helpx.adobe.com/indesign/using/creating-book-files.html.
Preflight, Package, Export, and Print
One big advantage of assembling a group of smaller documents into a Book file is that you can then preflight, package, export, or print all of them, or a selection of them, all at once.
Preflight
The Preflight Book command in the Book panel menu does just that: It runs the Preflight command on all the files in the Book, evaluating each on a pass/fail basis and flagging each file with a green or red icon in the panel. If a chapter fails (red icon) and you want the details, you’ll need to open the file and preflight it as you would a normal INDD file.
InDesign can also compile a report of all the preflight errors in the book and generate a PDF.
Package
The Package Book for Print command in the Book panel runs the File > Package command on all the files at once. Besides being easier than packaging each chapter individually, this command has the advantage of not creating multiple copies of linked items and fonts.
In other words, if both Chapter 1 and Chapter 4 use the logo.png file, InDesign copies it to the Links folder only once. If five chapters use Helvetica.otf, InDesign copies it to the Document Fonts folder only once.
Export
Via the Export Book to PDF and Export Book to EPUB commands in the Book panel menu, you can export the entire Book to a Print PDF, Interactive PDF, Fixed Layout EPUB, or Reflowable EPUB.
There are a few things you should know about the PDF export.
- First, all chapters are output as a single PDF. If you want to output each chapter as a separate PDF, see the Export Book Files Individually script by Peter Kahrel.
- If your chapters are set up as facing pages and you want to output PDF spreads, you’ll run into another limitation. If a chapter ends on a left page and the next chapter starts on a right page, that spread will output as two separate pages in the final PDF, while all the rest of the pages will be output correctly as spreads.
- There is no way to export a Book to Publish Online, nor many other formats, such as HTML, JPG, PNG, or IDML. A couple of scripts by Bruno Herfst, however, can be helpful. Export_Book exports all the stories in a Book to a text file, and Export_Book_2_JPG exports every spread in a Book as a JPEG.
The Print Book command in the Book panel menu prints all the chapters of a Book file continuously. On occasion, I’ve used this capability to queue up a bunch of dissimilar jobs for printing while at lunch. Just create a temporary Book file!
When you do so, be sure that Automatically Update Page & Section Numbers is turned off from the Book Page Numbering Options panel menu (more on that next). Add your InDesign files to the book, and print. Throw the Book away when you are finished.
Numbering Issues
The Book feature works well with automatic page, section, paragraph, and chapter numbering across individual files.
The key is to choose Book Page Numbering Options in the Book panel menu (Figure 6). In the dialog box that opens, turn on the Automatically Update Page & Section Numbers option. Now, the numbers will update every time you make a change to a chapter document or add, remove, or rearrange the chapters. If the option is off, InDesign will not change page numbers until you choose one of the Update Numbering options in the Pages panel menu.

Figure 6. The Book Page Numbering Options let you control when and how automatic page numbers between chapters are updated.
Old Tech
InDesign’s Book feature works well and is still relevant in modern workflows. But because it was introduced more than 20 years ago in InDesign 2.0 and hasn’t been refined much since, it’s looking a little long in the tooth in a few respects.
This panel is unique
The Book panel itself is a little strange. It looks like a panel and it acts like a panel (sort of), but it behaves in some unexpected ways.
- First off, it doesn’t live in the Window menu with the rest of the InDesign panels. Instead, the Book panel appears on your screen whenever you open a Book (INDB) file. If you open a second Book file, that file appears alongside the first as a separate tab in the Book panel.
- While you can group and dock a Book panel with other panels in your workspace, as soon as you close and reopen InDesign, the Book panel disappears. When you reopen a Book file, the panel reappears smack-dab in the middle of your screen.
- Alas, right-clicking a file in the Book panel does nothing. Instead, all interaction with the panel must happen through the panel menu.
Features that don’t work with Books
Sadly, as Adobe has added new features to InDesign (and Creative Cloud services), its developers often haven’t connected those features to the Book panel or considered how people using the Book panel might want the feature to work. Here are a few things to watch out for.
- The Endnotes feature doesn’t support Books, so there is no way to insert Endnote references in the individual chapters that point to endnotes at the end of the last chapter or in a separate endnotes chapter. In other words, endnotes can appear only at the end of a single InDesign file, not at the end of a Book.
- The Share for Review feature works only with individual InDesign files. There’s no way to share an entire Book for review.
- If you create a single PDF of an entire Book and then send that PDF out for review, the File > Import PDF Comments command won’t import the PDF comments into their respective InDesign files. For this workflow, you’re better off exporting a separate PDF of each InDesign file in the Book.
- Find/Replace Font works only on the currently active file—not across the entire book—so you have to search for fonts in one InDesign file at a time.
- If you are using Adobe Fonts, there is no way to activate all the fonts used in a book all at once. This must be done on a file-by-file basis.
- The Last Page Number text variable will keep track of only the last page number of the current file, not the last page number in the Book. A workaround: Create a page-only cross-reference to some text that appears on the last page of the document.
- The Bookmarks panel displays bookmarks in the active document only. It won’t show bookmarks for the entire book.
- The Go to Page command allows navigation only to a page in the active file, not the Book. However, Peter Kahrel’s Go to page script is a really nice replacement for this command.
- The Find/Change command will not search through all the files in a Book. You can open all the files in the book and choose All Documents for the scope of the search—but this would defeat the purpose of using a Book file in the first place! Furthermore, there’s no easy way to open all the files in a Book short of double-clicking on each in the Book panel.
- Likewise, there is no way to check the spelling of an entire Book, short of opening all its files and changing the Search scope to All Documents.
- The Info panel doesn’t support Books, so the Character/Word/Line/Paragraph count will display statistics only for the active single document.
If any of these items are important to your workflow, be sure to make your voice heard by voting for a feature or by creating your own feature request on the Adobe InDesign UserVoice site.
Useful Scripts
As you’ve seen throughout this article, enterprising scripters have developed handy workarounds for many of the Book panel shortcomings. Here are a few additional handy scripts.
- BookOfSelectedFolder, a free script from Kasyan Servetsky, prompts you for a folder, then creates a Book from all the InDesign documents in the folder.
- Relink documents in book, another free script from Kasyan, relinks all the missing files in a book. It’s really handy if you have moved Book files from one location to another.
- Kasyan’s Batch Processor script makes it possible to run scripts that are intended to run on a single file to run on every file in a Book. For example, someone recently told me they had a large project where every chapter had its own table of contents. They used the Batch Processor script to run my Update TOCs script on every file in their Book.
- Sync Layers across Book, and Sync Superscript/subscript settings, two scripts by the late Theunis de Jong, let you synchronize layer visibility and superscript, subscript, and small caps settings across the documents in a Book. Both are described in this article, which also includes a download link.
Should You Use It?
So is the added complexity and long list of caveats worth the benefits that the Book panel brings to your long-document game? Your answer to this question will be dictated largely by how badly you need to separate your documents into smaller pieces. For many of us who produce lengthy, complex documents, the trade-offs and limitations are very much worth it.
This article from CreativePro Magazine is for members only. To continue reading, please log in above, or sign up for a membership today! Thanks for supporting CreativePro!
Commenting is easier and faster when you're logged in!

Recommended for you

Nigel French’s InDesign Type (4th Edition) Published
News about the latest edition of Nigel French's authoritative guide to working w...
Book Design Basics in InDesign
For book designers, let this article be your guide to getting the most from InDe...
Now available: GREP in InDesign, 3rd Edition
Learn how to harness the power of GREP in InDesign to supercharge your work. And...