
Accessibility Features and Limitations in InDesign
What InDesign does great—and not so great—when it comes to creating an accessible PDF


This article appears in Issue 11 of CreativePro Magazine.
Of all the possible source document formats for accessible PDFs, InDesign offers the best starting point. Admittedly, as a dedicated user for over 20 years, I could be biased. I love using InDesign because it gives me the freedom to design beautiful layouts and the control to output well-structured, accessible PDF files from them. To be fair though, InDesign does have some shortcomings. In this article, we’ll analyze what it does well and where it falls short when creating accessible PDF files.
What Is an Accessible PDF?
So, what exactly is an accessible PDF, and where does InDesign fit into the process of creating one?
As graphic designers, we’re visually oriented in our work. We focus on the appearance of what we create because that’s what we’ve all been taught to do. But we also need to consider how people with low vision, blindness, or mobility impairments can consume our content. Those folks often use assistive software commonly referred to as screen readers, which read content (usually a PDF or website) aloud. JAWS (Job Access With Speech) and NVDA (NonVisual Desktop Access) are the two most common examples of this technology.
The software’s task may sound simple enough, but not all PDF files are created equal. For software to read the content of a PDF aloud, it needs to be accessible—that is, the contents must be structured and organized in a way that can be expressed non-visually.
Accessible PDFs can comply with several standards: Web Content Accessibility Guidelines (WCAG), developed by the World Wide Web Consortium; PDF/UA, from the International Standards Organization; or Section 508, the U.S. government’s Americans with Disabilities Act. Software like PDF Accessibility Checker (PAC) 2021 can check the structure of your PDF and judge whether it meets the accessibility requirements.
The process of generating a PDF file that can be read by non-sighted individuals is called remediation. That makes you the remediator.
You can retrofit a PDF in Acrobat or other software to make it accessible, but this method is time-consuming, arduous, and expensive. The better alternative is to create an accessible PDF file in the first place using an application like InDesign, Word, or PowerPoint. If you’re using InDesign, you can get close, but you will almost certainly need to make some changes in Acrobat before you have a truly accessible PDF.
Accessibility Jobs that InDesign Does Well
The accessibility features in InDesign have been building up for over a decade. Starting in 2011 with InDesign CS 5.5 (in the Creative Suite era, before Creative Cloud), Adobe made a concerted effort to give us tools for making accessible PDFs and EPUBs. That effort has produced a set of powerful features you’ll use any time your goal is accessibility.
Tags
Essential elements of an accessible PDF file, tags define the hierarchy of headings and other elements in a document. These definitions enable assistive technologies to communicate the content to the reader more accurately and in context.
When it comes to working with tags, InDesign pretty much gives you everything you need. Using paragraph styles, you can control which standard tags will be associated with the styled content when the PDF file is exported (Figure 1).
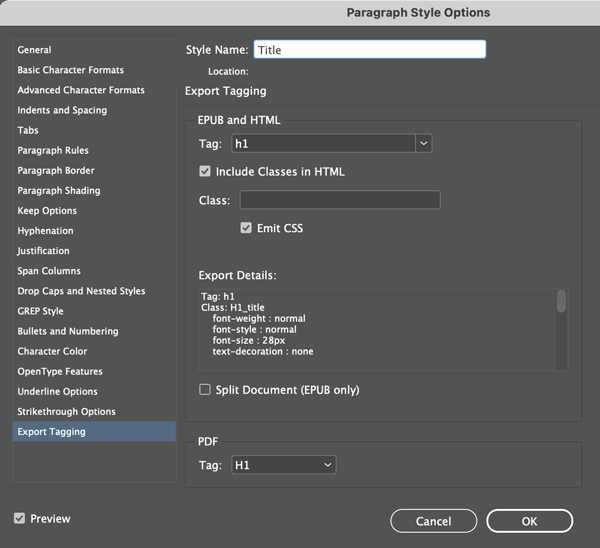
Figure 1. Use Export Tagging when defining a paragraph style to select an associated tag to apply in the PDF to text using that style.
Most of the additional tagging you’ll need occurs in InDesign automatically. For example, any image placed into an InDesign document will be tagged using the <Figure> tag in the exported PDF file. Similarly, endnotes, footnotes, lists, and tables are automatically tagged in the exported PDF without any intervention on your part.
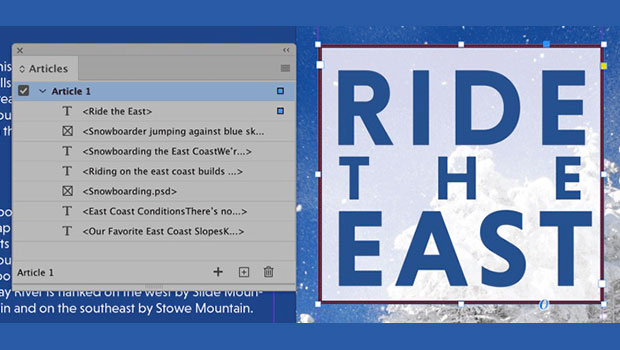
In addition to the tags themselves, the order of those tags is paramount for ensuring a consistent and logical experience for anyone reading your PDF files with assistive technology. InDesign provides the ability to control the tag order perfectly with the Articles panel. You can add content from the layout by dragging it into the Articles panel or by using a custom keyboard shortcut.
Once your content is listed in the Articles panel, you can rearrange their order.
Warning: You must choose Use for Tagging Order in Tagged PDF from the Articles panel menu (Figure 2). If you forget to do so, the Articles panel is completely ignored.
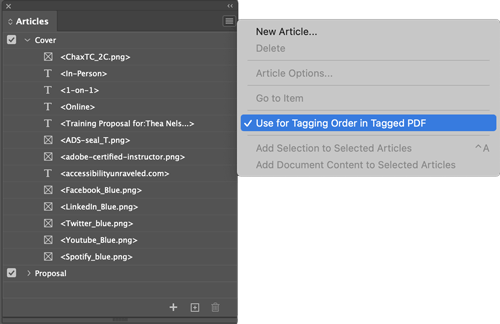
Figure 2. When using the Articles panel, you must enable the Use for Tagging Order in Tagged PDF option.
Reading order
One large point of confusion for many just getting started in the world of PDF accessibility is the fact that there are two ways to define content order in a PDF: reading order and tag order.
As previously mentioned, the tag order in a PDF document is key because the most popular assistive technologies use it. But other assistive technology applications use the reading order. Because WCAG states that a PDF must be able to be read by all technologies to be considered accessible, it is important to set both.
You can view the reading order of your PDF in Acrobat by choosing the Reading Order tool or by making the Order panel active. Doing so will display a number next to each object in a document to indicate its position in the reading order.
The InDesign Layers panel enables you to control the reading order of content in an exported PDF file, but you need to understand one twist: The Layers panel reflects visual order of InDesign objects in a document from top to bottom, but the reading order in your exported PDF file goes from bottom to top.
That’s right—the bottom-most item in the Layers panel will appear first in the Reading Order panel of the exported PDF. At first glance it might seem backwards, but logically, it does make sense. When you add objects to the page, they are stacked with the first object being at the bottom and the last being at the top. So, the Reading Order panel assumes the bottom-most object was the first one, and so on. That means to achieve proper reading order before you export a PDF from InDesign, you need to organize content in the Layers panel from bottom to top (Figure 3).
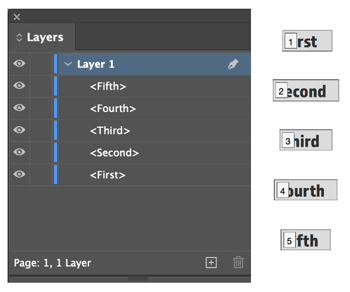
Figure 3. Organizing content in the Layers panel from bottom to top equates to reading order in the PDF from beginning to end.
Metadata
One of the requirements of an accessible PDF file is that when you open it, you can see a descriptive title assigned to the file instead of the filename. I’m sure you’re as guilty as I am for giving your files convoluted names that really make sense to only you and your team (e.g., myfile_final_final_finalforrealthistime.pdf). Needless to say, it is not helpful for a reader opening the file to hear this sort of filename read aloud.
InDesign lets you add this descriptive title to a file, and display it in an exported PDF file. Choose File > File Info to display the File Information dialog box, which lets you enter or edit the Document Title field and other metadata (Figure 4).
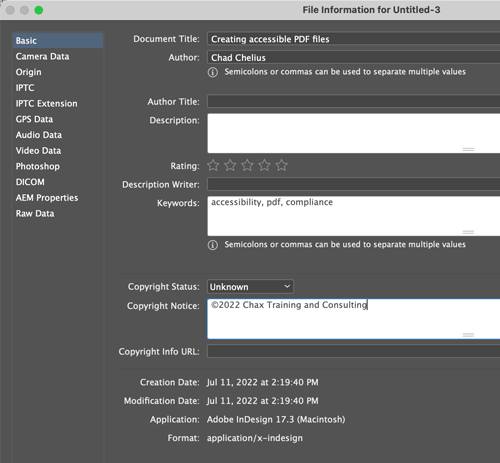
Figure 4. Add your title and other metadata in the File Info dialog box.
Document Title is the only field you need to fill in for an accessible PDF file, but don’t forget that search engines index the metadata of a PDF file. So, adding metadata can help people find your files, because it enhances search engine optimization.
You can then set that title to be displayed when the PDF file is opened by choosing Document Title in the Advanced Category of the PDF Export dialog box (Figure 5).

Figure 5. When you export your PDF, you must select the option to display the document title when the exported PDF file is opened.
Figures
In an accessible PDF file, images, photographs, graphics, charts, and graphs are tagged using a <Figure> tag. If you use File > Place to incorporate any external file into your document, InDesign tags it as a figure in an exported PDF file. The logic is that if you’re placing an external graphic into your layout, you probably were unable to create it directly within InDesign and, therefore, it’s probably a figure.
But what if you have a shape that you created directly in InDesign (maybe an icon or other design element) and you want to output it to the PDF tagged as a figure? InDesign will do so if you add alternate text or actual text to that object.
A requirement for accessible PDFs is that any figure must contain these attributes to describe it in its context. You need alternate text (sometimes referred to also as alt text) because from the viewpoint of assistive technology, a graphic, by itself, has no value or context. The only thing assistive software knows about that figure is that it’s a graphic—that’s it! You’d simply hear “graphic” whenever the device encountered a graphic element, and any visual context would be out of reach for you.
Warning: You might think that the caption for a figure could automatically be used for the alternate text, but that rarely works. A caption usually describes what’s happening in the image, whereas alternate text should always describe the image itself.
A caption might read “students from the local school playing soccer,” while the alternate text might read “elementary-aged children wearing soccer uniforms, running down the soccer field chasing the soccer ball.” For everything you need to know about alternate text, check out Dax Castro’s article in this issue.
Actual text is often employed when you are using an image of text in a document. Because it’s literally just showing text, the image has no value beyond the words it depicts but adding actual text will cause assistive technology to read those words aloud and will not voice the image as a figure.
To add alternate text to a figure in InDesign, simply select the frame of the figure and choose Object > Object Export Options (Figure 6). If you click on the Alt Text tab at the top of the dialog box, you can change the Alt Text Source to Custom and then enter your alternate text.
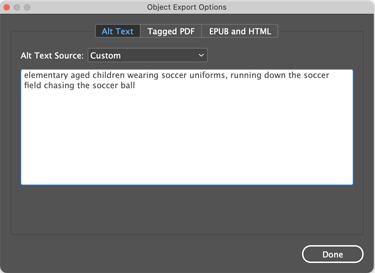
Figure 6. To add alternate text to a placed graphic, use the Object Export Options dialog box.
You can add actual text from the same dialog box. Click on the Tagged PDF tab at the top of the dialog box and change the Actual Text Source to Custom and then enter your actual text.
Tables
Tables give readers the ability to process a lot of data in a very limited amount of space. They provide the ability to compare, contrast, and categorize information appropriately. There’s a lot going on inside of a table! It’s very important that you build and structure tables appropriately so that the visual information translates meaningfully to audio.
InDesign is probably the best source application that I’ve used for structuring tables appropriately. Most other source applications get confused when they encounter merged cells in a table—but not InDesign! It knows how these table elements need to be structured and will apply the appropriate <ColSpan> or <RowSpan> attribute to the exported PDF file to make those merged table cells accessible.
Every table needs a header row to define the data that falls beneath it. InDesign allows you to define a header row by selecting a row of cells in the table and choosing Table > Convert Rows > To Header. In the exported PDF file, these cells, properly defined as a header, will be tagged with a <TH> tag as opposed to <TD> tags for the table data (Figure 7).

Figure 7. Convert Rows in the Table menu will let you redefine a table row as a header row.
Artifacting elements
Designers will often drop an interesting image into a layout simply to add visual interest to the page. Beyond the visual appeal, such images add nothing relevant to the context of the project. So, it’s important that you artifact these images—that is, tell assistive technology not to read the item.
Artifacting can be done to an image or a text frame, and InDesign makes this task an easy one.
Select the object, then choose Object > Object Export Options. In the Object Export Options dialog box, click the Tagged PDF button and choose Artifact from the Apply Tag menu (Figure 8).

Figure 8. To artifact an element, use the Object Export Options dialog box.
Anchored objects
When flowing content through multiple frames, one accessibility challenge arises with regard to the sequence of content. It’s easy enough to set a figure or object to be read before the first frame of the thread or after the last frame. But, what if you want a figure or object to appear at a specific location within that flowed text?
You can use InDesign to anchor an object to a specific location in the text, the object will appear at that location in the tag structure of the exported PDF file. To anchor a frame to a location in text, click the square on the upper-right side of the text frame and drag that square to a location into the body of the text, inserting it where you would like the frame to be anchored (Figure 9). The item will end up in the exported PDF nested in the tag structure at that point.

Figure 9. Anchoring a graphic to a specific location in text
Hyperlinks
This one sounds like a simple one, perhaps because Acrobat lulls us into a false sense of security by automatically detecting probable hyperlinks in a PDF file: If you have say, https://www.creativepro.com somewhere in the text of your PDF, Acrobat or Adobe Reader will automatically make it clickable. The problem is that although it’s clickable, it’s not accessible because there’s no <Link> tag in the document structure of the PDF.
Rather than letting Acrobat do only part of the job, InDesign has a great feature in the form of the Hyperlinks panel (Window > Interactive > Hyperlinks). Select text that you want to become a hyperlink, then click the + button at the bottom of the panel to create a link that will be accessible in the exported PDF file (Figure 10).
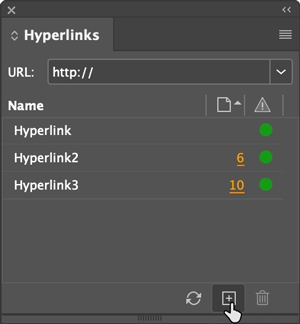
Figure 10. To create a new hyperlink, click the + button at the bottom of the Hyperlinks panel.
You can also make a figure a hyperlink by simply selecting its frame, then adding a hyperlink. This is particularly useful for making QR codes accessible using assistive technology.
InDesign doesn’t stop there, though. An additional accessibility requirement of the PDF/UA standard is that each hyperlink must contain alternate text to describe where the link is taking the reader. To add this information when creating or editing a hyperlink, select the Accessibility tab at the bottom of the dialog box, then add your alternate text into the Alt Text field (Figure 11).

Figure 11. Add alternative text to a hyperlink in Adobe InDesign in the Alt Text field when defining your hyperlink.
InDesign also very usefully goes out to the internet and verifies that each hyperlink can access the URL. If it is successful, a green dot will appear to the right of the URL in the Hyperlinks panel. If not, you’ll see a red dot (Figure 12). Though not directly an accessibility feature, this feature can save a lot of time.
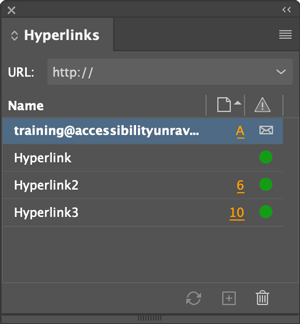
Figure 12. A green or red dot appears in the Hyperlinks panel, indicating whether a URL is valid.
Forms
I know of only one source application capable of adding page elements that will become fillable form fields when exported to a PDF, and that is InDesign.
InDesign provides you with an efficient and accurate way of creating fillable PDF forms with the Buttons and Forms panel (Window > Interactive > Buttons and Forms). You can select a frame and choose what type of form field you want that frame to become by selecting an option from the Type menu (Figure 13). When exported to the Adobe PDF (Interactive) format, that frame will become a fillable form field in the PDF file.
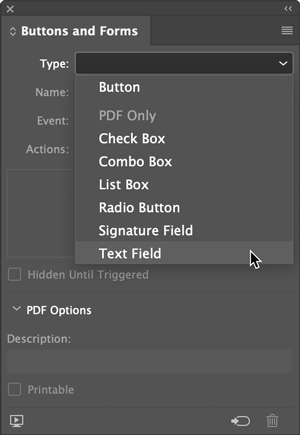
Figure 13. Use the Buttons and Forms panel to define a frame as a fillable form field.
In InDesign, you can anchor a form field to an area of text, which when exported to PDF will position the field precisely in the tag structure.
PDF export settings
In Export dialog box (File > Export), you’ll find two PDF options in the Format menu: Adobe PDF (Print) and Adobe PDF (Interactive) (Figure 14).
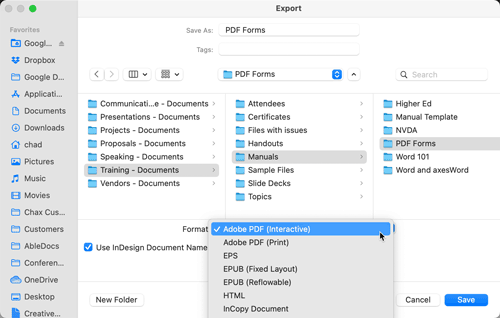
Figure 14. You can select either the Adobe PDF (Print) or Adobe PDF (Interactive) format to output an accessible (tagged) PDF file.
Both formats provide you with the options to output a tagged PDF, and both include an Advanced option to display the document title in the exported PDF file, among other settings.
Both formats create an equally accessible PDF file, with the Print format offering more control of image resolution than the Interactive version. Note that you must export to interactive PDF to preserve live form elements.
Accessibility Features that InDesign Doesn’t Do Very Well
As much as I love the power, design capabilities, and accessibility features that InDesign offers, I still find areas where it falls short.
In a typical InDesign accessibility workflow, I work under what I call the 80/20 rule: I can do 80% of the essential accessibility work directly within InDesign, but I have to do the remaining 20% in the exported PDF file to make it fully compliant with accessibility standards.
This may not sound too bad at first, but should your client need to change the document, you will need to re-export the PDF file and perform that 20% cleanup all over again.
This is when those shortcomings of InDesign become quite obvious. Let’s take a look.
TIP: MadeToTag is an InDesign plug-in made by Axaio. MadeToTag has one purpose and one purpose only, and that is to overcome 95% of InDesign’s accessibility shortcomings. For information, check out my review of MadeToTag in this issue.
Tags
Of the 37 tag options that can be applied to an object, InDesign offers only a short list of eight tags that you can apply to an exported PDF file using the Export Tagging section of the Paragraph Style Options dialog box. To be fair, you probably don’t need every single tag to be available in that list because some of them are applied automatically by InDesign for specific reasons.
For other tags, however, the inability to leverage InDesign to apply them is disappointing. Some commonly used tags that are definitely missing from Export Tagging include <Annotation>, <Bibliograph Entry>, <Block Quote>, <Caption>, <Code>, <Formula>, and <Quote>.
Currently, you can apply tags only by using paragraph styles. One of my long-standing InDesign wishlist items is the ability to apply a tag using a character style. If that were possible, you could apply tags such as <Code>, <Formula>, <Span>, and <Artifact>.
Providing this capability would increase your ability to control content in InDesign by, for example, applying the <Artifact> tag to dot leaders in a table of contents. Or you could apply the <Formula> or <Code> tag to specific content via a GREP style. The possibilities would be endless!
Figures
For the most part, the process of making figures accessible in a PDF is pretty straightforward in InDesign. But the program fails when you anchor a figure to a text area so that its tags will appear at a specific location within flowing text.
Fundamentally, InDesign does what you ask it to. When the PDF is exported, the <Figure> tag appears within the paragraph tag (or heading tag) where you anchored the figure. The problem is that in the tag structure of the PDF, this placement often doesn’t make sense and will generate an error when you validate the PDF using automated checkers.
A <Figure> tag is a block-level element, which means that in the tag structure it belongs at the root level of the tag structure. The problem is easily fixed in Acrobat by just dragging the <Figure> tag out of the containing paragraph to the root level of the tag structure. But again, this is a manual adjustment, and you’ll need to repeat the step if you ever re-export the PDF file. Not a big deal for one or two figures, but you’re not going to be happy when you have 50 of them to do.
I wish InDesign could be a bit smarter and give us the ability to control the positioning of the <Figure> tag in the tag structure of the exported PDF file.
TIP: You can define both alt text and actual text in the metadata of a placed image. This can be a significant time saver!
Tables
I feel bad complaining at all about tables in InDesign because for the most part it does a really good job. But one of my biggest complaints is that the program has no concept of a table row header. You can define a row as a header, which essentially creates a column header, but if you have header cells in the first column of a table (the left edge of the table), there’s no way in InDesign to define them properly as row headers. So, you’ll need to do this in Acrobat.
To be fair, table styles do allow you to control the formatting for the left column of a table (essentially, the row header), but it doesn’t do anything to tag it uniquely in the exported PDF file.
Anchored objects
The shortcoming with anchored objects is similar to what I described for figures, except anchoring isn’t limited to figures or images. Often, objects like pull quotes or sidebars need to appear at a specific location within flowing text. Anchoring objects allows you to achieve this result.
But InDesign is a bit messy from an accessibility standpoint. When you anchor a text frame to an area of text in the tag structure of the exported PDF file, you end up with a <Sect> (Section) tag nested within the paragraph or heading—and as a block-level element, that’s invalid. So automated checkers will yield an Inappropriate Use of a Sect Structure Element error because a block level element shouldn’t appear within a <P> or heading tag. The ability to control the positioning of an anchored element would be a huge improvement in InDesign.
Hyperlinks
You typically won’t notice InDesign’s shortcoming with hyperlinks until you get to the very end of a project. If you take anything away from this article, I want it to be this: When creating a hyperlink in InDesign, the default behavior is to make every hyperlink a shared hyperlink destination.
Leaving this option enabled can have devastating consequences for your workflow. The idea with shared destinations is for when you are using the same hyperlink in multiple areas of a document. Saving as a shared destination allows you to pull from a list of saved hyperlinks instead of having to manually enter each one.
The problem is that there’s a bug where the destinations can start overwriting one another. In the exported PDF, when you highlight some of your hyperlinks in the tags tree, you’ll notice that other unrelated links in the document also get highlighted. From an accessibility standpoint, this creates a complete mess within the document. And in my experience, once this happens, there’s no quick and easy way to fix the issue. You will end up having to delete the existing hyperlinks and recreate them.
Keith Gilbert released a great script that automates the process of deleting shared destinations. I’ve found that sometimes this script resolves the issue but sometimes it seems that the damage is already done and the problem can still linger. So I recommend that you always turn off the Shared Hyperlink Destination checkbox when creating hyperlinks in InDesign. I wish I could make this choice a default, but unfortunately, it’s not an option.
Understand the Strengths and Weaknesses
When it comes to making accessible documents, I truly believe that the strengths of InDesign far outweigh its shortcomings. But I also feel that to work efficiently, you need to understand both to help you take those factors into account and minimize problems at the end of the PDF remediation process.
After all, the more you can address early on in the process, the better equipped you’ll be to avoid pitfalls along the way.
This article from CreativePro Magazine is for members only. To continue reading, please log in above, or sign up for a membership today! Thanks for supporting CreativePro!
Commenting is easier and faster when you're logged in!

Recommended for you

The CreativePro Accessibility SuperGuide
A compendium of essential knowledge, tools, and techniques for producing accessi...

InDesign Magazine Issue 62: A Fresh Start
We’re happy to announce that InDesign Magazine Issue 62 (June, 2014) is now avai...
10 Steps to Accessible PDF
Making sure that the PDF files you create are accessible to all users should be...