


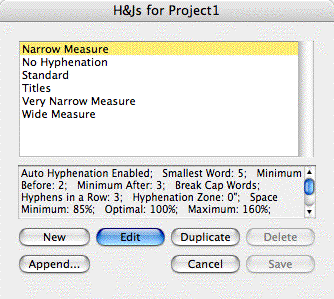
Many users moving to InDesign from QuarkXPress are surprised the program doesn’t offer an H&J Styles feature. Instead of being able to set up Hyphenation & Justification styles beforehand (as shown on the left — these are the default H&Js with version 7) and then choose the one they want from a dropdown list when they’re creating a Paragraph Style (as shown on the right) …

… InDesign requires users to spec these from scratch in two separate areas, Hyphenation Settings and Justification Settings, for every paragraph or style that should have different specs than the ones in the default [Basic Paragraph] style.
For most users, this is a minor bump in the road, and its significance pales in comparison to overwhelming number of other time-saving features in InDesign that other layout programs lack.
However, if for you the bump is more like a roadblock, you should know that you can get close to replicating H&J Styles functionality via InDesign’s Paragraph Styles panel. I’m not saying it’s the best way to go, but it is an option.
Create H&J Paragraph Styles
The basic strategy is to create one or more Paragraph Styles that carry the different H&J settings you want to use in the publication. Don’t bother changing anything about them other than their Hyphenation and Justification settings, you’re not really going to apply these to text. Then, after you create your “real” paragraph styles, base each one on the H&J paragraph style it should use.
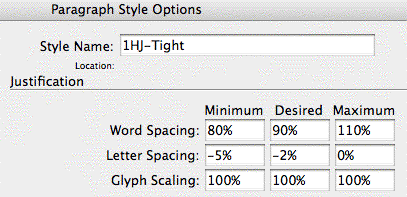
For example, I’ve duped the [Basic Paragraph] style (by dragging and dropping it onto the New Style icon at the bottom of the Paragraph Styles panel), renamed the dupe “1HJ-Tight” and edited its settings in both the Hyphenation and Justification panels to force type to take up less space. Here’s a close up of the Justification settings:
Then I duped it twice more, named them 1HJ-Standard and 1HJ-Loose (I’m adding the “1” to force the style names to be grouped together at the top, but that’s only required if you’re using CS2), and edited their H&J panels accordingly.
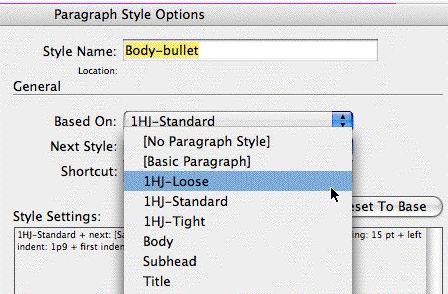
Now as I create my “real” styles (Body, Subhead, etc.), I can quickly populate their H&J panels by just choosing one of my H&J styles as the Based On paragraph style:
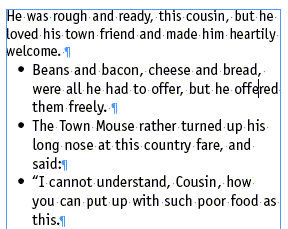
Here’s an example of how it works in practice. First, three paragraphs formatted with “Body-bullet” with 1HJ-Loose as the Based On style:
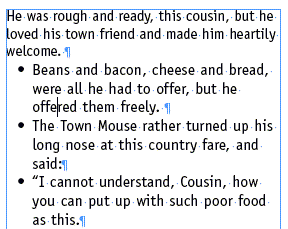
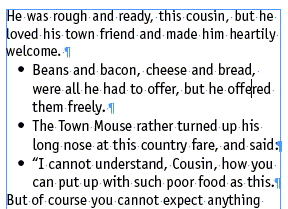
The same text, but this time Body-bullet is based on 1HJ-Standard:
And finally, Body-bullet based on 1HJ-Tight:
If you like, you can download the InDesign document I created with these styles. Click H&JStyle.inx to download a 140K .inx document you can open in CS2 or CS3.
Caveats
Subverting the Based On Style feature in this way means that you can’t used Based On as it’s normally used, so that changing, say, the typeface in the “parent” style ripples through all the other styles based on it so they change in unison.
Also, remember that as soon as you edit a style to change it from one based-on H&J to another, that new setting applies to all the text you formatted with the paragraph style throughout your document. So changing Body-bullet’s based-on style to 1HJ-Tight would tighten up all the bulleted text (text formatted with Body-bullet) throughout my document.
For more control, the best way to go is to create variations of the same style. Instead of just one Body-bullet style, create two: Body-bullet Tight, and Body-bullet Loose, for example. That way if I need to squeeze a few bulleted paragraphs in, I could just select the Tight variation for them, and no other bulleted text would be affected.
This article was last modified on December 18, 2021
This article was first published on December 11, 2007
Commenting is easier and faster when you're logged in!

Recommended for you

How to Use InDesign to Create Content for AEM Mobile
Even if you don't have access to Adobe Experience Manager, you can create conten...

A Script to Empty Selected Text Frames in InDesign
A simple fix for a missing feature in InDesign, with the help of AI

CreativePro Tip of the Week: Using the HUD (Heads-Up-Display) Color Picker in Photoshop
This CreativePro Tip of the Week on using the HUD (Heads Up Display) Color Picke...