
Better CSS Export for EPUB & HTML
Kevin Callahan takes a close look at how careful use of CSS classes can save you a lot of work with EPUB and HTML.

This article appears in Issue 110 of InDesign Magazine.
If you’ve been exporting EPUB or HTML files from InDesign, you may have run into some significant limitations (which may have caused you to bang your head repeatedly against the desk). The good news is that while it can still be difficult to get just the look your want for your EPUB, InDesign CC 2018 includes valuable improvements to its HTML and CSS export for EPUB—improvements that go a long way toward making your life easier. In this article, I’m going to explain those changes and how you can take advantage of them in your work.
I should note, however, that I’m assuming that you already know how to make EPUBs with InDesign, that you understand HTML and CSS reasonably well, and that you’re already somewhat experienced with the process of making and editing EPUB documents. If not, Anne-Marie Concepción’s course, Ebook Foundations at Lynda.com, is a wonderful place to get started.
Also, this article won’t address design or styling. It’s true that CSS is where we define those things, but we’re going to address only the CSS structure in this discussion, not what you can do with it.
Until now, InDesign has offered some limited control over mapping InDesign styles to CSS classes. You could substitute semantic tags for the defaults (<figure> instead of <div> for an image, for example); add multiple classes to a single tag; and “emit” (export) paragraph and character style definitions.
Now you can go further by telling the program which CSS classes to export and which not to. This lets you target InDesign’s paragraph, character, and object styles to a CSS class that best carries your intention to the EPUB. And you don’t need to export a class for a plain-vanilla style,
one without any modifications (such as flush left or space above).
This makes for a cleaner set of HTML files and a CSS that’s easier to work in. And you’ll have much greater control in InDesign in manipulating your export to achieve the results you need.
Why Is this a Breakthrough?
This seemingly small change is important because it lets you trim down the markup in your HTML in good ways. Until now, if you let InDesign do all the work when you export an EPUB3 file, you’d get way too much markup in your HTML.
Think about your InDesign document. While you’re working, you put all kinds of stuff on the pasteboards: unused images, text snippets, notes to collaborators. But when the job is done and you package up the file, I’ll bet you trash all that unused material so the document doesn’t carry missing links or extra copy that will confuse anyone (yourself included) later on.
Exported HTML and CSS are the same. InDesign assigns lots of extraneous information, such as unnecessary <id> tags along with override classes. Some might be interesting, informative, or perform real duties, but most don’t need to be there in the way InDesign includes them.
Well-made EPUBs from InDesign require two things: a good, clean InDesign file and good, clean HTML/CSS export. Build a solid InDesign file, and you’ll see that you’ve accomplished much of the work, which means you’ll spend less time noodling in the HTML and CSS.
Start with InDesign
Achieving clean CSS and HTML export doesn’t require much extra post-export work if you’re using InDesign’s features thoroughly. Basically, that means a somewhat obsessive use of style sheets: paragraph, character, and object styles, and avoiding manual formatting whenever possible.
Control Overrides
Most InDesign users occasionally apply manual formatting, over and above the styles they’ve applied—that is, they make style overrides. One of the most important tasks in readying your document for export is converting overrides to paragraph or character styles. If you don’t, you risk losing formatting on export. Or, if you don’t lose the formatting, you’ll get CSS and HTML documents that are complicated and hard to work with (Figure 1).
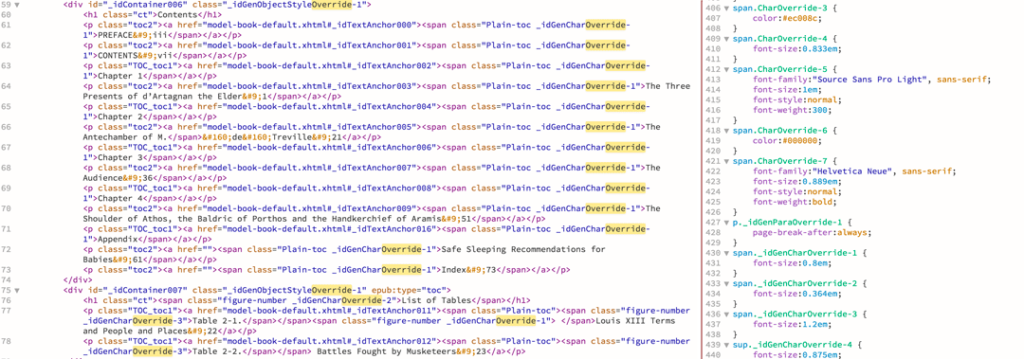
Figure 1. Left: Multiple overrides highlighted in an HTML file. Right: A CSS document with overrides defined. The HTML markup is nearly impossible to understand. You’ll need to go to the CSS and root around the many overrides classes for each definition.
There are some overrides you don’t need to address. For example, if you have manually applied tracking to text, you can leave it alone. It won’t export to EPUB with an override class assigned. But you do need to make sure that you convert the following to character styles:
- Italic and bold (and words that are both italic and bold)
- Super- and subscripts
- Small caps and all caps
- Underlined words and letters
- Text color
- Text that needs any kind of special treatment
- Languages other than the main language set for the document
- Math and scientific terms and equations
Be sure to convert them all to styles and map them. Figure 2 shows how to easily identify style overrides throughout your document.

Figure 2. You can see overrides at a glance from the Paragraph and Character Styles panels. Click the little plus sign, and text without a style sheet assigned is highlighted. In this case, the italics, super-tight tracking, and the magenta color are all overrides.
If You Do Export Overrides
If you don’t convert overrides to styles, you can retain formatting by exporting an EPUB, letting InDesign write the CSS, and then choosing Preserve Local Overrides in the EPUB export dialog box (Figure 3). But unless you do careful style mapping (which I’ll discuss in the next section), you’ll end up in the override swamp I described.
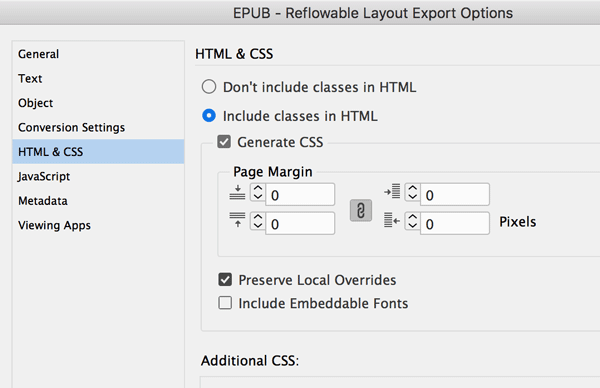
Figure 3. Settings for generating CSS and preserving overrides in the EPUB Export Options dialog box.
InDesign creates a single override class for identical overrides—for example, you may see something like <span class="CharOverride-3"> for all text manually made red. If you export and find overrides like this, you can do a Find/Change in the HTML to turn that meaningless name into something you can read and understand at a glance.
Find: <span class="CharOverride-3">
Change to: <span class="red">
Of course, you would also need to change the name of the class in the exported CSS file.
However, it would be far better to fix the source of the problem by using InDesign’s Find/Change feature to search for all the manually formatted text and to apply actual character styles.
Map Styles
Once you’ve converted local formatting to styles, you can assign your InDesign styles to their corresponding CSS tags and classes with InDesign’s style mapping features to sweep away a lot of the extraneous markup.
You can map styles either in the definition of each paragraph and character style, one at a time, or all at once in the Edit All Export Tags panel (Figure 4). See my article on Accessible EPUBs in Issue #104 for a thorough explanation of mapping.
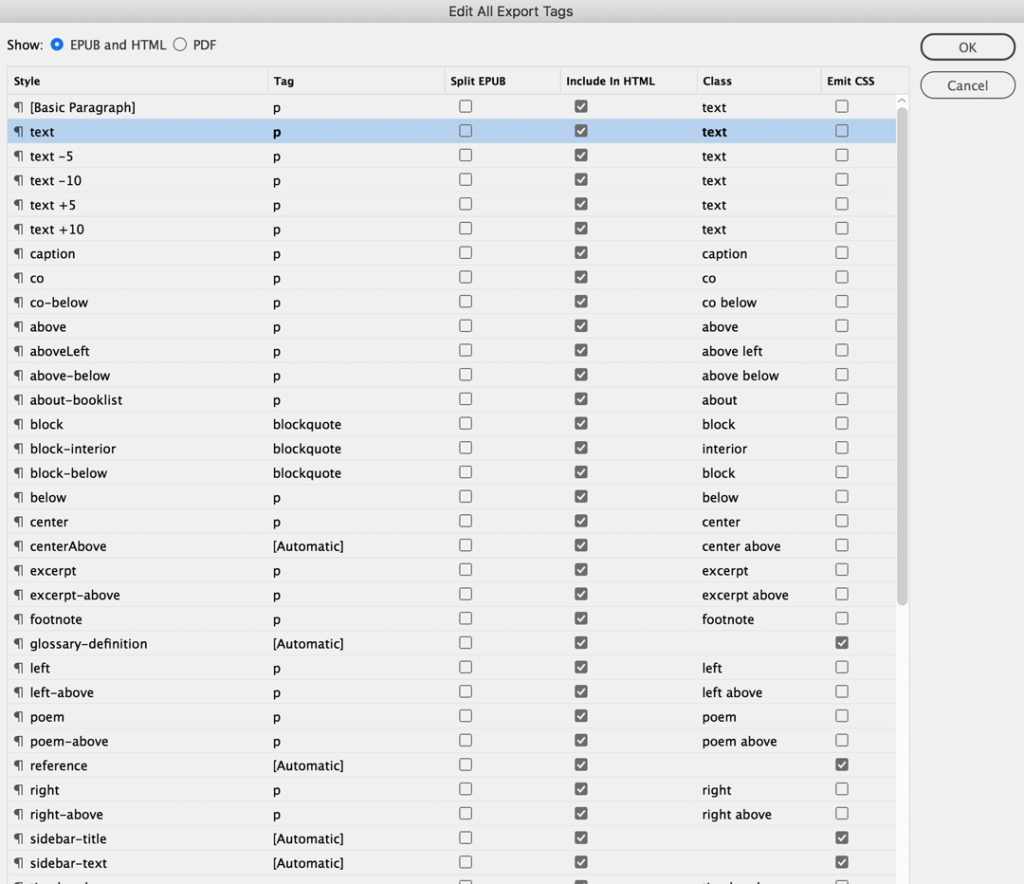
Figure 4. Accessible via the Paragraph Styles panel menu, the Edit All Export Tags dialog box is the best place to do exactly that. Paragraph, character, and object styles are all listed. Here, I’ve assigned the <p> tag to most paragraphs.
It might seem daunting to enter mapping information for a complex InDesign file with many styles. But remember, you probably don’t need to do it for every style. To make it simpler, first delete unused styles from the Paragraph and Character Styles panels. I recommend you do this just before you export to EPUB, when you’ve finished applying styles (Figure 5).
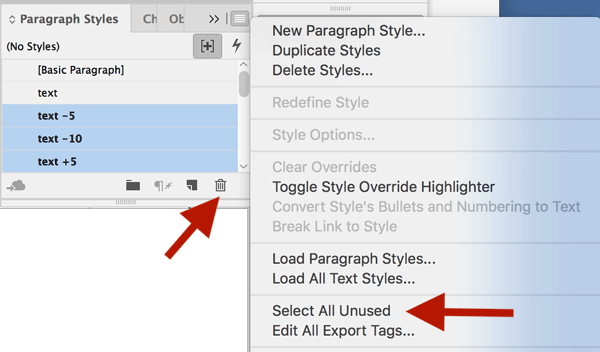
Figure 5. Choose Select All Unused from the panel menu, and then click the trash icon at the bottom of the panel.
Then, you can leave a lot of the mapping to InDesign. The program automatically assigns the paragraph tag <p> to every paragraph, wraps a <span> around every character style, and assigns <div> to items defined with an object style. It then automatically creates a class name that matches your style name. So if you have a paragraph style called text, InDesign will export <p class=”text”>.
That’s a nice, simple name. But I’ve seen many InDesign files that employ complicated style names, like heading1- ch3-left-nospacebelow.
If you export without mapping, you’ll get this: <h1 class="heading1- ch3-left-nospacebelow">
which is almost as hard to work with as nonsense like class="paragraph- style-override-84" as far as I’m concerned.
In these cases, I use style mapping to simplify my exported CSS classes, so that crazy paragraph style name ends up as something simple, like <p class="text">.
Reuse CSS Classes
Not every paragraph style needs a unique CSS class. Say you apply a paragraph style called attribution to a person’s name after a quotation, and it’s formatted like regular body text, except that it’s set flush right with a line space above.
You won’t necessarily need an attribution class in the CSS. Instead, you can use classes that you’ve already defined for other purposes, such as right and above. Doing this helps keep your CSS trim and easier to navigate.
You can consolidate similar styles, too. So if you have these paragraph styles:
heading1-ch3-left
heading1-ch4-right
heading1-ch5-left
where the only difference is that for print, some headers align left and others align right, depending on pagination. Left and right pages don’t matter in reflowable ebooks, so you can keep all heads aligned left. You won’t need three different heads—just map them all to <h1>.
To Emit or Not?
When you turn on the Emit CSS checkbox (while defining your style mapping), you’re telling InDesign to export the attributes you’ve assigned via paragraph, character, and object styles and translate them into CSS terms. Figure 6 shows the two side by side.

Figure 6. Under Export Details, note the Tag, Class, and attributes that InDesign will translate into CSS. The inset shows the exported CSS, which lists those styles—among many others—in CSS terms. Font-family is replicated; font-size is translated from pixels to ems (em is the preferred unit of measurement in ebooks for font-size); and the two attributes that take ‘normal’ all transfer to CSS.
Exclude Class Names
You want to assign a class in your export when you need a style that differs from the usual display (centered instead of justified text, for example). But you don’t need a class for every style. InDesign CC 2018 lets you not include classes in your export. Classes that are not defined in the CSS are useless; they just take up space in the HTML. So be sure to deselect Include In HTML in the relevant line in the Edit All Export Tags dialog box (which is selected by default; Figure 7).
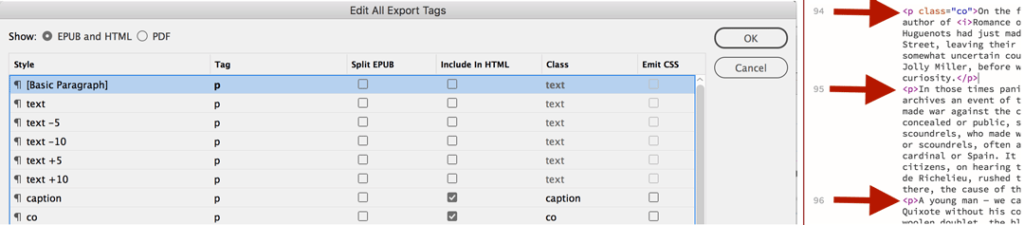
Figure 7. You can choose to not include a CSS class in the exported HTML. Left: The paragraph style text will export without any class, as will text-5, etc. Right: The HTML markup with plain <p> tags on lines 95 and 96. Note that the style co is set to Include In HTML as Class co, and that becomes <p class="co"> on line 94 of the exported HTML.
At this point, a word of caution is in order. You need to pay close attention when excluding class names; otherwise you could lose formatting, even if that formatting was applied using styles.
For example, if you open the Paragraph Style Options dialog box and type in some tags (like <i> or <b>) and turn off the Include Classes in HTML checkbox, that entire tag is dropped from the HTML export. So words that are italic or bold in InDesign would be plain roman in the ebook!
When you do select Include Classes in HTML, your class is attached to the tag (Figure 8).

Figure 8. InDesign adds <i class="italic"> only when you select Include In HTML in the Edit All Export Tags dialog box. If you deselect that box, InDesign ignores your italic style altogether and the text will not be italicized in the EPUB.
However, this is not true for all manually entered tags, like <section> and <figure>. If you assign <figure> to an image’s object style, and export without assigning a class, the image will be wrapped in a <figure> tag with no class.
This seems to be a bug in this new style-mapping function.
So your best option is to select Include Classes in HTML for all manually changed tags, and then do some Find/Change operations in the HTML to clean up unneeded markup.
For example, to preserve italic text, you can search for <i class= "italic"> and change to <i>.
Your markup will be much cleaner and easier to work with when you edit text or do other work.
Post-export Work Is Always Going to Be Part of the Process
Of course it would be grand if every EPUB export were perfect and ready to ship to bookstores. Sadly, this isn’t the case. I think of exporting an EPUB as just one step in the book-making process, where changes and adjustments are inevitable, expected, and welcome.
In almost every ebook I’ve made, editors and authors have found text they want to change or design features they want to adjust once they’ve reviewed the EPUB. Just like going from manuscript to page layouts reveals needed text changes, so can seeing material as an ebook.
Because I know I’ll want to work in my ebook post-export, I’ll do anything I can to make that easier… like create a cleaner export.
InDesign CSS vs. Custom CSS
It’s important to remember than when you export an EPUB (or HTML) you can choose for InDesign to create a CSS file for you, or have it include your own CSS file from disk. I almost always use my own custom CSS, which I’ve built over time and adapt for each project. That way, I can apply styles to elements on the fly in InDesign, knowing that, for example, because my CSS already has a class called no-indent, I need only apply the “no-indent” style to create a flush-left paragraph.
But lots of folks let InDesign generate the CSS. Here’s a rundown of the differences between the two approaches.
InDesign-generated CSS
If you let InDesign write the CSS, make sure your mapped names are clear and easy to read and that you’ve cleared all overrides. As I’ve discussed already, InDesign will define seemingly every attribute possible in the CSS (see Figure 9 for an example). Notice how many lines it takes to define a single class. There are 19 attributes listed! How many are needed and how many are fluff?

Figure 9. Attributes that InDesign defines: you can’t get much more granular than this.
First let’s deal with the fluff: You can delete anything defined as normal. Saying something is “normal” is like assigning a character style with no definition. Normal means “don’t do anything here.”
Similarly, the lines with none can go away. If there is no text decoration (like an underline), there’s no reason to say that. You need to specify only if you do want an underline.
Color defined as #000000 is just black, the default. Best practice in ebook-making is to not define a color as black, particularly for the main text. This can mess up night-view reading on devices and apps.
Look at the margin attributes: they’re all set to 0, and each one is listed separately. You need to mention margins only if you’re making a block of text different from other blocks. And in any case, there’s a better way to write this:
margin: 0 0 0 0;
This sets (in order) the top, right, bottom, and left margins all to 0.
So the bottom line is: if you let InDesign export your CSS, you should expect to do a load of clean-up work.
Using a Custom CSS
Since I create ebooks from print-focused documents made by many different designers using a seemingly infinite variety of style names, it’s easier to have a single CSS with consistent tags and class names that I can map to InDesign styles. So I know to map all chapter titles to h1; paragraphs with no indent to no-indent, and so on.
If I need to capture attributes from an InDesign document, I’ll export and let InDesign write the CSS, and then transfer what I need to my custom document. For example, InDesign includes color specs in its own CSS, which I which I can then selectively copy and paste into my own CSS file.
A Tale of Two Exports
In Figure 10 you can compare two very different EPUB exports, neither of which is ideal. The sample on the left has too many unneeded classes; on the right, too few.

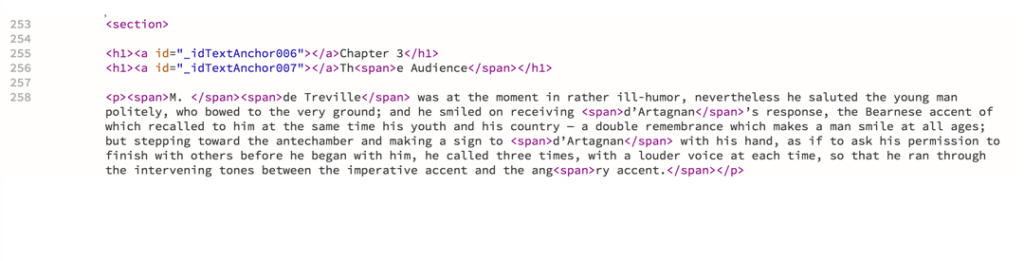
Figure 10. Two exports of the same content, with quite different results
In line 274 (on the left), we have a section element with id="_idContainer0123" In this case, the id is useless. Perhaps you’d need it if you’re going to link from elsewhere in the book to this spot, but in this case InDesign isn’t providing any kind of navigation, so it’s just redundant. And as for the class name: "_idGenObjectStyleOverride-1"/>
obviously, my document had an override on a style (in this case, an object style) and InDesign wrote some CSS to account for it. But what exactly are the style definitions? You’ll have to scroll through the CSS file itself to find out. All the class tells you is that this is an object style override; it gives you no clue about what the unique attributes are.
In line 276, you’ll see <h1 class="cn">. This is fine if you’re going to define a class of cn with attributes that vary from the standard <h1> style. Think of classes here as character styles: they indicate an exception to the rule.
Also of note is the <a id…> tag. This is the actual navigation link created by InDesign’s Table of Contents generator. It belongs there.
On line 277, the <span> is another character style–like exception to <h1>. In this case, it’s giving the chapter title a style defined in the CSS class chtitle.
On line 279, notice <p class="co">. This is paragraph style <p> mapped to the CSS class co (that’s what I name my chapter openers). This defines the appearance and position of the first paragraph in the chapter.
Then, on line 281, consider <p class="text">. This is another case of unneeded markup. The <p> is sufficient here; there is no CSS definition for text; it’s just material that is styled by the <p> definition in the CSS.
Then there’s <i class="italic">. Another redundancy! Simply having the <i> is sufficient. There is no definition in the CSS for class “italic.”
On the right side of Figure 10 is part of the same selection exported with Don’t Include Classes in HTML selected. Here you see no classes at all. So that means the first paragraph won’t have the needed class="co" and the chapter title doesn’t have its necessary <span class="chtitle">.
Again, neither of these exports is what you should be aiming for, but they both illustrate the kinds of things that can trip you up when exporting HTML. Figure 11 shows the same content with the proper tags and classes applied. Note the use of role and epub:type in the section tag, as well as leadintext class in line 279, and the use of <em> tags in line 281.

Figure 11. The same content as Figure 10, now properly coded with tags and classes
A Better Class of Export
InDesign’s EPUB and HTML style mapping has allowed flexibility and a customized export for a while. But now that we can manipulate class exports—adding where needed, eliminating where redundant or meaningless—we’ll write HTML and CSS files that are cleaner and easier to work with.
Links and Resources
When creating EPUBs, it’s important to keep a number of resources at your fingertips. Here are a few you should consider checking out.
- My article from Issue#104: Building Accessible EPUBs with InDesign.
- W3Schools HTML5 Tutorial
- W3Schools CSS Tutorial
- Laura Brady’s post on InDesign CC2018 EPUB upgrades at EPUBSecrets
Commenting is easier and faster when you're logged in!

Recommended for you

This Week in InDesign Articles, Number 122
As you have likely heard, PePcon was amazing last week in Chicago. My head is sp...

HTML: The Secret Sauce for Layout, Animation, and Interactivity
As we publish more content across more screens and devices, HTML remains the mos...
Structure Pane versus Page Order for EPUB Export from InDesign
There are two ways to control the order of text and graphics in your EPUB export...