

3D printing is the technology of the year, but few people realise you can create printable objects directly inside Photoshop CS6. There’s no need for complex and arcane CAD programs, and you don’t have to master the intricacies of Nurbs and B-splines: Photoshop has a powerful tool set that’s easy to use and which generates solid, printable objects.
In this workthrough we’ll look at how to make a replacement pawn for a chess set. Not only will we model it directly in Photoshop, we’ll do so directly from a photograph of one of the original pawns.
Step 1: The initial photograph
Photograph your pawn against a plain background. Don’t position the camera too close, but rather keep it at some distance and use your zoom lens to bring the pawn closer, to minimise the perspective distortion.

Step 2: Tracing with the Pen tool
If you’re comfortable with the Pen tool, then use it to trace half the pawn on a new path, as seen here (if you find the Pen tool tricky, skip to step 8). Don’t follow the curve of the bottom of the pawn, but go straight across and join the top and bottom points with a single vertical line.
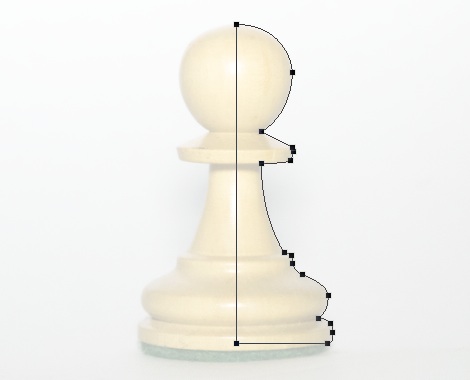
Step 3: Modify the outline
The original pawn isn’t quite printable as it stands: that overhang is just too strong. So instead, move the corner point down and make it into a smooth point, so the filament has something to print on as it creates each new layer.

Step 4: Create the object
Select the path and, from the 3D panel, choose Work Path as the Source, and 3D Extrusion as the method. Click the Create button, then skip to step 8.

Step 5: Select and Refine
Assuming you don’t like the Pen tool, select the area outside the pawn with the Magic Wand tool, then use Select > Inverse so just the pawn itself is selected. Choose Refine Edge from the Options bar, and increase the Smooth value to iron out any wrinkles. Hit Enter to turn it into a selection.

Step 6: Halve the selection
To make the revolved 3D object, we only need half the pawn. So switch to the Marquee tool, and hold the Alt and Shift keys (Windows) Option and Shift keys (Mac) as you drag the marquee over exactly half the pawn. When you release the keys, only the right half will be selected. Using QuickMask, paint in a little extra curve as described in step 3, then use Ctrl J (Windows) Command J (Mac) make a new layer from the selection.

Step 7: Create the object
From the 3D panel, choose Selected Layer as the Source, and then 3D Extrusion as the method. Click the Create button to make your 3D object.

Step 8: The third dimension
Initially, the 3D object will be created by simply extruding the pawn half, as seen here (if you’ve used the selection rather than the Pen method, you’ll see the pawn image on the face of the object). We now turn it into the right kind of object.

Step 9: Moving around
You can drag the workspace around using the Move tool, to view the pawn from any angle. But if you do so, make sure the pawn itself is not selected. It’s OK to move the viewing angle, but you won’t want to shift the object off its base. It should remain flat on that ground plane.

Step 10: Lose the extrusion
By default, the pawn will be extruded – but we don’t want that. In the Properties panel, either press the V key on your keyboard or select the second icon at the top to switch to the Deform settings. Here, select the Extrusion Depth field and set it to zero. The pawn will now lose all its depth.

Step 11: Add a revolve
Now to lathe that pawn. Towards the bottom of the Properties panel you’ll find the Bend and Shear controls. Make sure the Bend radio button is checked, and type in a value of 360° to make a full revolution.

Step 12: Set the axis
The object will, by default, revolve around its center, which is why all we got was a cylinder. At the top of the Properties panel you’ll see the Deformation Axis marker: click the center left marker to revolve it around the left edge. Suddenly, that outline will appear as a real pawn.

Step 13: Check the coordinates
Before outputting the object, it’s worth checking it’s sitting flat on the ground plane. Click on the final icon at the top of the Properties panel to switch to the Coordinates pane, and make sure the X, Y, and Z angles are all set to 0. If they aren’t, then change them to 0 now.

Step 14: Export the object
In the 3D panel, click on the pop-up menu in the top right corner, and choose Export 3D Layer. When the dialog appears, choose Wavefront OBJ as the file type, and click OK. You’ll be asked a question about textures, but it’s irrelevant as you won’t be using any.

Step 15: Get slicing
The next step is to turn the OBJ file into a format a 3D printer will understand. There are several programs that will do this; we’ll look at Cura, which is one of the most accessible. Import the object, and it will almost certainly be much too big. Photoshop doesn’t handle size units very well, but it doesn’t need to.

Step 16: Guess a size
I’ve guessed a fraction that’s 0.04 of the original size here, gauged visually so the pawn looks more or less right. After choosing the settings for a normal quality print, clicking Prepare Print begins the process.

Step 17: Check the size
A glance at the number field after the process has completed shows this pawn to have a depth and breadth of 42.8 mm, and a height of 70.8 mm. Measuring the original pawn shows its height to be 47.8 mm, so this is the figure we want to match.

Step 18: Adjust the scale
Typing in different scale values will instantly show the new projected height. In this case, a scale of 0.027 gives us the 47.8 height we want. Hitting Prepare Print now will “slice” the object, producing all the individual layers that will make up the final printable object.

Step 19: The slicing result
The bottom left corner shows the result of the slicing process. Our pawn will use 0.69 metres of filament, and will take 42 minutes to print at a cost of around 18 cents. Not a bad price!

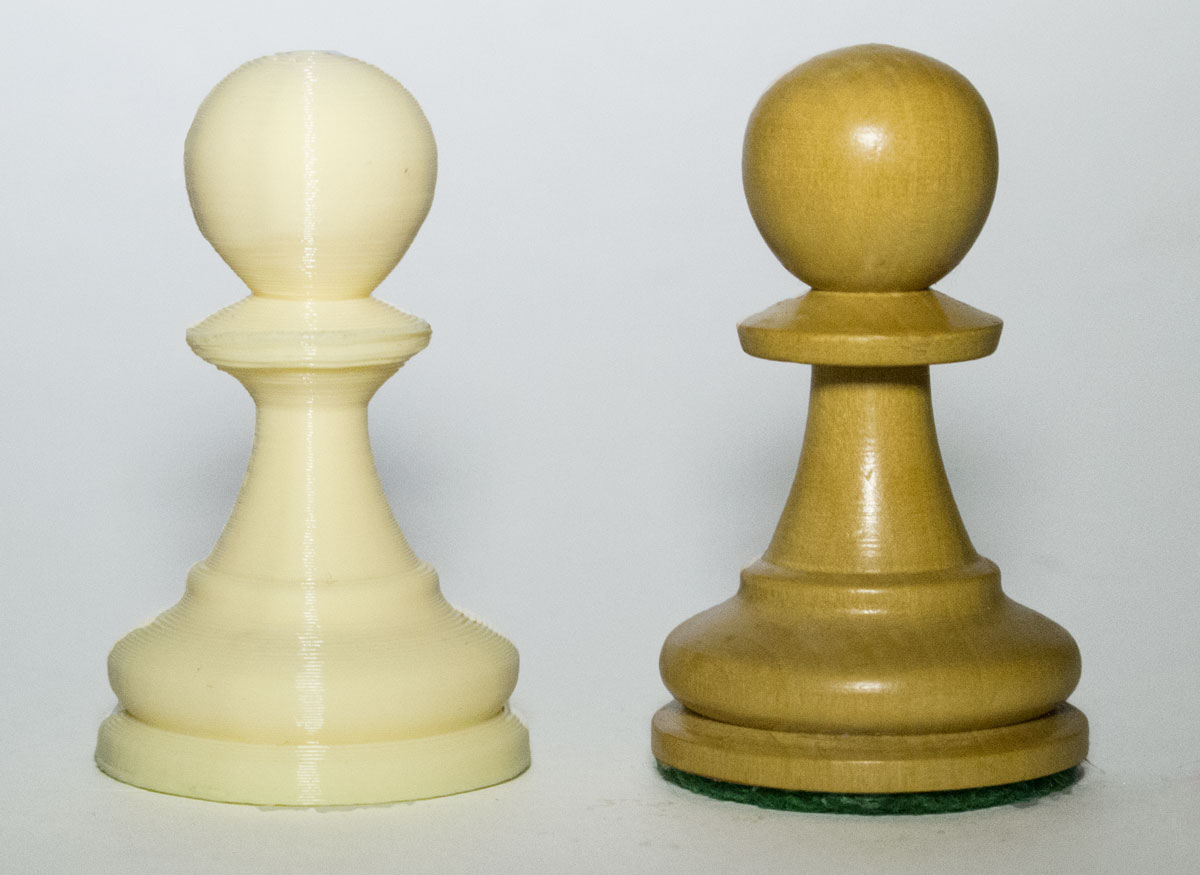
Step 20: Print the pawn
The result of the slicing operation will be a G-Code file, which describes the 3D object precisely for the printer. And here’s the result: a pawn that’s a good match for the original in height and size, produced from a simple photograph. All that’s needed is a little wood dye to make it look perfect.
As a bonus, here’s a link to download the pawn 3D object so you can view it in a program like Cura, and (if you have access to a 3D printer) print it yourself.
This article was last modified on January 18, 2023
This article was first published on March 28, 2013
Commenting is easier and faster when you're logged in!

Recommended for you

Out of Gamut: Why Do High-Bit Editing?
Almost everyone who has a scanner does some high-bit editing whether they know i...

Removing Hair in Photoshop
A few years ago I was asked by a British newspaper if I could take a dozen celeb...

Photoshop 10 Essential Tips: Working with Layers
Photoshop users have been enjoying the ability to shuffle around layers since ve...