


Using styles in InDesign is one of the best practices you can employ to ensure consistency within a single document and across multiple documents. In a Utopian world of perfect file layout, there would be a style for everything. Getting to Style Nirvana, however, involves discipline and forethought in wrangling those styles into submission. With a little organization in your styles panels, you’ll maintain an easy-to-use system and be able to find just the style you need quickly and with very little effort.
When you create a style—whether it’s a character, paragraph, object, cell, or table style—the names in the corresponding style panel automatically display in the order they are created. You can re-arrange that order in a couple of ways. The easiest is to drag them into a new order, but you can also display them alphabetically.
To re-order:
- Drag the name of the style in the panel up or down.
- A black line will indicate its new location.
- If the style is part of a style group (see style groups below), drag to the very top or bottom of the panel list to remove it from the group.
- To place the moved style into a style group, drag the style over that group’s name and release.
To order alphabetically:
- Choose Sort by Name from the style panel menu.
- Naming styles with a short prefix can further organize styles.
An example of organizing styles by purpose, or attributes.
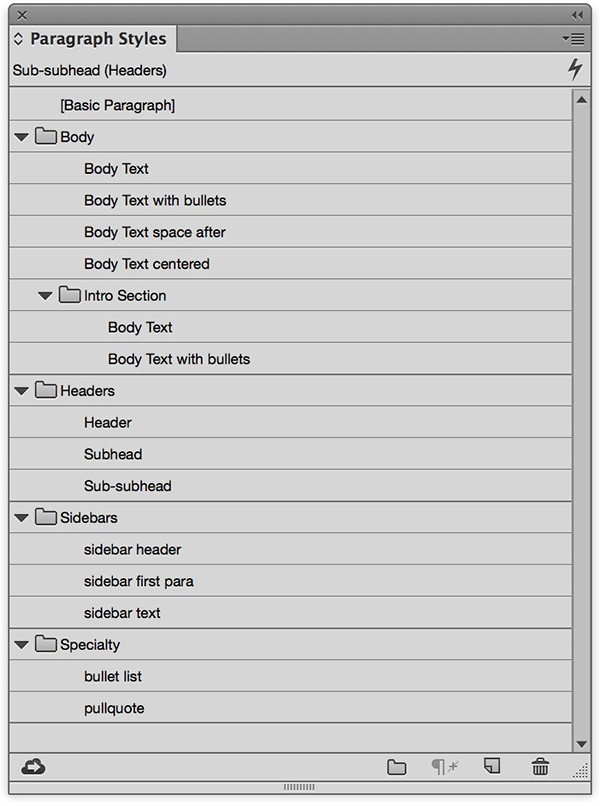
Style groups are the best way to organize a large number of styles for easy retrieval and location from the panel menu.
- Option/Alt-click the Create New Style Group icon from the bottom panel bar and name the group.
- If you have existing styles, you can drag them onto the folder to place those styles in that group.
- To create styles while adding them to a style group, select the style group folder, then click or Option/Alt-click the Create New Style icon.
- You can also select multiple styles, then choose New Group from Styles to create a new group and move those styles into that group.
- Copy styles from one group to another by Option/Alt-dragging or selecting multiple styles and choosing Copy to Group from the panel menu. Note that copying the style doesn’t link or base styles on one another.
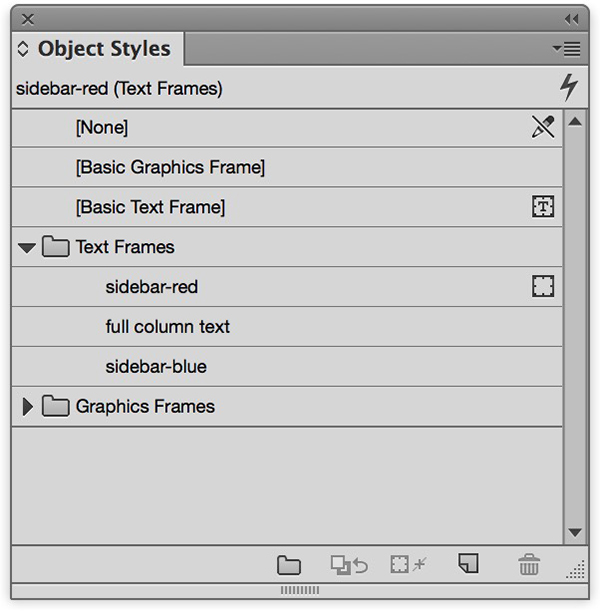
Separated text and graphics frames object styles.
You can further organize styles and style groups by nesting groups.
- Move an existing group into another group by dragging one group on top of another.
- Select an existing group then Option/Alt-click on New Style Group to create a sub group.
- Expand and collapse the groups and sub groups all at once by Command/Ctrl-clicking on one of the groups’ disclosure triangle.

Creating a new style group from the selected styles.

Copying the selected styles into another style group.
Keeping only the styles and groups you are using makes for neat and tidy style panels.
- Choose Select All Unused from the panel menu and click the trash icon to remove any unused styles.
- Delete style groups—and all their styles—you don’t want by selecting them then selecting the trash icon. If styles are in use, you will have to assign a new style to each. If you just want to delete the group (but not the styles), be sure to drag the styles out to the root level of the list before deleting the group.
This article was last modified on January 21, 2016
This article was first published on January 21, 2016
Commenting is easier and faster when you're logged in!

Recommended for you
Using Numbered Lists for Captions in InDesign
Bullets and Numbering options in InDesign aren’t just for boring lists. Yo...

Quick Wins: InDesign Template Essentials
Use these five Template Essentials collections to speed up your InDesign documen...

Top 10 Things You Must Do Immediately After Installing InDesign
When you first install InDesign, don't just dive in! First, make these ten chang...