
Working With Endnotes in InDesign
The Good, Bad, and Ugly of InDesign’s new Endnotes feature

This article appears in Issue 105 of InDesign Magazine.
When footnotes were added to InDesign, back in 2005 (version CS2), I wrote about them for issue #5 of InDesign Magazine. So here we are, twelve years and exactly 100 issues of the magazine later… and the other shoe has dropped: InDesign CC 2018 has finally gained the ability to create endnotes.
Endnotes, as you probably know, are just like footnotes—they’re numbered auxiliary notes that relate to text in the body of the publication—but instead of sitting at the bottom of each page, they’re placed at the end of a story or document. Endnotes are very common in academic and trade book publishing, but until now it has been a hassle to create them in InDesign. But before you get too excited, it’s worth saying that the new features have some significant limitations. How successful you are with them depends on how well you understand how they work, what their pitfalls are, and how you can best take advantage of them in a particular project. So read on to find out.
Document Endnote Options
Before you start working with endnotes, you should choose Type > Document Endnote Options (Figure 1) to tell InDesign how to handle endnotes according to your preferences. The features in this dialog box work similarly to InDesign’s Footnote Options dialog box, but there are some key differences. This large dialog box is made up of 6 sections: Endnote Header, Numbering, Endnote Reference Number in Text, Endnote Formatting, Positioning Options, and Prefix/Suffix. Let’s take a look at each one.

Figure 1. The default settings in InDesign’s Endnote Options dialog box.
Endnote Header
In the Endnote Header section, you can type the title that will appear
at the beginning of your endnotes and choose a paragraph style to format the title. If you don’t have a paragraph style and need to create one from scratch, that option is available here too.
Numbering
InDesign offers nine numbering styles to choose from, including Roman numerals, Arabic numerals, upper- and lower-case letters, and symbols/asterisks. You can choose the starting position for your numbering style and whether the numbering is continuous across stories, or should restart for each story in your document. Warning: Just like with footnotes, if you choose the asterisk numbering style, InDesign only creates up to eight asterisks (any subsequent endnotes will contain only eight asterisks). Also like footnotes, if you choose the symbols numbering style, the symbols will repeat after you reach the pilcrow (¶) character.
Endnote Reference Number in Text
The Endnote Reference Number in Text section allows you to choose the position of the endnote marker in the body text of your publication: superscript, subscript, or normal. Alternatively, you can apply a character style to the marker (or create a style), which can override the position setting.
Endnote Formatting
From the Endnote Formatting section, you choose both the paragraph style to be applied to your endnote text, and the whitespace separator used between the numbering system you chose and the actual text. There’s also a disclosure triangle revealing common spacing values, such as Tab, Em Space, En Space, Hair Space, and Thin Space, so you don’t need to remember any metacharacter codes.
Positioning Options
The Positioning Options feature is the largest difference between the Footnote Options and Endnote Options dialog boxes. The Scope option lets you control whether the endnotes appear after each story or all together at the end of the current document. You also choose how InDesign should handle the frame created when endnotes are added: either by creating the frame on a new page, or with a loaded place cursor so you can create your own frame. I’ll discuss some of the pros and cons of these options later in this article.
Prefix/Suffix
You can choose to insert a prefix and/or suffix to either the endnote reference, the reference in the endnote text, or both. For example, you might want your endnote reference to be surrounded by brackets, such as [1]. For the prefix, a disclosure triangle lets you choose between a left parenthesis, a left square bracket, a hair space, and a thin space. You can always insert your own character(s) too. For the suffix, you can choose between a right parenthesis or right square bracket, or insert your own character(s). You cannot, unfortunately, set them independently. I’m not sure why these Prefix/Suffix options appear in a separate section of the already large Endnote Options dialog box rather than as part of the Numbering section, as they do in the Footnote Options dialog box.
Now that we’ve properly dissected the numerous endnote formatting options, let’s see how they work.
Adding Endnotes While You Type
Much like inserting a footnote, to insert an endnote while typing or editing text in InDesign, you select the Insert Endnote command from the Type menu or by right-clicking and choosing it from the contextual menu. When you do either of those, one of several things will happen, depending on how you’ve set your Positioning Options.
If the Endnote Frame pop-up menu is set to On a New Page, the endnote reference marker will be added to the text and InDesign will add a new page, either at the end of the story (if Scope is set to Story in the Positioning Options), or at the end of the document (if Scope is set to Document or the document has only one story). If Endnote Frame Positioning is set to Load the Place Cursor, the endnote reference marker will be added to the text, and then InDesign will take you to the end of that story (even if you set the Scope to Document) and load the place cursor so you can place the endnotes frame where you want it.
As with footnotes, if you delete an endnote reference marker, InDesign deletes the text of the endnote as well; however, unlike footnotes, even if you delete all the endnote markers, the endnotes text frame is not deleted—you will need to delete it manually.
There are some other odd things you should know about the frame that contains the endnotes. The endnotes frame uses blue markers to indicate endnote text, and they appear whether or not you have Show Hidden Characters enabled in the Type menu (Figure 2).
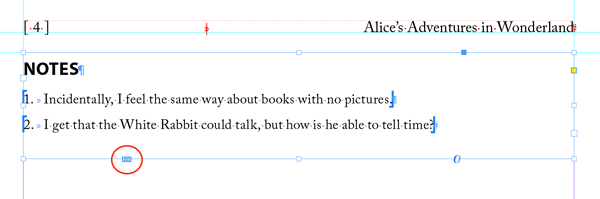
Figure 2. An endnote text frame. Endnote text appears between blue markers, and the endnote frame contains a new adornment (circled in red) that you can click to open the Endnote Options dialog box.
The endnote text frame contains a new adornment at the lower left, which you can click for easy access to the Endnote Options dialog box. In my opinion, the way the endnotes frame itself works could use some more thought. For instance, when InDesign is set to automatically create the endnote text frame on a new page, the frame will be as large as the margins of the page. But once you fill that frame with note text, InDesign doesn’t add another page and thread to a new frame, even if Smart Text Reflow is enabled! Instead, you just end up with an overset text frame.
But the most alarming thing about the endnotes frame is that if you select it with the Selection tool, it takes just one accidental tap of the Delete key to erase the frame, all your notes, and the note markers in your text! They’re gone without even so much as a “Do you really want to do that?” warning. Thank goodness for Undo!
You might think writing with endnotes would be easier in the areas of InDesign that were designed for writers and editors, but you’d be wrong. For example, you can insert an endnote when you are in InDesign’s Story Editor (Figure 3), but it will only insert the marker—there’s no way within the Story Editor to type out the actual text of the note!
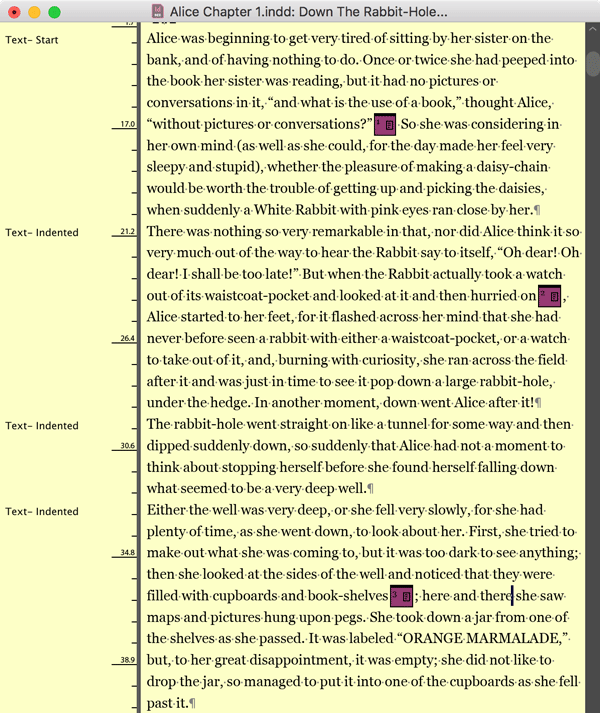
Figure 3. Endnote markers appear with maroon indicators in the Story Editor, but you can’t actually add endnote text to them, like you can with footnotes.
Ideally, there’d be an area at the bottom of the Story Editor window that would appear, allowing you to insert your note, much like Microsoft Word. And as for InCopy, Adobe’s “integrated word processor for InDesign”… it doesn’t even support endnotes yet! Stories containing endnotes cannot be exported for InCopy or added to InCopy Assignments.
My largest criticism, however, stems from a fundamental flaw in the way the new endnotes feature was implemented. In my 23 years of designing and typesetting books, I’ve never once had a project where the endnotes reside on a new page at the end of the chapter, like an afterthought. Instead, they should come at the end of the text, flowing immediately after the last word of the last paragraph. What this means is that you must manually position the endnotes frame (and reposition it, if there are edits to the text) if you want it to butt up against the last frame of the story to which the notes refer (Figure 4).
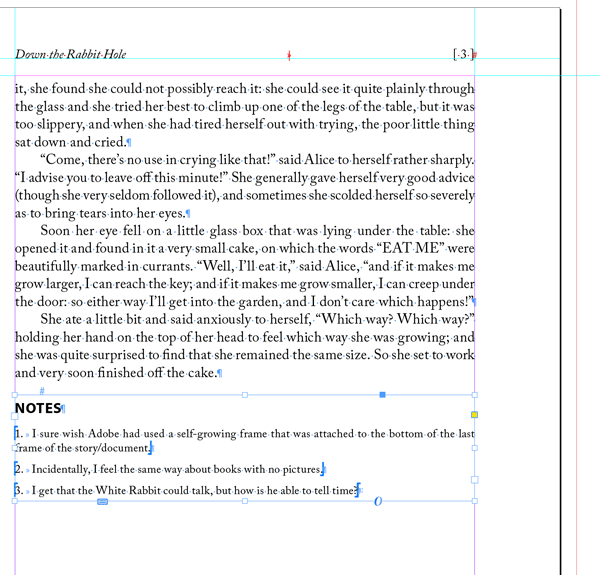
Figure 4. You’ll have to manually position the endnotes frame any time you want the notes to flow at the end of the story/document, rather than appear separately on their own page.
I wish Adobe had engineered a self-growing frame attached to the bottom of the last frame of the story/document. One setting you should use that will help get around this limitation is Smart Text Reflow, found in the Type pane of the Preferences dialog box. With this setting and Delete Empty Pages turned on, new pages can be added/removed between your text and endnotes as you continue to write or edit. Otherwise, you could end up with empty pages between your text and endnotes.
Opening Documents with Endnotes in Earlier Versions of InDesign: BEWARE!
If you open a document that uses endnotes in a version of InDesign earlier than CC 2018, either via IDML or the Creative Cloud “Convert” feature, you’ll end up losing all your endnotes and the endnote markers! While it would be unreasonable to expect earlier versions to maintain dynamic endnote text, it’s terrible that even the endnote markers get stripped in the process. Hopefully Adobe will address this issue, perhaps by letting us convert the markers to text.
Another significant problem is that InDesign’s endnotes feature is not integrated with the book feature. That is, if you have multiple documents grouped in a book panel, your endnotes can live at the end of each document, but there’s no way to place them all at the end of the book, or in a separate file.
These frustrations aside, there are a few small touches that make inserting endnotes easier. For instance, once you’ve finished writing the text of your endnote, you can choose Type > Go to Endnote Reference (or right-click to choose from the contextual menu). This feature takes you back to your main text so you can continue writing or editing. You can (and should!) assign that command a keyboard shortcut, and it will act like a toggle: if you’re in the endnote text, it will take you to the endnote reference, and if you’re at the endnote reference, it will take you to the end of your endnote text. (I should point out the odd behavior—perhaps just a bug—that if you do assign a keyboard shortcut to the Go to Endnote Reference command, the shortcut appears in the contextual menu, but not in the Type menu.)
Another nice touch: just like inserting a footnote, InDesign will not apply the endnote marker’s character style (such as superscript) to your text as you continue typing after you insert the marker.
Endnotes From Word
Now, as with Microsoft Word footnotes, you can import endnotes from a Word document. The option to import endnotes is found in the Microsoft Word Import Options that you access by checking the Show Import Options checkbox in the Place dialog box. (TIP: If you don’t want to see the Import Options every time you place a file, you can hold the Shift key as you press the Open button to access the Import Options for that Place action only.) The option is turned on by default (Figure 5).
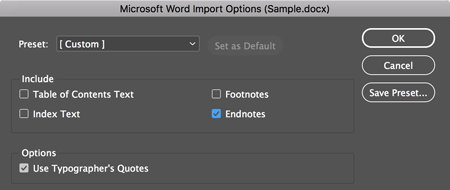
Figure 5. Importing endnotes is enabled by default in the Microsoft Word Import Options dialog box.
When you place your file, InDesign places the endnotes according to your Document Endnote Options… with the exception of Positioning Options. Endnotes from Word docs are always placed on a new page. And, if you place multiple Word files containing endnotes, each story will create its own endnotes frame at the end of the story—sadly, there’s no option to combine them all at the end of the document.
If you’ve ever placed pre-styled text (where all the paragraph and character styles have been applied to the text in Word) into an InDesign document that contains definitions for those styles, then you likely know your text doesn’t always faithfully adhere to the definitions of your InDesign paragraph and character styles—you often need to select all the text and clear overrides. But because endnotes exist outside of the main text (just like footnotes), you’ll subsequently need to clear overrides in the endnotes frames too. Fortunately, unlike footnotes, which can only be selected one at a time, you can select all the endnotes and clear overrides in one step.
However, just as with inserting endnotes as you type, InDesign will only place one page of endnotes, regardless of how many are in your Word file (even with Smart Text Reflow enabled), so you’ll often end up with overset text frames. I find this to be one of the most frustrating limitations in the way the endnotes feature was implemented—there’s absolutely nothing a user can do to get InDesign to flow more than one frame of endnotes when placing Word files.
Converting Endnotes to Footnotes
InDesign CC 2018 does not contain an option to convert endnotes to footnotes or vice versa, but here are two workarounds:
Scripting: Scripting guru Peter Kahrel offers a variety of scripts for working with footnotes and endnotes in InDesign, including converting from one to the other in CC 2018. (Also, see Peter’s excellent explanation of footnotes in Issue #95.) Peter’s scripts dealing with notes of both varieties can be found here on his site and include methods for creating endnotes in CC 2017 and earlier by taking advantage of cross-references. He also includes scripts to convert between endnotes and footnotes in CC 2018. Keep in mind that although Peter makes these scripts available for free, donations are appreciated if you find them useful.
Microsoft Word: Another option for documents that originate in Microsoft Word is to use that program to convert between endnotes and footnotes. To do so, open your document in Word and choose Footnotes from the View Menu (whether the document uses footnotes or endnotes, you view them with the “Footnotes” command). The notes will appear in a split window at the bottom. Select the note(s) you want to convert, and right-click to choose the convert option. It’s best to perform this action before you place the Word document into InDesign, as any formatting changes you make to the Word text in InDesign will be lost if you update the Word document.
A Rough Start
After waiting 12 years since gaining footnotes, it seems only right to finally have endnotes in InDesign. But with that much time to implement endnotes, I was expecting the feature to arrive more polished.
I’m not terribly troubled by the minor inconsistencies, like the fact that you can’t include/exclude endnotes from Find/Change searches, as you can with footnotes. But I do feel that Adobe needs to address this feature’s large shortcomings:
- Endnotes can be deleted without even a warning
- Endnote text can’t be added while in the Story Editor
- InCopy doesn’t support endnotes
- InDesign will not flow more than one frame of endnotes
- Endnotes aren’t included when exporting to RTF
- All endnote text and markers get removed when opening in earlier versions of InDesign
- Endnotes are not book-aware
And while they’re at it, Adobe should add an option to convert endnotes to footnotes and vice versa (see the sidebar on the previous page for ways to overcome this limitation).
Sadly, Adobe’s record for improving the use of features after they’ve been introduced is mixed at best. Nevertheless, if you know its limitations, the new endnotes feature in InDesign CC 2018 offers basic functionality. Ultimately, however, I want it to be more than just functional. I want it to be great!
Commenting is easier and faster when you're logged in!

Recommended for you

InDesign Magazine Issue 65: Long Documents
We’re happy to announce that InDesign Magazine Issue 65 (September, 2014) i...

Tips for creating ad-hoc bookmarks
InDesign’s Bookmarks panel (Window > Interactive > Bookmarks) provid...
