
Working with Adobe Cloud Documents
Learn all about Adobe’s vision for the future of rapid collaboration.

This article appears in Issue 6 of CreativePro Magazine.
Traditional methods for teams to review and edit documents require transferring those often-large documents via email or cloud-based file sharing services. Inevitably, delays happen each time a participant needs to stop and register for accounts or install software.
Over the past couple years, Adobe has rolled out new ways for multiple participants to review and edit a single document created by Photoshop, Illustrator, and several other applications in the Creative Cloud suite. InDesign is not among them—yet—but Adobe has hinted that it could be in the offing.
A new file format—the Adobe cloud document—simplifies the collaboration process. This format lives exclusively online; Photoshop cloud documents are identified by the PSDC extension, while Illustrator cloud documents are saved as AIC files.
Anyone can be invited to use a web browser to review the work and make comments. Meanwhile, designers can take turns editing the cloud document in its original source application.
Using Adobe cloud documents offers several key advantages over regular application files:
- You can access your documents from any device—desktop computers, laptops, or tablets—if you have a link. You can even share a cloud document file across multiple devices. Team members can also review and edit a cloud document from different locations.
- Cloud document files are autosaved as soon as you make a change.
- You can work with cloud documents online or offline.
- A version history for the document is created automatically; you can view it in the application or in a web browser.
- Collaborators with permission can restore a previous version of the file.
- Reviewers can make comments in a web browser for all team members to see.
- Designers on the team can open the document to make edits, which are visible to all collaborators.
Collaborative Choices
If you’re a Creative Cloud subscriber, you can store three primary types of files online. Each has its own purpose and advantage.
Adobe cloud documents. When using cloud documents, work is autosaved and available wherever you are working. You can manage cloud documents from an application’s Home screen, through the Creative Cloud application, or on the Creative Cloud website. Cloud documents are the native format for Adobe XD, Adobe Fresco, and Adobe Aero.
Libraries. Libraries (or CC Libraries, as they are known in InDesign) let you collect and share design elements, including graphics, images, styles (character and paragraph), brushes, color palettes, and text. You can organize Libraries around a project or client and share them with others. Access is available in Creative Cloud apps (desktop or mobile), as well as in the Creative Cloud website, and even in Microsoft Office applications (see Alan Gilbertson’s “CC Libraries in Word and PowerPoint” in CreativePro Magazine, Issue #3).
Synced files. Also called Creative Cloud files, synced files are traditional application files (PSD, AI, and the like) that are saved in your Creative Cloud folder and made available from any connected device. You can manage synced files in the Files section of the Creative Cloud website or the Creative Cloud application.
Working with Cloud Documents in your Desktop App
Illustrator and Photoshop allow you to save a new document either to your computer (in the traditional file formats) or to the cloud (in the new Adobe cloud document format).
To save a new or an existing document as a cloud document in these apps:
- Choose File > Save or File > Save As.
- By default, you will see a new dialog box: Save on Your Computer or to Creative Cloud (Figure 1). In it, click Save to Creative Cloud.

Figure 1. When you first save a document in Illustrator or Photoshop, you can set the default to save files on your computer or as a cloud document.
Tip: If you select the Don’t Show Again checkbox, the app remembers your choice.
Illustrator saves cloud documents with an AIC extension; Photoshop saves cloud documents with a PSC extension. A cloud symbol is displayed on the tab that shows the file name from either program (Figure 2).

Figure 2. If you open a cloud document, the filename—with a different extension—appears next to a cloud icon on the document tab. The Share Document icon on the Application Bar () initiates a collaboration. You can track your project’s progress with the Comments panel and its journey through multiple saves with the Version History panel.
Accessing and managing cloud documents
After saving a file as a cloud document, you can access it from the Home screen in your application, in the Creative Cloud desktop application, or from the Creative Cloud website (assets.adobe.com). Whichever method you use, you’ll find a mostly consistent interface. (See “Using the Creative Cloud Website.”)
- To rename your cloud documents from the app or from the Creative Cloud website, click the ellipsis (…) icon and select Rename from the menu (Figure 3).

Figure 3. In a design app, or the Creative Cloud app or website, controls for managing a cloud document appear when you click the ellipsis under the document thumbnail.
- Similarly, to delete a cloud document, click the ellipsis icon and select Delete. The file will be archived indefinitely (along with other documents you delete), but you can still access and restore it later on.
- To restore a cloud document, click the ellipsis (…) and select Restore. It will be returned to its original location.
- You can see all of your deleted files in the Deleted area. To permanently delete a cloud document, click the ellipsis and choose Permanently Delete.
- To move a cloud document to a folder, click the ellipsis and select Move To. In the Move To dialog box, select the destination within existing folders, or use the Add Folder option. Click Move.
- To create a copy of a cloud document from the Creative Cloud website, click the ellipsis icon and choose Copy. Use the Copy To dialog box to select a destination folder. Note: You cannot copy a cloud document when you’re working on it within in an app.
- To perform operations like moving or copying multiple cloud documents en masse, select the checkboxes that pop up on document thumbnails when you move your pointer over them. Select multiple files, then perform the desired operation.
Using the Creative Cloud Website
The Creative Cloud website provides an alternative way of viewing and working with Creative Cloud files of all kinds in a web browser. In the Your Files section of the Creative Cloud application, right-click a file or folder and choose View On Web. Or, you can visit assets.adobe.com.
Within this interface, choose Your Files > Cloud Documents to work with cloud documents.

The website extends your options for working with cloud files beyond those you can use within one of the applications. For example, you can use it to copy files to a different folder. When viewing a cloud document thumbnail, clicking the ellipsis gives you an option to share a document or download a cloud document to your computer.
Clicking a thumbnail on the website lets you view the file. In this window, you can add comments and view previous ones, as well as view file info and version history. There are also buttons to share the file and to open it in the native application for editing.

Sharing and Collaborating on Cloud Documents
If you’re a member of a team, it’s easy to invite collaborators to review, share comments, and co-edit a cloud document. Collaborators who need to edit documents in Illustrator or Photoshop just need an Adobe ID. However, reviewers need not have an Adobe ID. They can receive a link which opens in the Creative Cloud website and allows them to make comments. Both comments and edits are visible to all participants.
Sharing a cloud document with collaborators
Any kind of sharing begins by clicking the Share Document button on the right end of the app’s Application Bar. This opens the Share Document dialog box (Figure 4).

Figure 4. The Share Document dialog box is where you invite and manage collaborators to a document.
You can invite people by entering their Adobe ID, or via a shareable link. Click the gear icon and choose Settings to control who can access the document (anyone with a link or only those you specifically invite) and whether those invitees can comment or download a copy of the file (Figure 5).

Figure 5. The Settings (found under the gear in the Share Document dialog box) control the collaboration process.
Optionally, you can write a note that will be sent to collaborators with an invitation to participate (Figure 6). As they accept invitations, their names and email addresses are added to the Share Document dialog box.

Figure 6. Collaborators receive an invitation, which can include instructions.
Working with reviewers
The link-copy method works best for collaborators who are just reviewing and sharing comments. You can copy and paste the link into an email or a text message and send the link to them.
When they click the link, it will let them view the cloud document on the Creative Cloud website. They can choose to comment as a Guest, and don’t need to enter an Adobe ID.
These collaborators can leave general comments, augmenting them with the Pin tool to attach comments to a particular location in the layout or the Pencil tool to mark the area to which a particular comment applies.
Working with designers
If you work with designers who will collaborate on updating the document, you will need to add them in the Invite People section.
Warning: Make sure the email address that you use to invite a user matches their Adobe ID.
To edit the document, the designer chooses Open in Illustrator or Open in Photoshop, as appropriate. Only one person can open a file for editing at a time. If someone has the file open, everyone else has to wait for that person to close it. You can choose Make A Copy and dive in as someone is working on the original, but I don’t recommend that since it can set off a domino effect of version-control issues. Instead, make it a rule to copy documents only when they’re not being edited by others.
When you begin editing a document, collaborators receive notifications in the Creative Cloud desktop app (Figure 7) and through email.

Figure 7. Collaborators receive notifications in the Creative Cloud desktop app as well as by email.
Managing comments and shared cloud documents
If you initiated the review, that means you’re the owner of the document and can control comments, which appear in the Comments panel in your app (Figure 8). You can click a comment to navigate to the relevant area of the document. As you go through individual comments, you will have the options to Reply to, Resolve, or Delete them.

Figure 8. The Comments panel in Illustrator or Photoshop lists all the comments in the collaboration.
If someone leaves a team or finishes their task, you can remove them from the collaborators list. Hover your pointer over their name and click Remove.
After a collaborator leaves or has been removed, the document is removed permanently from that person’s set of shared documents (the Shared With You area on the Creative Cloud website or desktop app).
Working on Cloud Documents, Online or Offline
You can work on an offline copy of your cloud document, and your artwork will be synced to the cloud when your device comes back online.
Three icons indicate the current status of the artwork (Figure 9).
Figure 9. Three icons indicate whether your document is online or offline.
- To make the document available offline, look at the list in the Your Files section of the Files tab. Click the ellipsis and select Make Available Offline Always. The gray cloud icon changes to a green checkbox.
- To make the document online-only, click the ellipsis and select Make Available Online-only. The icon changes to gray cloud.
Tip: You can choose to download the file if you want to access it quickly later. - Your document is continuously synchronized with the cloud. The blue double arrow icon appears when a document is synchronizing. Obviously, you can’t sync updates if you don’t have an internet connection, but you can work offline. A gray double arrow icon will remind you that the file will need to be synced when you are back online.
Tracking Version History of a Cloud Document
You can view and manage the version history of your document either from the app or from the Creative Cloud website.
Tracking versions in a desktop app
You can track and view the version history of your cloud documents using the Version History panel in the desktop app. Either choose File > Version History or Window > Version History to open it.
Here, each editing change is time-stamped and added to the history (Figure 10).
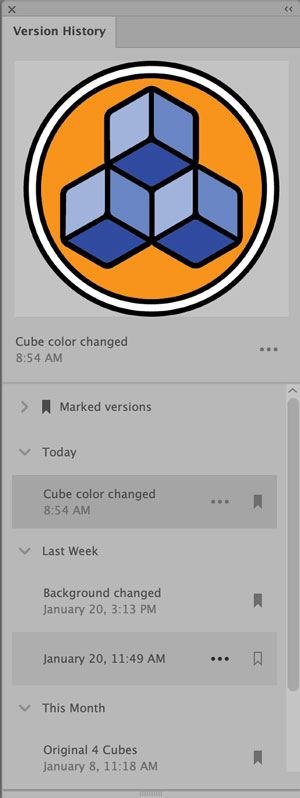
Figure 10. Each editing change is added to the version history in an app. You can apply a name to the edit and mark a step to make sure it’s retained.
Tip: Click the ellipsis under an entry to edit the name of the version to describe your changes to the file.
Click the Marked Version icon when it’s a hollow bookmark to save that version step; it will change to a solid bookmark. Click it again to unmark a saved version. Warning: Versions that are not marked are automatically deleted after 30 days, so make sure to mark any version you want to retain permanently.
Tracking version history from the Creative Cloud website
You can also track and view your cloud document’s version history when you open your document from the Creative Cloud website.
Click the Timeline panel icon (Figure 11) to open the Timeline panel, where the preview and options are similar to the desktop app Version History panel.

Figure 11. The Timeline panel in the Creative Cloud website shows the same document version history as in the app, with similar options.
Reverting to a previous version of a cloud document
You can easily revert to an earlier version of a cloud document. In the desktop app’s Version History panel, click the ellipsis icon next to a marked history event you want to revert and choose Revert to this version. The cloud document will be reverted to the selected version immediately when you close the dialog box.
From the same icon, you can also click Rename this version to change the name of the cloud document version.
In the Timeline panel on the website, you will find similar choices for reverting and renaming versions.
The Future of Cloud Documents
Despite their advantages, it’s clear that cloud documents aren’t for everyone. If you work by yourself, cloud documents may have little to offer you. Likewise, if you work for a company where storing documents on an external cloud service is forbidden, this workflow won’t be viable for you.
But you should consider an Adobe cloud document workflow if you work in an industry that demands participation from multiple players (editors, art directors, reviewers) working on a document in multiple locations on different devices.
In the race to enable rapid remote collaboration, other major tech companies are ahead of Adobe with such technologies as Google Docs and Microsoft Office 365. Viewed from that perspective it’s easy to see how the addition of cloud documents was an inevitable and essential part of Adobe’s long-term business strategy.
Commenting is easier and faster when you're logged in!

Recommended for you

Photoshop and Illustrator: June 2020 updates
The June 2020 releases of Adobe Photoshop and Illustrator bring some small but s...
Poll Results: Which programs do you wish you knew better?
The results of our poll asking if you still use Flash (SWF) and a new poll on wh...
How to Display Measurements Using the Dimension Tool in Illustrator
Learn how to add measurements to your Illustrator artwork using the new Dimensio...