Working in Microsoft Word
Mastering the ultimate InDesign text editor

This article appears in Issue 124 of InDesign Magazine.
As a book designer and typesetter for the last 30 years, I spend the majority of my day moving text from Microsoft Word to Adobe InDesign. And I know that InDesign Magazine has published many articles devoted to the best practices for working with text once you get it into InDesign (see, for example, Issue #26, Issue #35, Issue #62, and Issue #84). For this article, I’m going to focus on the details of working with the text before it gets to InDesign—setting up and using Word so you can be more efficient and productive in your workflow.
The Ultimate Argument
The title of this article includes the phrase “the ultimate InDesign text editor.” But some people (including my editors here at InDesign Magazine) would argue that Adobe InCopy is actually a better accompaniment to InDesign. It’s true that InCopy is better than Word when it comes to handling all the text formatting options that InDesign can offer, but I argue that Word is still the ultimate tool for one important reason: Almost everyone has it and is at least somewhat comfortable with using it.
Customizing the Word Interface
One of the nice things about Microsoft’s Office 365 implementation of Word and the other Office programs is how much they look and act alike on both the macOS and Windows platforms (Figure 1). It’s not 100%, but it’s closer than it’s ever been, and Microsoft keeps both platforms updated with monthly releases. Much like InDesign, the default layout of Word’s tools and options is functional, but can be greatly enriched to make you more productive.

alt=”” width=”600″ height=”246″ /> Figure 1. The Microsoft Word interface for macOS (top) and Windows (bottom).
For starters, I like to enable Show Non-Printing Characters—the equivalent of choosing Show Hidden Characters in the Type menu of InDesign. If your job is working with text, it only makes sense to have these characters showing so you know whether a paragraph is indented with a tab or a first-line indent setting. You can toggle them on and off by clicking the Show/Hide ¶ button in the Home Tab, or show them permanently by choosing which non-printing characters to always show in the View section of Word Preferences (Figure 2).

Figure 2. The Show/Hide Non-Printing Characters button in the Home Tab (top), and Word’s Show Non-Printing Characters Preference options (bottom).
You’ll notice in Figure 2 that one of the non-printing characters to show is Hidden Text. There’s an option to hide text in Word, but you would never know it was there if you didn’t have this option turned on. Of course, once you place that Word file in InDesign, the text is no longer hidden. Believe me when I tell you this can cause all kinds of headaches when authors unwittingly (or wittingly) apply this option to text in Word.
While I’m in Word’s View Preferences, I also make sure to set a number in the Style Area Width setting of the Show Window Elements section, anywhere from 1–2 inches. The style area width displays the name of the style applied to text along the left-hand edge of the document window when in Draft view, much like InDesign’s Story Editor (Figure 3). Working in Draft view is like working in the Story Editor in InDesign, while Word’s Print Layout view is like InDesign’s Normal view. You can switch between the two views in the View tab of the Ribbon.

Figure 3. The names of styles applied to paragraphs appear in the style area width section when in Draft view in Word (left), much like InDesign’s Story Editor (right).
Also in the View tab is an option to show the Navigation pane. The Navigation pane acts like InDesign’s Pages panel, allowing you to quickly jump from page to page (Figure 4). This option is also available under View > Sidebar, where it’s confusingly called the Thumbnails Pane. There’s also a choice called Navigation in the Sidebar submenu which, when you go to it, is actually the document map—like a table of contents, or the bookmarks panel in Acrobat.

Figure 4. Word’s Navigation pane can be used much like InDesign’s Pages panel for navigating the document.
Finally, one of the most important interface options can be found on the right side of the Home tab—the Styles pane. The Styles pane is akin to a combination of InDesign’s Paragraph and Character Styles panels.
At the bottom of the pane is the List drop-down menu, with options to view recommended styles, styles in use, styles in the current document, or all styles. While the default is Recommended, I’ll typically set this to Styles In Use or In Current Document, because those are the styles I really care about—the styles in the document I’m currently working on.
Below the list of styles are two options that are only available when you are in Print Layout view: Show Styles Guides and Show Direct Formatting Guides. Show Styles Guides is a convenient way to see what styles are applied to text throughout your document, while Show Direct Formatting Guides shows where local formatting was applied to text (Figure 5). The latter feature is similar to the “+” button in InDesign’s Paragraph Styles panel, and is extremely helpful when trying to find local formatting.

Figure 5. When in Print Layout view, you can use Show Styles Guides to view where paragraph and character styles are applied to text (the number/color coded boxes along the edge), and Show Direct Formatting guides where local formatting has been applied (the blue boxes appearing over text).
What many users don’t realize is that the whole Styles pane can be moved and resized to anywhere on screen. Simply click at the top of the pane where it says Styles, and drag it to any location. Once you’ve moved it to a new location, select any corner to resize it. What makes this so helpful can be best illustrated by Figure 6. A single click on the style name of a paragraph in the style area width section of the document window will select the whole paragraph—a feature I’d love to see added to InDesign’s Story Editor. By moving the Styles pane to the left-hand side of the document window, you reduce the amount of mousing needed to apply styles. And when you’re styling hundreds of pages of manuscripts filled with tables, your arm will appreciate that!
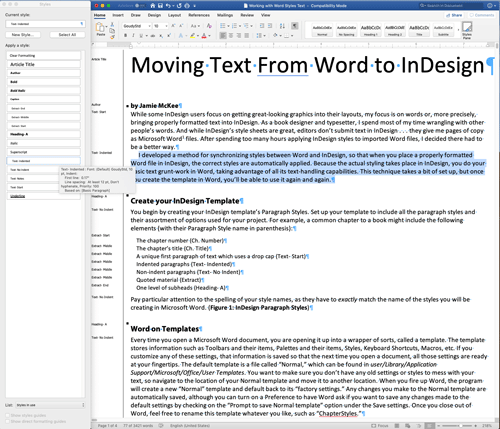
Figure 6. Applying styles in Word is as simple as clicking on the style name in the style area width section to select the whole paragraph, and then clicking a style name to apply that style.
Setting Up Your Styles
If the Word documents you receive are already well styled, you can simply use InDesign’s Microsoft Word Import Options to map the styles in the Word document to the styles in your InDesign document. You can read all about this process in Issue #35. For the more common scenario of a partially-styled or non-styled manuscript, it’ll be up to you to apply the styles. While you can do this in InDesign, I find it easier to work in Word. As already mentioned, selecting whole paragraphs to style can be done with a single click.
I also appreciate that you can make noncontiguous text selections in Word, which can’t be done in InDesign. To make noncontiguous text selections—handy for applying an italic character style to half a dozen words in a paragraph, for example—drag over or double-click words while holding the Command/Ctrl key (Figure 7).

Figure 7. Hold the Command key as you drag or double-click words to make noncontiguous text selections.
Before you can do any text styling in Word, you first need to make the styles available. You could manually create them, but it’s far easier to get them from InDesign if you already have a document with the styles you need. While in InDesign, create a sample story that uses those styles. To accomplish this, I’ll typically tell clients to type out the names of the styles in a text frame and apply each style to a paragraph—such that “Article Title” has the Article Title paragraph style applied to it, “BoldItalic” has the BoldItalic character style applied to it, and so on.
Saving a style master
It’s good practice to establish a style-naming convention for all your documents and build an InDesign document or template to hold those styles. In my work, I create a Master Styles document in InDesign to house all the styles I’ve ever used in a project. While the formatting of the styles may change depending on the project, the style naming remains consistent.
To do this, once you’ve created all the necessary styles and applied them to text in your InDesign document, click inside the text frame containing your story with the Type tool, and choose File > Export. In the Export dialog box, give your file a name like Master Styles, and then choose Rich Text Format from the Format drop-down menu. Save the document in an easy-to-find location.
Switching back to Word, open the file you want to style with the styles you just exported from InDesign. Choose Style from the Format menu, which will bring up the Style dialog box. Click the Organizer button in the lower left of the dialog box to access the Organizer. The Organizer allows you to copy features from one Word document to another, such as styles, AutoText entries, toolbars, and macros (Figure 8).

Figure 8. The Organizer allows you to copy features from one Word document to another.
As Figure 8 shows, the styles in the file you have open are listed on the left, while the styles that are part of the global template are listed on the right (see the sidebar “Word Templates”). To gain access to the Master Styles.rtf document you just exported from InDesign, click the Close File button beneath the list on the right-hand side, and then click the Open File button that appears. In the dialog box that follows, select the Master Styles.rtf file exported from InDesign, and click Open. Word imports the styles into the Organizer, and you will now have access to all your InDesign styles. This process is similar to InDesign’s Load All Text Styles command, found in the Paragraph and Character Styles panels.
Cleanup and import
At this point you have a choice to make: delete all the styles that are in the Word document that you intend to restyle, or merely add the styles from your Master Styles.rtf document to it. If you delete everything, you’ll start with a clean slate, with all paragraphs returning to the Normal style, leaving only local formatting.
Many times, however, I receive Word files with a combination of local formatting and paragraph and character styles applied. By deleting all the styles in the document, I can remove some necessary styling. But caution is advised: I once removed all the styles in a document, only to discover after the fact that the author had applied italic, bold, and bold italic formatting using both local formatting (the B and I buttons in Word’s Ribbon) and character styles. After removing all the styles that came with the document, I received an angry call from the author wondering why half their bold and italic formatting was missing!
If you choose to delete all the styles in the document you’re formatting, select the first style name in the list on the left, scroll to the bottom of the list, and select the last style name while holding the Shift key to select them all. Unfortunately, this dialog box is not resizable, so you’ll only be able to see 5 style names at a time. With all the styles selected, you could then Command/Ctrl-click to deselect a style that you wanted to keep. When you are satisfied with your selection, click the Delete button between the two lists. Word will then present a dialog box so you can click through all the styles to be sure you really want to delete each one. Or, if you’re 100% sure of yourself, you can click the Yes to All button that appears the first time. Word will then delete the styles but inform you that there are a few built-in styles that cannot be deleted (Default Paragraph Font, No List, Normal, and Table Normal).
Next, to copy the styles from your Master Styles.rtf list, select the topmost style in the list on the right (you can ignore the [No Paragraph Style] style), scroll to the bottom of the list and, while holding the Shift key, click on the last style (Figure 9). You’ll notice that the direction arrow in the Copy button switches, now pointing to the list on the left. Click the Copy button and, just like with the delete operation, a dialog box will appear that you can click through to be sure you really want to copy each style (or you can click the Yes to All button). When you are finished, click the Close button at the bottom right. Your document will now contain all the styles from your InDesign master list, and you can start styling the Word file.

Figure 9. Load the styles of your Master Styles document into the Organizer and copy them to the current document.
Word Templates
Every time you open a Microsoft Word document, you are opening it up into a wrapper of sorts, called a template. The template stores information such as the layout of your Ribbon, styles, keyboard shortcuts, macros, etc. If you customize any of these settings, that information is saved so that the next time you open a document, all those settings are ready at your fingertips. The default template is a file called Normal.dotm. Any changes you make to the Normal template are automatically saved, although you can turn on a Preference to have Word ask if you want to save any changes made to the default settings by selecting the Prompt Before Saving Normal Template option under the Save settings of Word’s Preferences.
If you have a master list of styles, you can add them to the Word template so that they are always available for all the Word files you open. Using the Master Styles.rtf file as an example, here’s how to proceed: Open the file in Word. Open the Organizer by selecting Format > Style > Organizer. The Organizer will show you the name of the file you have open with all its styles listed on the left-hand side, and the Normal.dotm template with all its styles listed on the right (Figure A).

Figure A. Use the Organizer to move Styles in and out of your documents. If you move Styles into the Normal.dotm template, they will be available to all your other documents.
Select all the styles in the list on the left, and click the Copy -> button between the two lists to copy your master list of styles to the Normal.dotm template. Word presents a dialog box for each style selected that you can click through to be sure you really want to copy it, or you can click the Yes to All button that appears the first time. With your master list of styles copied to the Normal.dotm template, you can close the Organizer. Now when you open any file in Word, you can open the Organizer and copy the styles from the Normal.dotm template into the document you are working on.
Find and Replace
When it comes to styling documents, I spend much of my time finding one thing and replacing it with another: local formatting to paragraph and character styles, hyphens to en dashes between number ranges, double paragraph returns to single returns, double spaces between sentences to single spaces, three periods together to the ellipsis character … the list goes on and on. To handle all of these, you need powerful search and replace options. InDesign has them and, though they’re rather hidden, Word has them too.
You can access Word’s search feature in the top right of the document window. It’s handy for quickly locating letters or words within your document. Handier still is the Find and Replace section of the Sidebar (View > Sidebar > Search). The most powerful, however, is the Advanced Find and Replace window, which acts just like InDesign’s Find/Change window (Figure 10).

Figure 10. Word’s Advanced Find and Replace dialog box (left) is nearly as functional as InDesign’s Find/Change (right).
You can access Word’s Advanced Find and Replace window from the Edit menu (Edit > Find > Advanced Find and Replace) or from the gear menu in the Find and Replace section of the Sidebar. To me, the options in Advanced Find and Replace are so valuable that I reset the keyboard shortcut for Find, Command/Ctrl+F (which would normally take me to the search bar at the top of the document window) to Advanced Find and Replace. You can customize keyboard shortcuts in the Customize Keyboard dialog box (Tools > Customize Keyboard), which is similar to InDesign’s Keyboard Shortcuts editor found under the Edit Menu (Figure 11). The list of Categories on the left generally corresponds to Word’s Menus, while the Commands section corresponds to the items within those menus. There’s a handy search bar for finding Commands, which I find simpler than InDesign’s Show Set method of creating a text file you then need to search through.
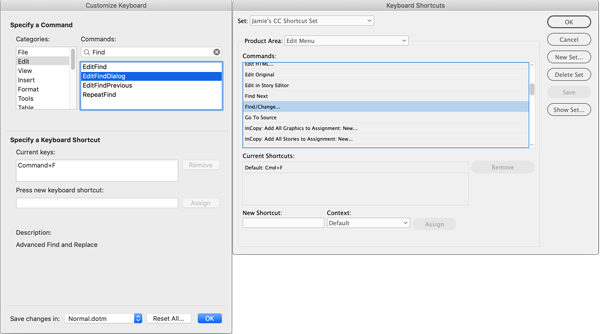
Figure 11. Word’s Customize Keyboard dialog box (left) is similar to InDesign’s Keyboard Shortcuts editor (right).
When working with Advanced Find and Replace, be sure to click the disclosure triangle in the bottom left to access all the search options, such as which direction to search the document, whether to match case, find whole words, and specify formatting options such as font, paragraph, tabs, language, and style. There’s also a Special drop-down menu for accessing metacharacters, such as paragraph marks, tab characters, manual line breaks, nonbreaking spaces, and endnote/footnote characters. As I said, Word’s Advanced Find and Replace works just like InDesign’s Find/Change.
You can even do some GREP-like searches in Word. Just select the Use Wildcards option in the Search section. For instance, I often receive files from editors that have codes added to the text to let me know how certain items should be styled. The codes always appear in brackets, such as <AT> for the Article Title, <AHD> for an A-Head, and <LIST> and </> for the start and end of bulleted or numbered lists. After the document is styled, all those codes need to be removed and, while you could search the document and manually delete them one by one, it’s far easier to find and replace them all at once using wildcards (Figure 12). For instance, the wildcard expression <*> finds any open bracket < followed by 0 or more characters * followed by any close bracket > (in GREP, some characters, such as the < and > characters, must be escaped if you want to use them to match the corresponding literal character). By setting Replace With to nothing and making sure to use wildcards, all the codes can be removed from the document at once.
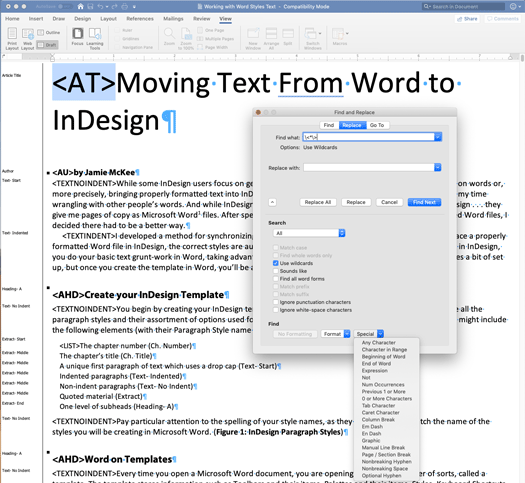
Figure 12. Select the Use wildcards option to make GREP-like searches in Word.
Bulleted and Numbered Lists
Word documents that contain automated bulleted or numbered lists can be tricky. Follow these guidelines to keep from getting tripped up.
Bullets
If you come across a bulleted list in Word where the bullet characters were manually entered (that is, the author actually typed the bullet character •), you can select the list of bulleted items, apply the Bullets option from Word’s Home Ribbon, and Word will replace the manually typed bullets with automated bullets—as long as there is a space (either a single space or a tab) character between the bullet character and the item. If there is no space, the bullets will be added, and you’ll end up with a double-bulleted list.
In this respect, Word is smarter than InDesign, as applying the Bulleted List option to text that already starts with a bullet in InDesign will always add a bullet to the beginning of the list rather than converting it as Word does. Thankfully, InDesign is smart enough to recognize Word’s bullets feature. Text using Word’s automated bullets feature that is placed into InDesign will always retain those bullets (as long as Convert Bullets and Numbers to Text isn’t enabled in InDesign’s Microsoft Word Import Options). For this reason I recommend always using the Bullets feature in Word—there’s always the Convert Bullets to Text option in InDesign if you need it.
Numbers
Numbers work similarly to bullets in Word: select the list of numbered items, apply the Numbering option from Word’s Home Ribbon, and Word will replace manually typed numbers with automated numbers—as long as there is a period and a space (either a single space or a tab) character between the number and the item. If there is neither a period nor a space, you’ll end up with a double-numbered list.
As with bullets, Word is smarter than InDesign in that it will convert manual numbered lists, but InDesign is smart enough to recognize Word’s numbered lists and apply its numbered list feature to both styled and unstyled text placed into a document. Finally, note that both bulleted and numbered lists that are copied from Word to InDesign (rather than placed) will retain their bullets/numbers, but those bullets or numbers will be converted to text. (See the sidebar “Numbering Selection Trick.”)
Numbering Selection Trick
For one of my clients, I lay out a journal whose articles usually contain a long Notes section. The editors don’t use Word’s Endnotes feature; they simply include the notes at the end of the article. The notes are numbered, but only use a space between the number and the text of the note, rather than a period and a space. If I were to apply Word’s Numbering feature to these Notes, the numbers would be added instead of replaced, and I would end up with double-numbered notes. But Word has a neat selection feature that will select everything you mouse over as a rectangle when you hold the Option/Alt key as you drag and make a selection (Figure 13). Everything within that rectangle can then be acted upon, so you can apply formatting or delete the text. In this instance, by setting a hanging indent to the Notes, I can isolate the numbers and delete them all at once.
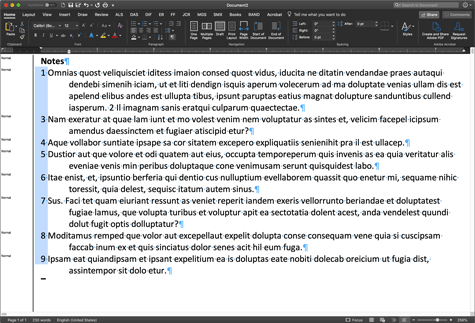
Figure 13. Hold the Option/Alt key while dragging your mouse to make rectangular selections anywhere in the document.
Other Word Tips and Timesavers
Over the years I’ve come across a handful of tips and tricks that I find myself coming back to again and again. The following are some of my favorite and most useful tips for staying productive.
Hyperlinks
It’s not uncommon to receive Word documents containing hyperlinks that you need to remove because the document will only be output to print. You can remove all the hyperlinks in InDesign after the fact, but it’s a breeze to remove them in Word. Just select all of your text, and press Command+6 on the Mac or Ctrl+Shift+F9 in Windows. All of your hyperlinks will be removed. (This command will also set the text of Word Fields to static.)
Bookmarks
I often place Word files into InDesign and discover the file is full of bookmarks. When it comes to removing extraneous bookmarks, I find it’s actually easier to deal with them in InDesign, because you can resize the Bookmarks panel, select all of them at once, and delete them all in one click. The Bookmarks dialog box in Word is not resizable, showing only 5 bookmarks at a time, and they each have to be deleted individually.
Images
Word’s .docx file format is a glorified ZIP file. Change the file extension to ZIP, decompress it (using a 3rd party app on macOS such as The Unarchiver or StuffIt Expander), and you’ll find all of the document’s original assets, including the images as individual files in a folder.
But here’s another method for exporting all the images: if you’ve already opened a Word file, you can simply do a Save As and choose Web Page (.htm) from the File Format pop-up menu. This will save the file as HTML and include a folder with the images saved into it. You can then delete the images in the Word file and continue working on it.
(Note that with either of these techniques, Word may significantly change the images from their original sources. For example, you can place a high-resolution .tif or .psd file into Word, but Word will probably convert it into a low-resolution .jpg or .png. Therefore, these two techniques are only appropriate to use if you cannot obtain the original images.)
Corruption
Sooner or later, you’re going to end up with a Word file that just won’t cooperate. Weird behavior, crashes, scrambled or skipped text when placed in InDesign—there’s no telling what might happen. One tried-and-true solution is to “Maggie” the file. The term Maggie refers to Maggie Secara, the woman who popularized the process by sharing it so often in Word forums, the solution came to be known as hers.
To Maggie a Word file, select everything in the file except the final pilcrow (paragraph marker, i.e., ¶) and paste into a new Word file. The technique seems to work because Word saves all kinds of arcane information in that last paragraph character that can cause problems.
The Final Word on Word
Over the years, Microsoft Word has gotten a bad rap, being characterized as the program everyone loves to hate. Some of that frustration has been deserved, but the Word of 20 years ago is not the Word of today. Today’s Word looks and functions similarly across multiple platforms, including mobile. With these tips, tricks, and methods, you’ll be able to corral your Word documents quickly and efficiently before pouring them into InDesign.
Commenting is easier and faster when you're logged in!
Recommended for you
InDesign Magazine Issue 110: Illustrator and InDesign
Issue 110 of InDesign Magazine include articles on Illustrator, designing with g...

How to Find and Fix Partially Italic Words with GREP
You can banish incomplete italics fast with Find/Change and the clever use of a...


