Why You Can’t Trust Acrobat’s Separation Preview

Here’s the problem: When you open a PDF in Acrobat, then click on Output Preview, and then check the colors in your document, you may (or may not!) get a realistic reading of your document’s CMYK inks. And this is never more obvious or frustrating than when you’re checking something as simple as black text.
After all, you generally want your black text to just be black right? Just 100% black, no extra inks, like this:
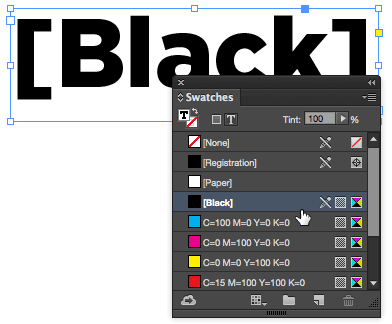
But sometimes when you export a PDF, black can change to “four color black” or “rich black”—where instead of just black, you also get cyan, magenta, and yellow. So you open your document in Acrobat and check, just to be sure that your black really is just black and… see how in the following image, the cursor is over some of the text, and there are clearly percentages of inks other than Black!
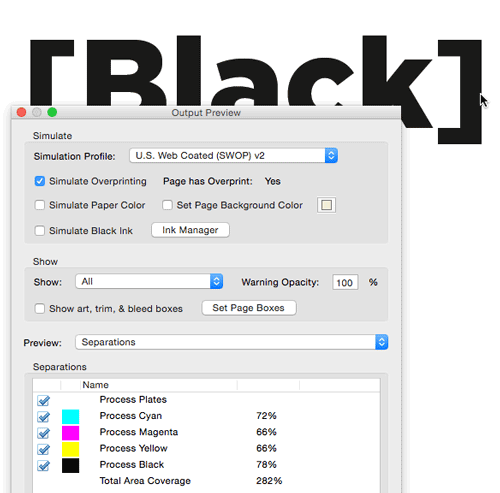
That is bad! But should you panic? Not yet, because… here’s what you need to remember: Acrobat sometimes lies!
Well, technically, it’s not lying… it’s just telling you that the colors might change when you print.
Unfortunately the whole thing comes down to color management, a topic which can make even the smartest person start to whimper. I’ll do a quick explanation of why in the image above, Acrobat appears to be lying to us, and then I’ll show you a few ways to get around it.
When Acrobat Gets it Wrong
When I export my simple document from InDesign using the PDF/X-1a preset, I can choose a CMYK destination in the Output pane of the Export PDF dialog box:
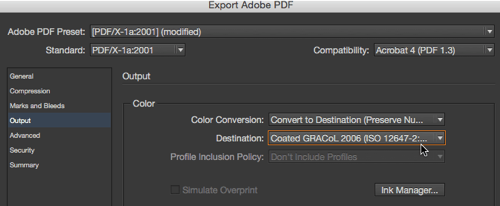
This is really helpful when you have a mix of RGB and CMYK images or colors in your document, because this converts all the RGB to a particular CMYK. I like that.
And see, in the image above, how the Profile Inclusion Policy popup menu is grayed out? But you can see that it says “Don’t Include Profiles.” That means that while InDesign does save that “Destination” information inside the PDF, it doesn’t tag individual items on your pages with the profiles. So, check out what happens when you open that in Acrobat:

It works great! The 100% black text actually shows up as 100% black. And, if you look up at the top of the Output Preview dialog box, you can see that the Simulation Profile pop-up menu automatically shows the same profile as the one we chose (the “Destination”) when we made the PDF. It turns out that the Simulation Profile pop-up menu is one of the keys to solving this problem.
So exporting as a PDF/X1a (or a PDF/X3 or X4) usually works just fine and Acrobat displays it the way you would expect.
But, some people don’t use those presets. There are lots of reasons to make your own presets or change values. For example, let’s say you start with the High Quality Print preset, but you think you may have used some RGB colors, so you decide to make it convert all your colors to CMYK… and you choose a really good standard, such as GRACoL. Your Export Adobe PDF dialog box now looks like this:
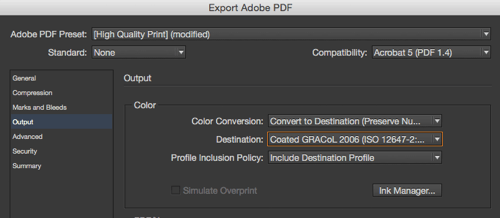
Great! Export the PDF and open it in Acrobat and… solid 100% black now looks like:

What happened?! The PDF is actually exactly the same, but there’s an important difference: When you open this PDF in Acrobat, it no longer changes the Simulation Profile for you automatically. I believe that’s because it’s not a PDF/X standard file anymore.
If you know what the Destination pop-up menu was in InDesign when you exported the PDF, and you manually choose that same profile from the Simulation Profile here in Acrobat then, guess what? It works! When Destination and Simulation Profile match, then your 100% black shows up as 100% black in Acrobat’s Output Profile panel.
Unfortunately, someone else may have made the PDF, and you have no idea what Destination they chose!
How to Figure Out the Right Profile
One way to figure out what destination profile was used when the PDF was created is to use Acrobat’s Preflight feature. I am definitely no expert on this feature, but I when I run the “List objects using ICCbased CMYK” profile, I can (with a little drilling down with twirly-triangles) see that the object in this PDF used the Coated GRACoL profile:
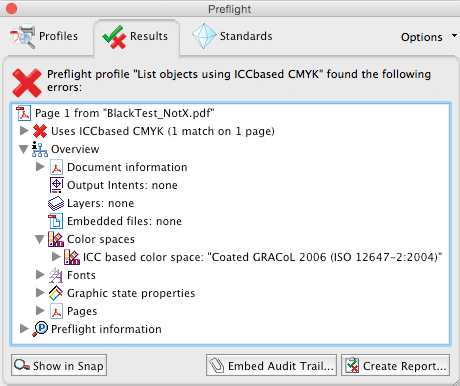
Armed with that information, I could go back to the Simulation Preview popup menu, change it, and things would look normal again.
Use Object Inspector Instead
There’s another solution: Don’t use Acrobat’s Separations preview feature at all for this task! Stephen Marsh of Prepression pointed out in a comment on another blog post that a better tool is the Object Inspector. It took me a good 5 minutes before I could find the Object Inspector in Acrobat, because it’s not a separate feature… it’s inside that very same Output Preview panel!
All you need to do is change the Preview popup menu (in the middle of the panel) to Object Inspector:
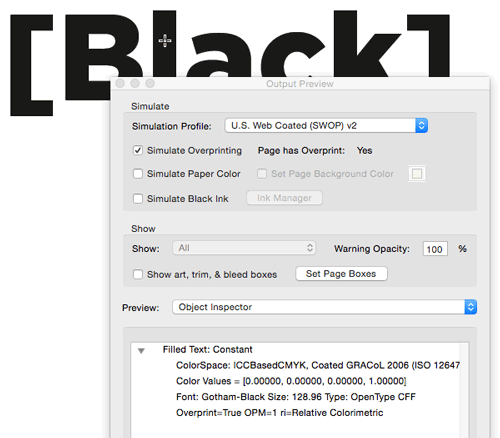
And, look down in the section at the bottom… it gives a very technical readout of the object’s Color Values. Of course, you have to know that those numbers refer to cyan, magenta, yellow, and black — and that 1.00000 means this object is 100% black ink.
Place it Back in InDesign
There’s another way you can see “real” CMYK values inside a PDF file — my favorite method, saved for last:
Just place your PDF into a new InDesign document, open the Separations Preview panel (Window > Output > Separations Preview), set the little View popup menu inside the panel to Separations, and then hover your cursor over the color you want to inspect:

Because InDesign, by default, ignores all those object profiles, the Separations Preview panel shows you The Truth. That’s the real color of that object in the PDF.
This article was last modified on September 16, 2015
This article was first published on September 16, 2015
Commenting is easier and faster when you're logged in!
Recommended for you

Make It Look Like a Book in the Acrobat PDF
Laying out a document in facing pages isn't that hard. Displaying it as facing p...

Tip of the Week: Viewing Color-blind Previews of Your Pages
How to view an InDesign layout as it would appear to someone with color blindnes...

Beware Stacked Transparency in PDF Files Across Long Documents
The Problem I recently encountered a PDF export problem that plagued me for mont...


