
Web How-to: Using CSS in Dreamweaver MX 2004
Workflow Recommendations
Experienced CSS developers will quickly adjust to the changes in the interface, because they are quite intuitive. Novice CSS users, on the other hand, may feel confused by the sheer number of methods available for making changes to styles.
So let’s look at what it does. It’s time to roll up our sleeves and dive in. Create a CSS test site:
- Launch Dreamweaver MX 2004 and choose Dreamweaver Site from the Create New column in the Start Page menu. Alternatively, once you launch Dreamweaver, choose Site > Manage Sites > New, then click Site. Click the Advanced tab if necessary.
- In the Site Name text box, type CSS test site.
- Click the file folder icon next to the Local Root Folder text box.
- In the Choose local root folder dialog box, browse to an appropriate place on your hard drive and click the New Folder icon to create a new folder called css_test.
- Select the css_test folder as the local root folder for your site.
- Click OK to accept these minimal settings. If you came to the Site Definition dialog box from the Manage Sites dialog box, click Done from within the Manage Sites dialog box.
We will use this same site to house the files we create in the following workflows.
Quickly Generate Simple Styles and Build Upon Them. This may be how developers accidentally use Dreamweaver MX 2004 at first. Although the style attributes you can define within the Property inspector are limited, it is easy enough to add attributes to existing selectors. And, let’s face it: It sure is handy.
Determine the Overall Appearance of the Page:
- With the CSS test site active, create a new HTML file. Again, this is easy to do from the Start Page if that is showing, but you can also choose File > New; then from the Basic page category, choose HTML. Click Create.
- Save the file into the CSS test site as sampler.htm.
- In the Property inspector, click the Page Properties button to open the Page Properties dialog box. The Appearance category appears by default.
Specify the following settings:- Page font: Verdana, Arial, Helvetica, sans-serif
- Size: 10 pixels
- Text color: #996600
- Background color: #FFFFCC
- Left Margin, Right Margin, Top Margin, Bottom Margin: 0 pixels
- Switch to the Links category, and specify the following settings:
- Rollover links: #CC9900
- Visited links: #CCCC99
- Underline style: Hide underline on rollover
- Switch to Headings category, and specify the following setting:
- Heading font: Courier New, Courier, Mono
- Click OK.
- Switch to Code view and look in the head region of sampler.htm. The CSS code is efficiently written (and note that the TD and TH tags are included with the body tag to receive the appearance stylings).
- Switch back to Design view.
Adding Content to the Page:
To give you an idea of what we have, add some content to this page.
- Type: This is the way text will appear without additional styling. Click Enter/Return to move to the next paragraph.
- In the Property inspector, choose Heading 1 from the Format pop-up menu, then type: This is the way Heading 1 will look. Click Enter/Return to move to the next paragraph.
- In the Property inspector, choose Heading 2 from the Format pop-up menu, then type: This is the way Heading 2 will look. Click Enter/Return to move to the next paragraph.
- In the Property inspector, choose Heading 3 from the Format pop-up menu, then type: This is the way Heading 3 will look. Click Enter/Return to move to the next paragraph.
- Choose Insert > Table, and specify the following settings:
- Rows: 2
- Columns: 3
- Table width: 100 percent
- Border thickness: 1
- Cell padding: 2
- Header: click the third image, which shows the header at the top
- Click OK. A table of that size appears. In the table cells, enter the following information:
- Column 1, row 1: Table heading 1
- Column 2, row 1: Table heading 2
- Column 3, row 1: Table heading 3
- Column 1, row 2: Table content cell 1
- Column 2, row 2: Table content cell 2
- Column 3, row 2: Table content cell 3
- Below the table, type: This is how a link will look. Highlight the word link and type in your favorite URL into the Link text box in the Property inspector. Note that the link appears blue in the Dreamweaver Design view. This is how it will appear in the browser as well since we did not specify a color for the link setting in the Page Properties dialog box. We specified a color for the rollover link and visited link, however.
- To see the other link settings, preview in browser by choosing File > Preview in Browser. If there are no browsers listed, click the Edit Browser List command and browse to locate at least one browser that Dreamweaver can use for previewing. By the way, not all browsers will show the rollover link (Internet Explorer 5 and above does).
- In the browser, click the link to go to the URL you specified. As you hover over the link, some browsers will display the brighter color and remove the underline.
- Use the browser’s back button to go back to the sampler page. The link text will now display the lighter color to indicate that you have already visited that link.
- Close the browser.
So far, everything we have done has involved defining styles for HTML tags. This means that the structure of the body content itself is not affected by the styling choices. But perhaps you want additional flexibility.
Define Custom Appearance Choices in the Form of Class Styles:
- Click Enter/Return after the last line of text on the sampler page, and type: Some things may need to be a different color.
- Highlight the words different color.
- In the Property inspector, click the bold button, and type #336600 in the color text box. Note that the word Style1 has appeared in the Style pop-up menu.
- With the words still selected, notice that the tag selector in the lower left corner of the design window has highlighted <span.style1>.
- With the words still selected, switch to Code view and note that the code highlighted is as following: <span class=”style1″>different color</span>
- Scroll up to the head region and note the code for the style1 class:
- .style1 {
- font-weight: bold;
- color: #336600;
- }
- Switch back to Design view and choose Rename… from the Style pop-up menu.
- In the Rename Style dialog box, choose Style1 if not already selected and type: highlight.
- Click OK and notice that the highlight style has replaced Style1 in the Style pop-up menu. Looking in the code will also indicate that the class has been renamed in the head and in the span tag. You may also see the Results panel appear, indicating the results of what is a successful find and replace function.
- In Design view, select the words Heading 2 in the third line on the page.
- With those words selected, choose highlight from the Style pop-up menu in the Property inspector. You have applied the highlight class style to the text otherwise styled as Heading 2.
Forcing Dreamweaver to Add the Class to an Existing Tag:
Since you applied the highlight class to pieces of text rather than to a block element, Dreamweaver has no choice but to add the <span> tag to your code to hold the class designation. Using this methodology efficiently requires that you understand when to apply the class styles to block elements instead of creating a new tag for holding it. The following example shows how you can force Dreamweaver to add the class to an existing tag.
- Click within the last line of text on the page (the one that reads Some things may need…).
- In the tag selector at the bottom left corner of the design window, select the entire paragraph tag by clicking the <p>.
- In the color text box in the Property inspector, type: #333300. Note that in the design window, the two words colored with the highlight class are still the brighter green, but the remainder of that line of text is now a dark, dull green.
- Switch to Code view and note that instead of adding yet another span tag, Dreamweaver has added a class attribute with the value of Style1 to the existing paragraph tag, <p class=”Style1″>.
- Switch to Design view and choose Rename Style from the Style pop-up menu.
- In the Rename Style dialog box, choose Style1 if not already selected and type: dullndark.
- In the table, click in the middle cell in the second row.
- In the tag selector in the bottom left corner, click the table data tag (<td>). This selects the entire TD tag in the code.
- With the table cell selected, choose dullndark from the Style pop-up menu. This adds the dullndark class to the table cell tag, and will affect any text contained within that table cell.
Setting Off Some of the Class Styles Using the Tag Inspector
As experienced CSS users will have noticed, the choices immediately available within the Property inspector are limited solely to common appearance choices available for text. Let’s set off some of the class styles we have already developed by breaking out the Tag inspector.
- Choose Window > Tag Inspector if necessary to enable this panel group.
- In the Tag inspector panel group, select the Relevant CSS tab.
- Click either within the table cell or the paragraph that has the dullndark class applied.
- Although you can make the changes to that particular class within the Relevant CSS panel, let’s use the CSS Properties panel by double-clicking the dullndark class in the Relevant CSS panel.
- As the CSS Properties panel appears, the page switches into Code view and navigates to the code for that style. Navigate to the Border category.
- Set the following border settings:
- Border-left-color: #996633
- Border-left-style: solid
- Border-left-width: thin
- Switch to Design view (or click in the body of the code in Code view) to switch the panel back to the Tag inspector panel group.
- Save sampler.htm.
The one drawback to this methodology is that you will write styles to the document head itself. You will best leverage the power of CSS if you create external CSS files and link to them, rather than define styles within each page. Although Dreamweaver allows you to export CSS styles to an external style sheet, once they are defined internally, doing so does not remove the internal style sheet code in the head of the document. Could that cause problems later? You betcha!
Define the Styles and Apply Them as You Create the Page
A far more common approach is to generate the CSS styles (or link to an existing external style sheet) independently of the content as you are developing it.
Actually, our sampler page is one approach to use for creating a style sheet: the page doesn’t contain real data, and you can quickly make general decisions about appearance. Even if you use a sampler page, however, you will undoubtedly encounter design needs along the way.
Export any existing styles into an external style sheet:
- Open sampler.htm and duplicate the page by choosing File > Save As.
- Save the file as sampler_external.htm in the CSS test site.
- Choose File > Export > CSS Styles.
- In the Export Styles as CSS File dialog box, save what will be a CSS file as css_sampler.css.
- Although a CSS file has been created containing all of your styles, those same styles also still exist in the head of your document. Launch the CSS Styles panel by choosing Window > CSS Styles.
- In the CSS Styles panel, you will see <style> and the existing styles may or may not be visible indented underneath. This listing includes all of the styles included in the internal style sheet. Select <style> in the CSS Styles panel and click the Delete CSS Style icon in the bottom right of the panel (it looks like a trash can).
- Although the page suddenly looks ugly-and the style code has been removed from the head of sampler_external.htm-the class attributes are still written to the code where those classes were assigned.
- Still in the CSS Styles panel, click the Attach Style Sheet icon.
- Within the Attach External Style Sheet dialog box, click the Browse button and locate the css_sampler.css file you exported in step 4. Click OK, then OK again to return you to the page.
- Note that the page returns to the same appearance, including the table cell and the paragraph of text to which you applied the class styles. The CSS Styles panel now says css_sampler.css instead of <style>.
- Switch to Code view and note that all style code has been removed from the head of the document with the exception of a link tag, which points to the css_sampler.css file.
Using the CSS Styles Panel to Add a New Style
Now that the external style sheet directs the appearance of your file, you need to stay away from the Property inspector. Well, ok… not completely. But you do not want to change color of text with it. Doing so will create a new style, again in the head of the document.
- Using the CSS Styles panel to add a new style.
- Click to the right of the last line on the page, and click Enter/Return to create a new paragraph.
- Notice that the paragraph is preceded with a brown line (because the new paragraph has assumed the class style of the previous paragraph). With your cursor still in the new paragraph, choose None from the Style pop-up menu in the Property inspector.
- Type: Bulleted lines should look nice, too.
- With your cursor still in the same line of text, click the Unordered list button in the Property inspector to set the paragraph as an unordered list.
- In the CSS Styles panel, click the New CSS Style button.
- In the New CSS Style dialog box, choose Tag from the Selector Type list, then choose UL from the Tag pop-up menu at the top. Before you click OK, make sure the
- Define in is set to css_sampler.css. This ensures that the new style code will be written to the external style sheet rather than to the head of the document.
- Click OK. The CSS Style Definition dialog box will appear.
- In the Type category, set Style to italic. In the List category, set Type to circle.
- Click OK.
- Unlike with earlier versions of Dreamweaver, Dreamweaver MX 2004 opens the external CSS file any time you edit a style in an external style sheet. This exercise is no exception. Notice that css_sampler.css is open and has an asterisk next to the file name indicating that it has been changed and needs to be saved.
- Save css_sampler.css.
- The actual bullet will not display differently in Dreamweaver, but you can see a circle in some browsers. The sentence will be italicized.
As you become accustomed to working within the Tag inspector, you may realize you prefer that environment for editing styles. Next, you are going to use the Relevant CSS panel to quickly change the appearance of our existing page.
Use the Tag Inspector for Changing and Creating Styles:
- Click in the first line of the page. The Tag inspector will show there are two rules affecting this item.
- Click the body,td,th line in the Applied Rules column. The lower part of the panel will show the styling that affects these tags. Make the following changes:
- Change color to #333333.
- Change font-size to 12 points (much more readable, huh?)
- Click the body line in the Applied Rules column. Make the following changes:
- Change background color to #CCCCCC.
- On the page again, click in the “different color” text. The Relevant CSS panel should indicate both classes: dullndark and highlight. Choose the dullndark class.
- Remove all three border stylings by clicking to the right of border-left-color and the others, and, when the input field appears with the value, click the delete button.
- Still in the dullndark class, add the following color to the background-color setting: #666666. Also set the color field to #FFFFFF.
- Select the highlight class and change the color to #FFFF00.
- Click within the text set to Heading 1 and click the Tag inspector’s options menu (in the top right corner).
- Choose New Rule.
- In the New CSS Style dialog box, set Selector type to Tag, and choose H1 from the Tag pop-up menu. Define in should already be set to css_sampler.css. Click OK.
Choose the Block category, and set Text Align to center. - Click OK.
You have now made changes to your external CSS style sheet and have seen how you can add new styles using the CSS Styles panel and the Tag inspector. In practice, it is likely you will use both methods to add and manipulate CSS styles. In fact, before you even realize it, you will discover that implementing CSS within your sites is as easy as adding font tags (and a lot more fun!).
Julie Hallstrom is a content coordinator for the Macromedia Dreamweaver Technical Support staff. Formerly a designer who hand-coded Web sites for small companies, she is now the number one fan of Dreamweaver. In addition to writing TechNotes, reviewing Dreamweaver documentation, and designing training materials for Macromedia, Julie has been a technical editor for several books on Dreamweaver and Fireworks.
This article was last modified on January 8, 2023
This article was first published on November 21, 2003
Commenting is easier and faster when you're logged in!

Recommended for you
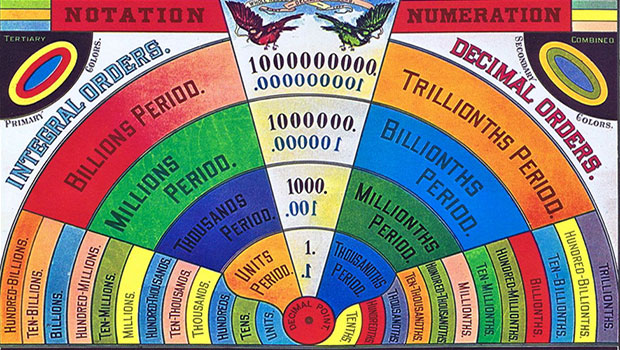
Scanning Around With Gene: A Printed “Teaching Machine” from 1894
I grew up in the era of so-called “new math,” a fairly radical and short-lived a...
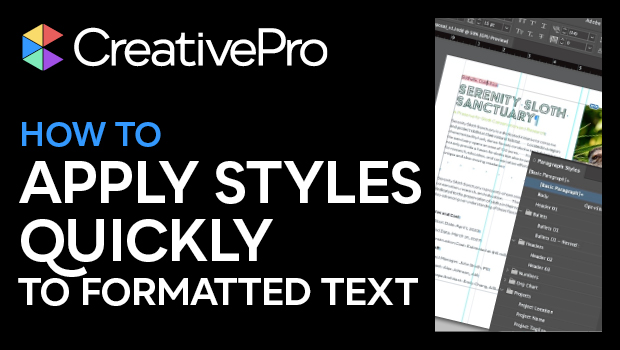
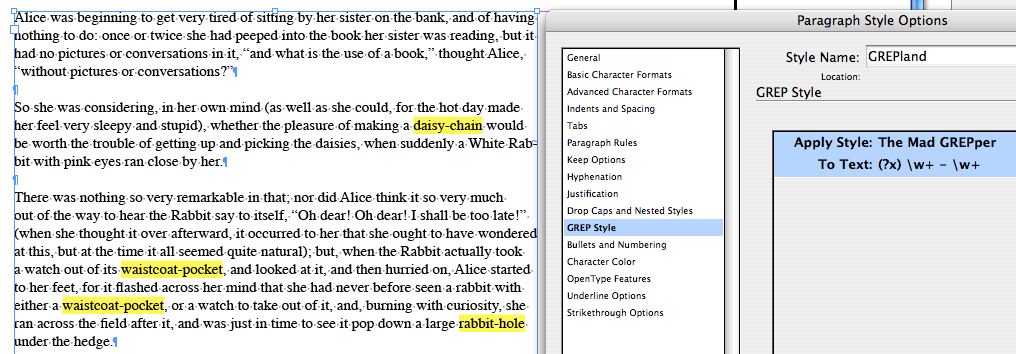
How to Apply Styles Quickly to Formatted Text in InDesign
Learn how to take InDesign text that has formatting already applied and assign s...

Harnessing the Power of Text Variables and IDML
Learn how Jeff Potter built a system for harnessing the power of text variables...