
View Source: Make Your Links Unforgettable

Most Web usability books (for example, Steve Krug’s excellent Don’t Make Me Think) emphasize that the less you make a visitor think and work, the more likely they’ll visit, enjoy, and benefit from your site. The typical HTML link is one of those things that make visitors work — a single linked word, for example, is a small target that requires good aim to hit. That’s one of the reasons Web designers make navigation bars with buttons that are larger than the text inside them.
For especially important links — the ones you really want users to click — it would be great to transform a handful of linked words into a large clickable block. For example, a large <div> tag with text and images makes a more enticing and easier to click target than a just a few linked words. Unfortunately, the <a> tag used to create links is an inline element — meaning it can only appear inside of a block-level element like a <div> tag, paragraph, bulleted list item, or headline; and you certainly can’t wrap a link around several paragraphs to create a large link target.
However, with a dash of CSS and a little help from JavaScript, you can turn a drab link, into a large clickable button (Figure 1).
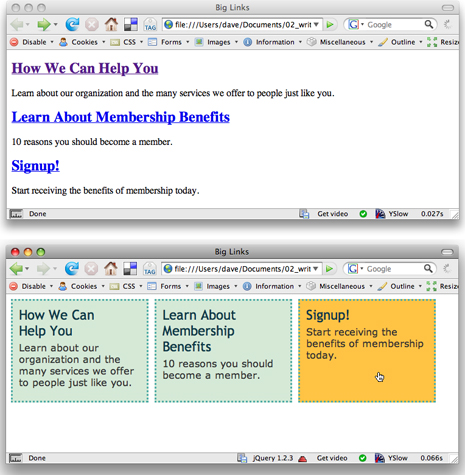
Figure 1. Normally, text links are too small to be an easily clickable target (top). With a little CSS and JavaScript, you can turn an entire <div> into a clickable link, complete with rollover effects (bottom).
Now take a look at a working model of what you’ll end up with:
Big Links site
The Concept
In this tutorial, you’ll be turning a <div> tag into a clickable link with a little CSS and JavaScript magic. The top image in Figure 1 above shows the starting point. There are three heading 2 tags; each heading 2 contains a link pointing to a different page; and below each link is a paragraph providing more information about the link. Finally, a <div> tag surrounds both the heading and the paragraph. In other words, this page has three <div> tags that you’ll turn into links.
To start, you’ll add a few CSS rules to make each <div> tag look more like a button; next you’ll add a little JavaScript to turn the <div> tags into links; and then finally, you’ll add a bit more CSS to provide a nice rollover effect for each div.
Getting Started
I’ll be working in Dreamweaver for this tutorial, but you can use any text-editor to add the CSS and JavaScript that make this effect work. If you want to follow along, download this ZIP file:
big_link_site.zip
Once the file is unzipped, you’ll have a folder named big_link_site containing all of the necessary files. Put this folder anywhere on your system you’d like — your desktop, for example — and take the following steps:
1. Launch Dreamweaver.
2. Choose Site > New Site. Click the Advanced tab in the Site Definition window, type Big Link for the site’s name; click the folder icon to the right of the “Local Root Folder” field and select the folder you downloaded — big_link_site. Click OK to finish defining the new site.
3. In the Files panel, double-click the file biglink.html (or choose File > Open and open the file biglink.html in the big_link_site folder.)
Adding Formatting
First, you’ll create several CSS rules to format the basic appearance of the text, links and <div> tags on the page.
1. If the CSS Styles panel isn’t already opened, choose Window > CSS Styles to open it. The styles panel is your command center for creating, editing and managing CSS styles (left image in Figure 2).
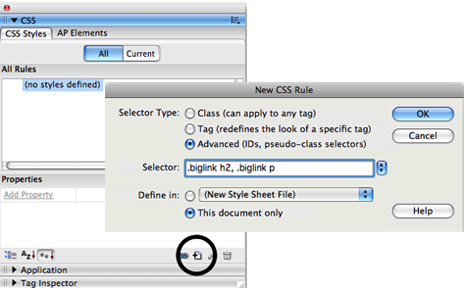
2. Click the “New Rule” button (circled in the left image in Figure 2) to open the New CSS Rule Window (right image in Figure 2).
3. Click the Advanced button, and type .biglink h2, .biglink p in the selector box. Make sure the “This document only” button is selected and click OK.
The CSS Rule definition window opens. You’ve just created a CSS style that will apply to every h2 and p tag that is also inside another tag with a class of biglink applied to it. Each of the <div> tags has the class biglinkapplied to it — the HTML looks like <div class=”biglink”> — so this rule will effect the heading 2 and paragraph tags inside those divs.
4. Select the Box category in the CSS Rule Definition window, and type 0 for both the padding and margin settings. Click OK to complete the style. This step eliminates any space that might normally appear around the tags and makes the h2 tags site right on top of the paragraphs.
Figure 2. The CSS Styles panel (left) lets you create and manage styles; the New CSS Rule window (right) lets you create a new CSS style.
5. Click the “New Rule” button on the CSS Styles panel again and create an advanced style named .biglink a. This style will apply to all links inside the <div> tags.
6. In the “CSS Rule Definition” window, select the Type category. Choose a font from the font menu, type 22 in the size field, check the “none” box under the Decoration option, and set the color to #0E3B4A. This removes the underline that normally appears under links and changes the font color, size and family.
7. Click the “New Rule” button on the CSS Styles panel again and create an advanced style named .biglink p. This style will apply to all paragraphs inside the <div> tags.
8. In the “CSS Rule Definition” window, select the Type category and choose “Verdana, Arial, Helvetica, sans-serif” from the font menu, and set the color to #333333. Click the Box category and uncheck the “Same for all” box under the Margin property. Type 5 in the margin’s Top box — this adds 5 pixels of space between the paragraph and the headline above it. Click OK to complete the style.
Now it’s time to format the <div> tags so that they look more like clickable boxes. You’ll start with basic formatting first.
9. Click the “New Rule” button on the CSS Styles panel again and create an advanced style named .biglink. This style applies to each <div> tag. First you’ll add a background color and border.
10. In the “CSS Rule Definition” window, select the Background category and set the background color to #D5E9D7. Click the Border category and select “dotted” from the style menu, type 3 in the width menu, and set the border color to #51ADA6.
At this point, the <div> has a border and background color, but isn’t yet positioned into the three side-by-side boxed pictured in Figure 1 above. To get that effect, you need to turn to the CSS float property.
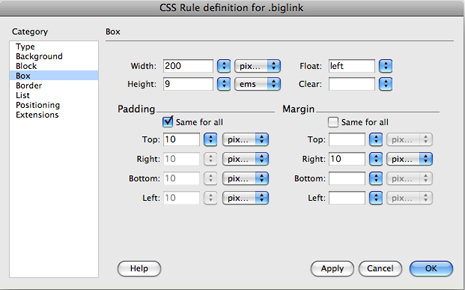
11. Select the Box category. Set the width to 200 pixels and the height to 9 ems; choose left from the float menu; type 10 in the Padding box; uncheck the “same for all” box under Margin, and type 10 in the right margin box. The CSS Rule Definition window should look like Figure 3, below. Click the OK button to complete the style.
There are a few things going here. First, the width is set to a specific pixel value — 200px. This assures that the box will remain a set width. A height setting is really only necessary when you want each of the div tags to be the same height and the amount of content inside each div varies. That is, if the same amount of information (same number of letters, for example) is in each box, they’ll automatically be the same height. However, if, as is the case with this page, there’s more content in one box than another, then you need to set a height. I choose a setting of 9 ems. An em is a relative measure, so if someone increases the overall font size of their browser, the box will grow taller.
The padding setting — 10 pixels — puts 10 pixels of space around the inside of the each div, providing a little breathing room between the content and the div tag’s edges. Likewise, the margin setting adds a bit of space between each div.
Finally, the left float makes the boxes wrap around each other creating the effect of side-by-side boxes.
Figure 3. The Box category of Dreamweaver’s CSS Rule Definition window lets you set properties that affect the size and positioning of an element, as well as the space inside and around that element.
Adding the JavaScript
At this point, only the headlines inside each box are clickable links. Clicking on the div or paragraph won’t take you to another page. For that you need to add a little JavaScript. A few years ago, this would have been a major undertaking, but, thanks to the growing number of free JavaScript libraries, it’s a lot easier to add sophisticated JavaScript effects to a Web page.
In a previous “View Source,” I introduced the jQuery JavaScript library and demonstrated how to use it to enhance the appearance and functionality of an HTML table. This month, I’ll use the jQuery library again and a separate chunk of JavaScript known as a jQuery plug-in, which will add all the programming we need.
The Biggerlink plug-in, created by Oliver Boermans, provides all the programming code you’ll need to turn a <div> or other block-level element into a clickable link. In fact, thanks to this plug-in, you’ll hardly have to type any JavaScript to get the effect we’re after.
I showed you how to do link to an external JavaScript file in the previous “View Source” by typing the proper HTML code. This time, I’ll demonstrate a simple Dreamweaver way of linking to a JavaScript file.
1. In Dreamweaver, choose View > Head Content. This opens a small bar between the Web page and the document toolbar (Figure 4). This area represents the HTML that goes inside the <head> tag of the web page — for example, meta tags, the <title> tag, and CSS style sheets.
Figure 4. The HTML tags in a page’s <head> are visible in the bar directly above the document. Icons representing the different head tags — the title tag, meta tags, style sheets, and so on — appear in this area.

2. Click anywhere inside this area, then choose Insert > HTML > Script Objects > Script. The Script window appears (Figure 5).
Figure 5. The Script window lets you link to an external JavaScript file by clicking the folder icon (circled).
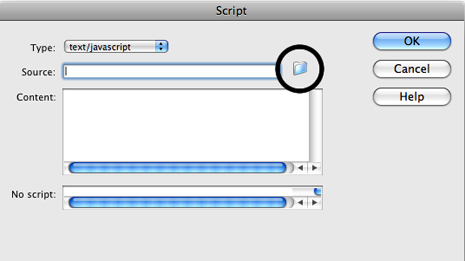
3. Click the folder icon to the right of the Source field (circled in Figure 5); the select file window appears. Navigate to the js folder inside the big_link_site folder, and double-click the file jquery.js. Click OK in the Script window to link the external JavaScript file to the page.
This step adds the proper HTML to the head of the page to link the JavaScript file. You can, of course, type the required HTML by hand in Code View, but this method makes sure you get the proper path to the JavaScript file, without having to figure it out yourself.
4. Repeat steps 2 and 3, but this time select the file jquery.biggerlink.js.
You must attach the two files in the order specified here. The jquery.biggerlink.js file depends on the programming code in the jquery.js file, so the jquery.js file must appear first in the HTML.
You’re almost done. At this point, you do have to go into Code View and type a small amount of JavaScript code.
5. Click the Code button in the Document window (or choose View > Code) to see the raw HTML for the page. Locate the closing </head> tag and directly before that tag, add the following:
<script type=”text/javascript”>
$(document).ready(function() {
$(‘.biglink’).biggerlink();
});
</script>
I won’t go into any detail about what the <script> tags and the $(document).ready(function(){ line do. The previous “View Source” explains it.
The important part here is the line $(‘.biglink’).biggerlink();. The first part — $(‘.biglink’) — identifies the elements you want to turn into big clickable links. In this case, each of the <div> tags has the class biglink assigned to it. $(‘biglink’) is a fancy jQuery way of selecting each of those divs (again, you can read about this concept in the previous article). With those divs selected, it’s just a matter of applying the biggerlink() function. And that’s it — all of the complex programming is taken care of by the plug-in.
6. Save the file, and preview it in a Web browser. Click on the border, background color or paragraph inside a div — the browser loads the Web page linked to in the headline.
There are a few final touches that will improve the effect. For example, the mouse doesn’t change to the pointer usually associated with links — instead of turning into a pointing finger when you mouse over the div, the mouse remains a text insertion bar. In addition, it would be nice to provide a little feedback — like changing the div’s background color — when the mouse moves over a clickable div. You can do that easily with a little CSS.
Adding a Hover Effect with CSS
The Biggerlink plug-in automatically adds the class name hover to any block-level element that has the biggerlink() function applied to it when a user mouses over that block-level element. In other words, when you mouse over one of the divs on this page, it automatically has a hover class applied to it; when you move the mouse off the div, the class is removed. This lets you create styles to format the div and the content inside it to change appearance when moused over.
1. Click the Design button to leave Code view and return to the designer-friendly WYSIWYG view (you could also choose View > Design.)
2. In the CSS Styles panel, click the New Rule button (see Figure 2), and create a new class style named .hover. Click the Background category in the CSS Rule Definition window, and type #FFC344 into the background color field.
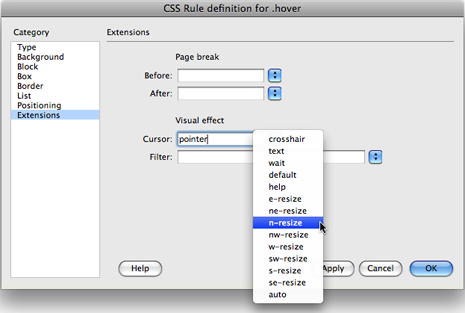
3. Click the Extensions category (Figure 6). You can choose a cursor from the cursor menu; however, the one we want isn’t listed. So just click into the cursor field and type pointer. Click OK to complete the style.
Figure 6. You can use CSS to make the cursor change when the mouse is moved over an element.
4. Save the page and preview it in a Web browser. When you mouse over a div, its background color should change to an orange yellow and the cursor should turn into a pointing hand.
Applying This Effect To Your Own Pages
You can use the steps outlined in this tutorial to create big links on your own pages. Here are a few other tips to help guide you:
- You can turn any block level element into a clickable link: a heading, a list item, a paragraph. But most commonly, you’ll use a <div> tag.
- The block-level element should only contain one link. In other words, if you want to make it so that clicking a div takes you to page A, you must include somewhere in the div a link to page A, and you should avoid including links to other pages inside that same div.
- At times, you may not want to use hover as the class name for styling the big links created with the Biggerlink plug-in — for example, you may have already created a class style named hover and applied it to different elements on your site. To replace hover with your own class name, call the biggerlink() function like this:
$(‘.biglink’).biggerlink({hoverclass:’yourStyleNameHere’});
In other words, you need to put {hoverclass:’yourStyleNameHere’} inside the parentheses of the biggerlink() function, and replace ‘yourStyleNameHere’ with the name of the CSS class style you wish to use.
- In this tutorial, you created a style — .hover — that changed the appearance of the div when the mouse moves over it. However, you might also want to change the formatting of tags inside that div. For example, if you change the background of the div to black, you might want to change a paragraph inside that div to white. You can use CSS descendent selectors for that; for instance, .hover p will format every paragraph inside the moused over div.
To learn more about the Biggerlink plug-in, visit its Web site.
This article was last modified on January 8, 2023
This article was first published on April 30, 2008
Commenting is easier and faster when you're logged in!

Recommended for you

Hunting the Elusive Plus Symbol (Local Formatting)
Chad wrote us about an InCopy problem that's not limited to InCopy; I've been as...
Find More Than One Paragraph with GREP
GREP is, by default, set up to find text inside a paragraph. That is, if you sea...

InDesign Template: Interactive Newsletter
This is a template for a newsletter that you can output in three different forma...