
Using the Dimension Tool in Illustrator
Your guide to adding live, dynamic measurements to your vector artwork


This article appears in Issue 35 of CreativePro Magazine.
With the 2024 release of Illustrator, Adobe introduced the Dimension tool, which allows you to add three types of dimensions to your artwork: linear (for straight-line measurements), angular (for angles), and radial (for a circle’s radius and diameter). The process is easy, and the dimensions stay live, automatically updating as you resize your artwork.
Getting Started
Clicking the Dimension tool opens its taskbar, where you can choose a specific dimension type or access the Dimension Tool Options dialog box via the gear icon. (For a closer look at dimension terminology, check out “What Makes a Dimension Object?” below.)
To create a dimension object, select the dimension type from the taskbar and hover over the Illustrator objects you want to measure. Pink previews of arrows, lines, and measurements will activate (Figure 1). Then, click and drag to place the dimension you want.
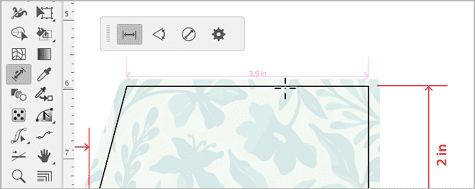
Figure 1. Hover with one of the Dimension tools to activate a pink preview of both the arrow elements and the measurement. Click and drag to create the dimension objects.
Linear dimensions
For linear dimensions, the tool automatically reads the distance between corner points in your artwork when you hover over a path. Simply click, drag away from the art, and release to place the dimension.
Typically, you’ll drag to create a dimension that is parallel to the side you’re measuring. But if needed, you can drag your cursor to align with the horizontal or vertical measurement (you’ll see it snap into place) before releasing
to place the dimension. This can be especially helpful when you’re measuring along a diagonal.
Prefer to plot dimensions manually? It’s a three-click process. First, click just outside the path to set the first end of the measurement. Move your pointer and click a second time to set the other end. Then, move your pointer away from the path and click to place the dimension object. To constrain your clicks in a straight line, hold Shift. To dimension one panel of the box shown in Figure 2, click alongside the path at two points, then hover away from the path and click to place the dimension.
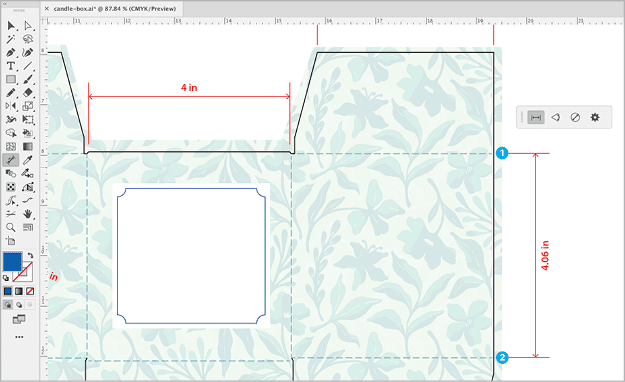
Figure 2. It takes just three clicks to add a dimension object to a line.
Here are a couple of essential keyboard shortcuts to use with the Dimension tool.
- Press the Esc key to release the pink guides and start again.
- Hold Option/Alt and click to create width and height dimensions simultaneously.
Angular dimensions
For angular dimensions, the tool reads the angle at its corner point. Click and drag away from a corner point (inward for an interior angle or outward for an exterior angle) to create a dimension, and release to place it (Figure 3).

Figure 3. To add an angular dimension, click both lines, then click to place the dimension object.
For two separate lines that intersect without a corner point, you can manually plot the angular dimension by clicking each line, then moving your pointer inward or outward from the intersection, and finally clicking to place the dimension.
Radial dimensions
Radial dimensions can be created only on perfect circles or arcs. Hover over the path, then click and drag inward for the diameter or outward for the radius, and release to place the dimension (Figure 4).

Figure 4. Drag inward from the edge of a circle to measure its diameter, or outward to measure its radius.
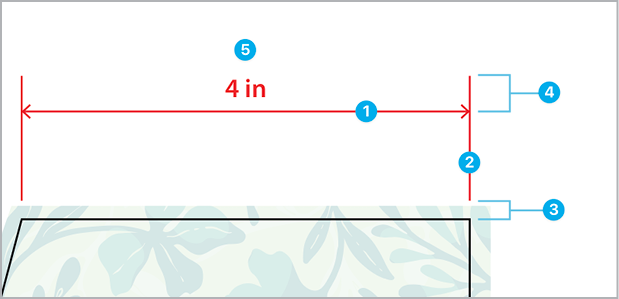
What Makes a Dimension Object?
In Illustrator, a dimension object is made up of several key components:
1. Dimension line: A line with arrows on both ends that indicates the measurement.
2. Extension lines: The lines that extend perpendicularly from the dimension line. The more you drag, the longer they get.
3. Offset: The space between the extension lines and the path you’re measuring.
4. Extension: How far the extension lines stretch beyond the dimension line.
5. Dimension text: The label that shows the measurement. It can be positioned on either side of the dimension line.
Working with Dimensions
Dimension objects remain live and will automatically update as you scale the paths they’re attached to. When repositioning a dimension object, always use the Dimension tool—not the Selection tool—to avoid expanding it. Once expanded, it’s no longer attached to your artwork and turns into a group of paths and live text.
The Dimensions layer
Illustrator conveniently creates a separate Dimensions layer and places your dimensions there (Figure 5). Be sure to check which layer is selected as you create new artwork. Accidentally drawing on the Dimensions layer won’t harm anything, but it can clutter your document and complicate showing or hiding dimension objects.

Figure 5. A new Dimensions layer is added to your document when you create a dimension object.
Copying objects with dimensions
When copying an object with dimensions attached, the dimensions won’t be copied. To retain them, you can expand the dimension object first by selecting it and clicking Expand in the Properties panel.
Dimension settings and styling
You can fine-tune the font and styling of your dimensions by adjusting the settings in the Properties panel and the Dimension Tool Options dialog box. Once I figured out how to navigate between these two places, I became much more efficient with this tool.
The Dimension Tool Options Dialog Box
You can access the Dimension Tool Options dialog box by clicking the gear icon in the Dimension tool taskbar. Here, you can fine-tune such settings as units of measure, scale, precision, and styling for any future dimensions you create. Keep in mind that the changes you make here won’t affect your existing dimensions but will apply to any new dimensions you create in any open document (Figure 6).
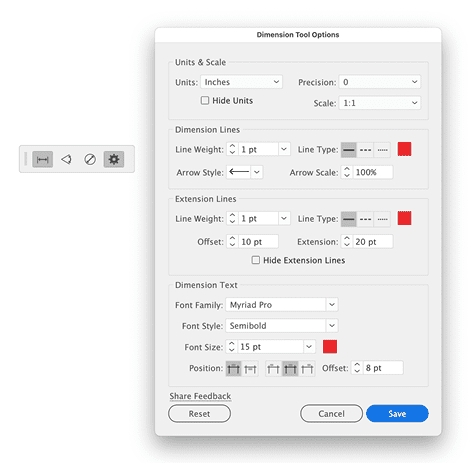
Figure 6. Use the Dimension Tool Options dialog box to choose settings for new dimension objects.
Units and precision
You can select from a variety of units or stick with your document’s unit of measure. The Precision menu allows you to choose up to three decimal points, or if you’re working with feet and inches, precision down to 0.25 inches. If you find this isn’t precise enough for your needs, consider giving Adobe some feedback through the Illustrator User Voice forum. Adobe is always improving the tool, and your input helps everyone. (Weigh in here: The Dimension Tool Precision menu needs more precise options.)
Scale
By default, the scale is set to 1:1. You can choose other scaling ratios from the menu or create a custom scale to suit your project.
Styling options
You can tweak the styling of your dimensions, including line weights, arrowheads, colors, and fonts. If you want to revert to the default settings, click the Reset button, which changes the type to Myriad Pro and sets all lines and arrowheads to black. Once you’re happy with your settings, click Save to apply them.
The Properties Panel Settings
The Properties panel (Window > Properties) gives you control over the styling options for your selected dimension object, allowing you to adjust lines, text, units, and precision. However, note that you can’t change the scaling ratio for selected objects here—that’s available in the Dimension Tool Options dialog box only (see “Creating Scaled Drawings”).
How to change the styling throughout your document
To apply a consistent look across all your dimensions, start by selecting a dimension and tweaking any styling options you want in the Properties panel. Once you’ve got the style just right, click Apply To All at the bottom of the panel (Figure 7). This instantly applies your chosen settings to every dimension in your document.

Figure 7. Use the Properties panel to apply a consistent look across all your existing dimensions, or to set a style as the default for new dimension objects.
If you want all future dimensions to match this styling, click Set As Default. You’ll notice this change next time you open the Dimension Tool Options dialog box.
Creating Scaled Drawings
When I’m planning to rearrange furniture in my house, I like to map out my ideas first—saves a lot of heavy lifting later! For my studio drawing (Figure 8), I set up a 1 inch = 12 inches (1 foot) scaling ratio, so I could print my plans at a manageable size. I clicked the gear icon in the taskbar, set a custom scaling ratio of 1:12, and adjusted the units to feet and inches.
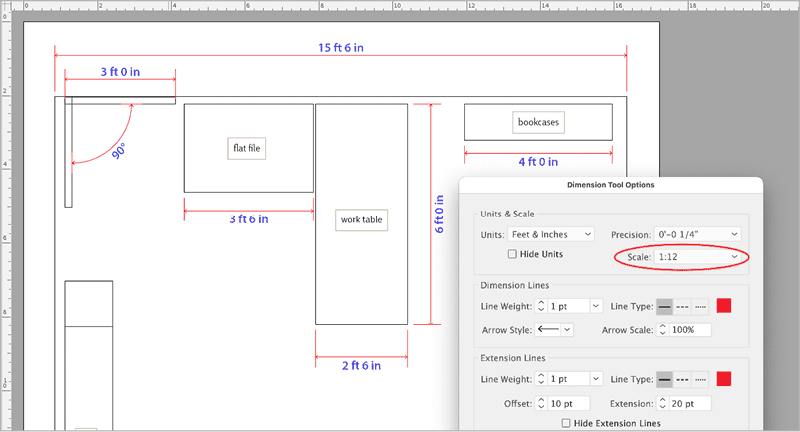
Figure 8. You can easily label the correct dimensions on a studio floor plan drawn to scale.
Warning: One thing I learned: It’s best to start with the scaling ratio you need, because changing it later can be a hassle. Updating the scaling means you’ll have to redraw dimensions manually to display the new ratio. Because you can change the scaling ratio only in the Dimension Tool Options dialog box, any adjustments you make will apply to new dimensions only. Unfortunately, there’s no way to update the scaling ratio for existing dimensions across your document—at least, not yet.
How to Save Your Styling
If you’re hoping to save a preset for your favorite dimension styling, you might be a bit disappointed. The Dimension tool doesn’t yet offer a way to save custom styling presets for easy access. My workaround? I save a separate document with my preferred styling. When I need it, I open my “presets” document, select the dimension I want, and in the Properties panel, click Set As Default. Then, when I go back to my current project, my next dimension will automatically adopt that style (Figure 9). For the dimensions already in place, I can update them to the new style by selecting a new dimension and clicking Apply To All.
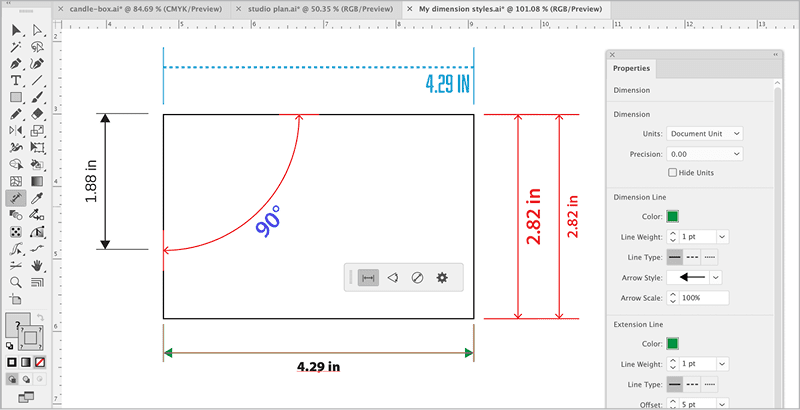
Figure 9. Having a document containing all the dimension styles you want to use is a good workaround until Adobe adds presets you can choose from.
Dimension objects will be stripped out of any artwork you try to save as a graphic in a CC Library, so it’s best to keep your style settings in an Illustrator or Illustrator Cloud document (AI or AIC). If you’d like to see custom presets added, you can upvote it here: Dimension Tool Style Presets at UserVoice for Illustrator.
Adding a New Dimension to Illustrator
I hope this guide helps you get the most out of Adobe Illustrator’s new Dimension tool. Happy dimensioning, and if you discover any tips along the way, don’t hesitate to share!
Commenting is easier and faster when you're logged in!

Recommended for you

Heavy Metal Madness: Treasures From Scrap
Perhaps it’s the voyeur in me, or maybe it’s a desire to live in the...

This Week in InDesign Articles, Number 30
Read, watch, ingest... for tomorrow we may InDesign!

FontAgent Pro Provides Font Management and Repair for QuarkXPress 7 Users
Insider Software today announced the immediate availability of the industry...