

Illustrator provides many useful methods to create color blends including the Gradient Tool, Mesh Tool, and Blend Tool. The Gradient Tool is powerful and effective and most importantly very intuitive, so is a valuable asset in any illustrator’s toolbox. The Mesh Tool is also powerful. It’s great for creating realistic effects, but unlike the Gradient Tool it’s not very intuitive nor easy to use especially when attempting to reselect points of colors you would like to blend. Which brings me to one of my favorite ways of blending colors in Adobe Illustrator: the Blend Tool!
The Blend Tool lets you create blends between two or more objects by simply clicking on them (when using the Blend Tool’s menu option Object > Blend > Make, you must have the objects selected). You can create blends between objects with multiple appearance attributes (effects, fills, or strokes), even objects with patterns, symbols, and varied blending modes. All of these options are great and useful, but my favorite way to use the Blend Tool is blending solid color filled objects. Blending various solid colored shapes in different tones helps create forms in a very flexible free flowing way, unlike the ways preset gradients and mesh gradients work.
For example, let’s examine an illustration of a baby pig and see how the little guy was made using blended shapes.
The Foundation
You can see in the outline mode art (Figure 1) how basic shapes were created to form the contours of our little piglet.


Constructing The Blend Shapes
Let’s create the hind quarters.
Some blended shapes will adjoin the outside edge of your object like this hind quarter region. To assure this blend aligns with the edge, choose the Direct Selection Tool (A), click the section between the two anchor points (Figure 2), then select Copy and Paste in Front using Command/Ctrl-C, then Command/Ctrl-F. (Copying then pasting a direct-selected path segment pastes a new path formed only from that section between the two anchor points.)

The remainder of this larger blend shape can now be drawn (Figure 3) using the Pen Tool (P) by clicking and dragging points to complete its shape.
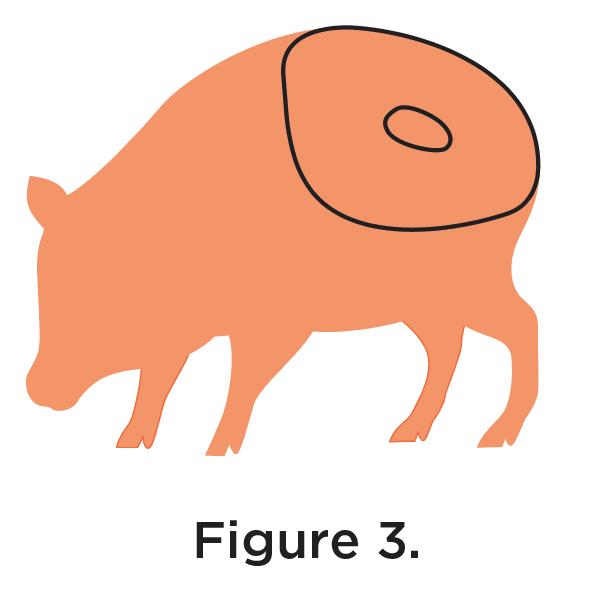
The right edge will perfectly align with the edge underneath it because we copied and pasted a portion of that same exact path. The smaller interior shape is made by selecting the outer shape with the Selection Tool (V), then Option/Alt-click dragging towards the center of it, which simultaneously scales and copies the path.
Adding Color To The Blend Shapes
Now comes the fun part. Coloring!
To create the piglet’s hind quarter blend, fill the larger shape with the same color of the base object (beige), then fill the smaller shape with a similar lighter color (Figure 4). Note: Red stroke is just for demo purposes.

Blending Shapes!
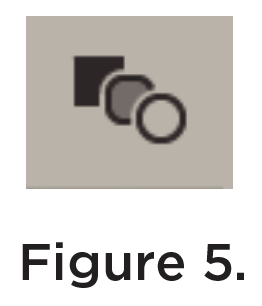
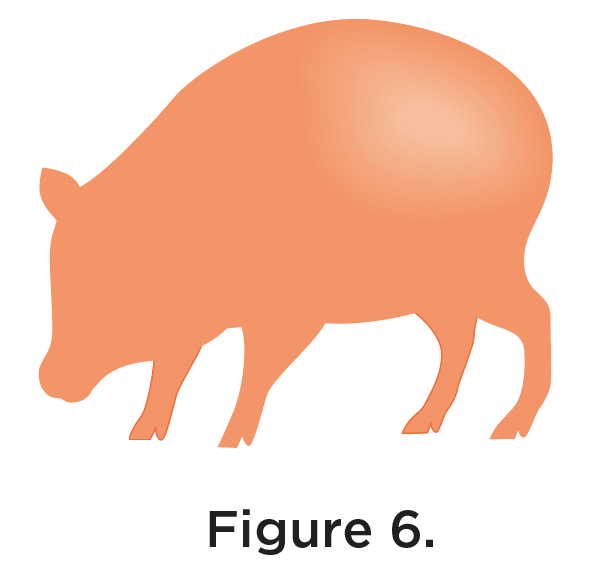
Last but not least, to blend the two objects, select the Blend Tool (W) from the toolbox (Figure 5), then simply click on each of the two shapes you are blending and presto! (Figure 6)
You are now on your way to creating your first blended shape piglet.
Note: To unblend a blend, go to Object > Blend > Release. The Object > Expand… command will not release a blend, it will expand the blend into separate objects, which may be useful if that is your goal.
Blended Shape Gallery

This article was last modified on June 25, 2018
This article was first published on June 25, 2018
Commenting is easier and faster when you're logged in!

Recommended for you

How to Straighten Photos Taken at an Angle
It’s hard to photograph many images head-on. For example, if you try to shoot a...

Introducing The Adobe Illustrator Summit—An Online Event, August 26–27, 2021
Level up your Adobe Illustrator skills Join us online August 26–27 for The...

Quick Guide: Two-Pass Sharpening in Photoshop
The steps below summarize the two-pass sharpening technique described in “...