
Using Neural Filters in Photoshop
This AI production sports some superstars and a few not quite ready for primetime players.


This article appears in Issue 31 of CreativePro Magazine.
Look up neural in the dictionary, and you will find this definition: “of or relating to a nerve or the nervous system.” Look up the term in Adobe Support, and you find Neural Filters. The promise of these evolving and aptly named Photoshop filters is that they are part of a connected network, powered by a machine learning model, known in Adobe parlance as Adobe Sensei, that will dramatically reduce difficult workflows to just a few clicks. Should we believe the hype? In practice, Neural Filters are like a modernized version of the old Filter Gallery. Some are gimmicky; others have practical applications. Most require a lot of processing power. I’d been reluctant to dive into Neural Filters after my early forays resulted in a lot of spinning beach balls and few tangible results. But I felt I could ignore them no longer. While still changing, the offerings have solidified, and although not totally stable, they are more stable than they were. The examples I’ll discuss later are Neural Filters I consider “successful.” Although I must confess, I had a low bar for success: I didn’t hate their results. Before we dig into individual filters, however, consider some Neural Filter basics.
Experimental
To begin, choose Filter > Neural Filters. This switches you to a new workspace where all the normal tools and panels are hidden, and the entire window is devoted to working with Neural Filters (Figure 1).
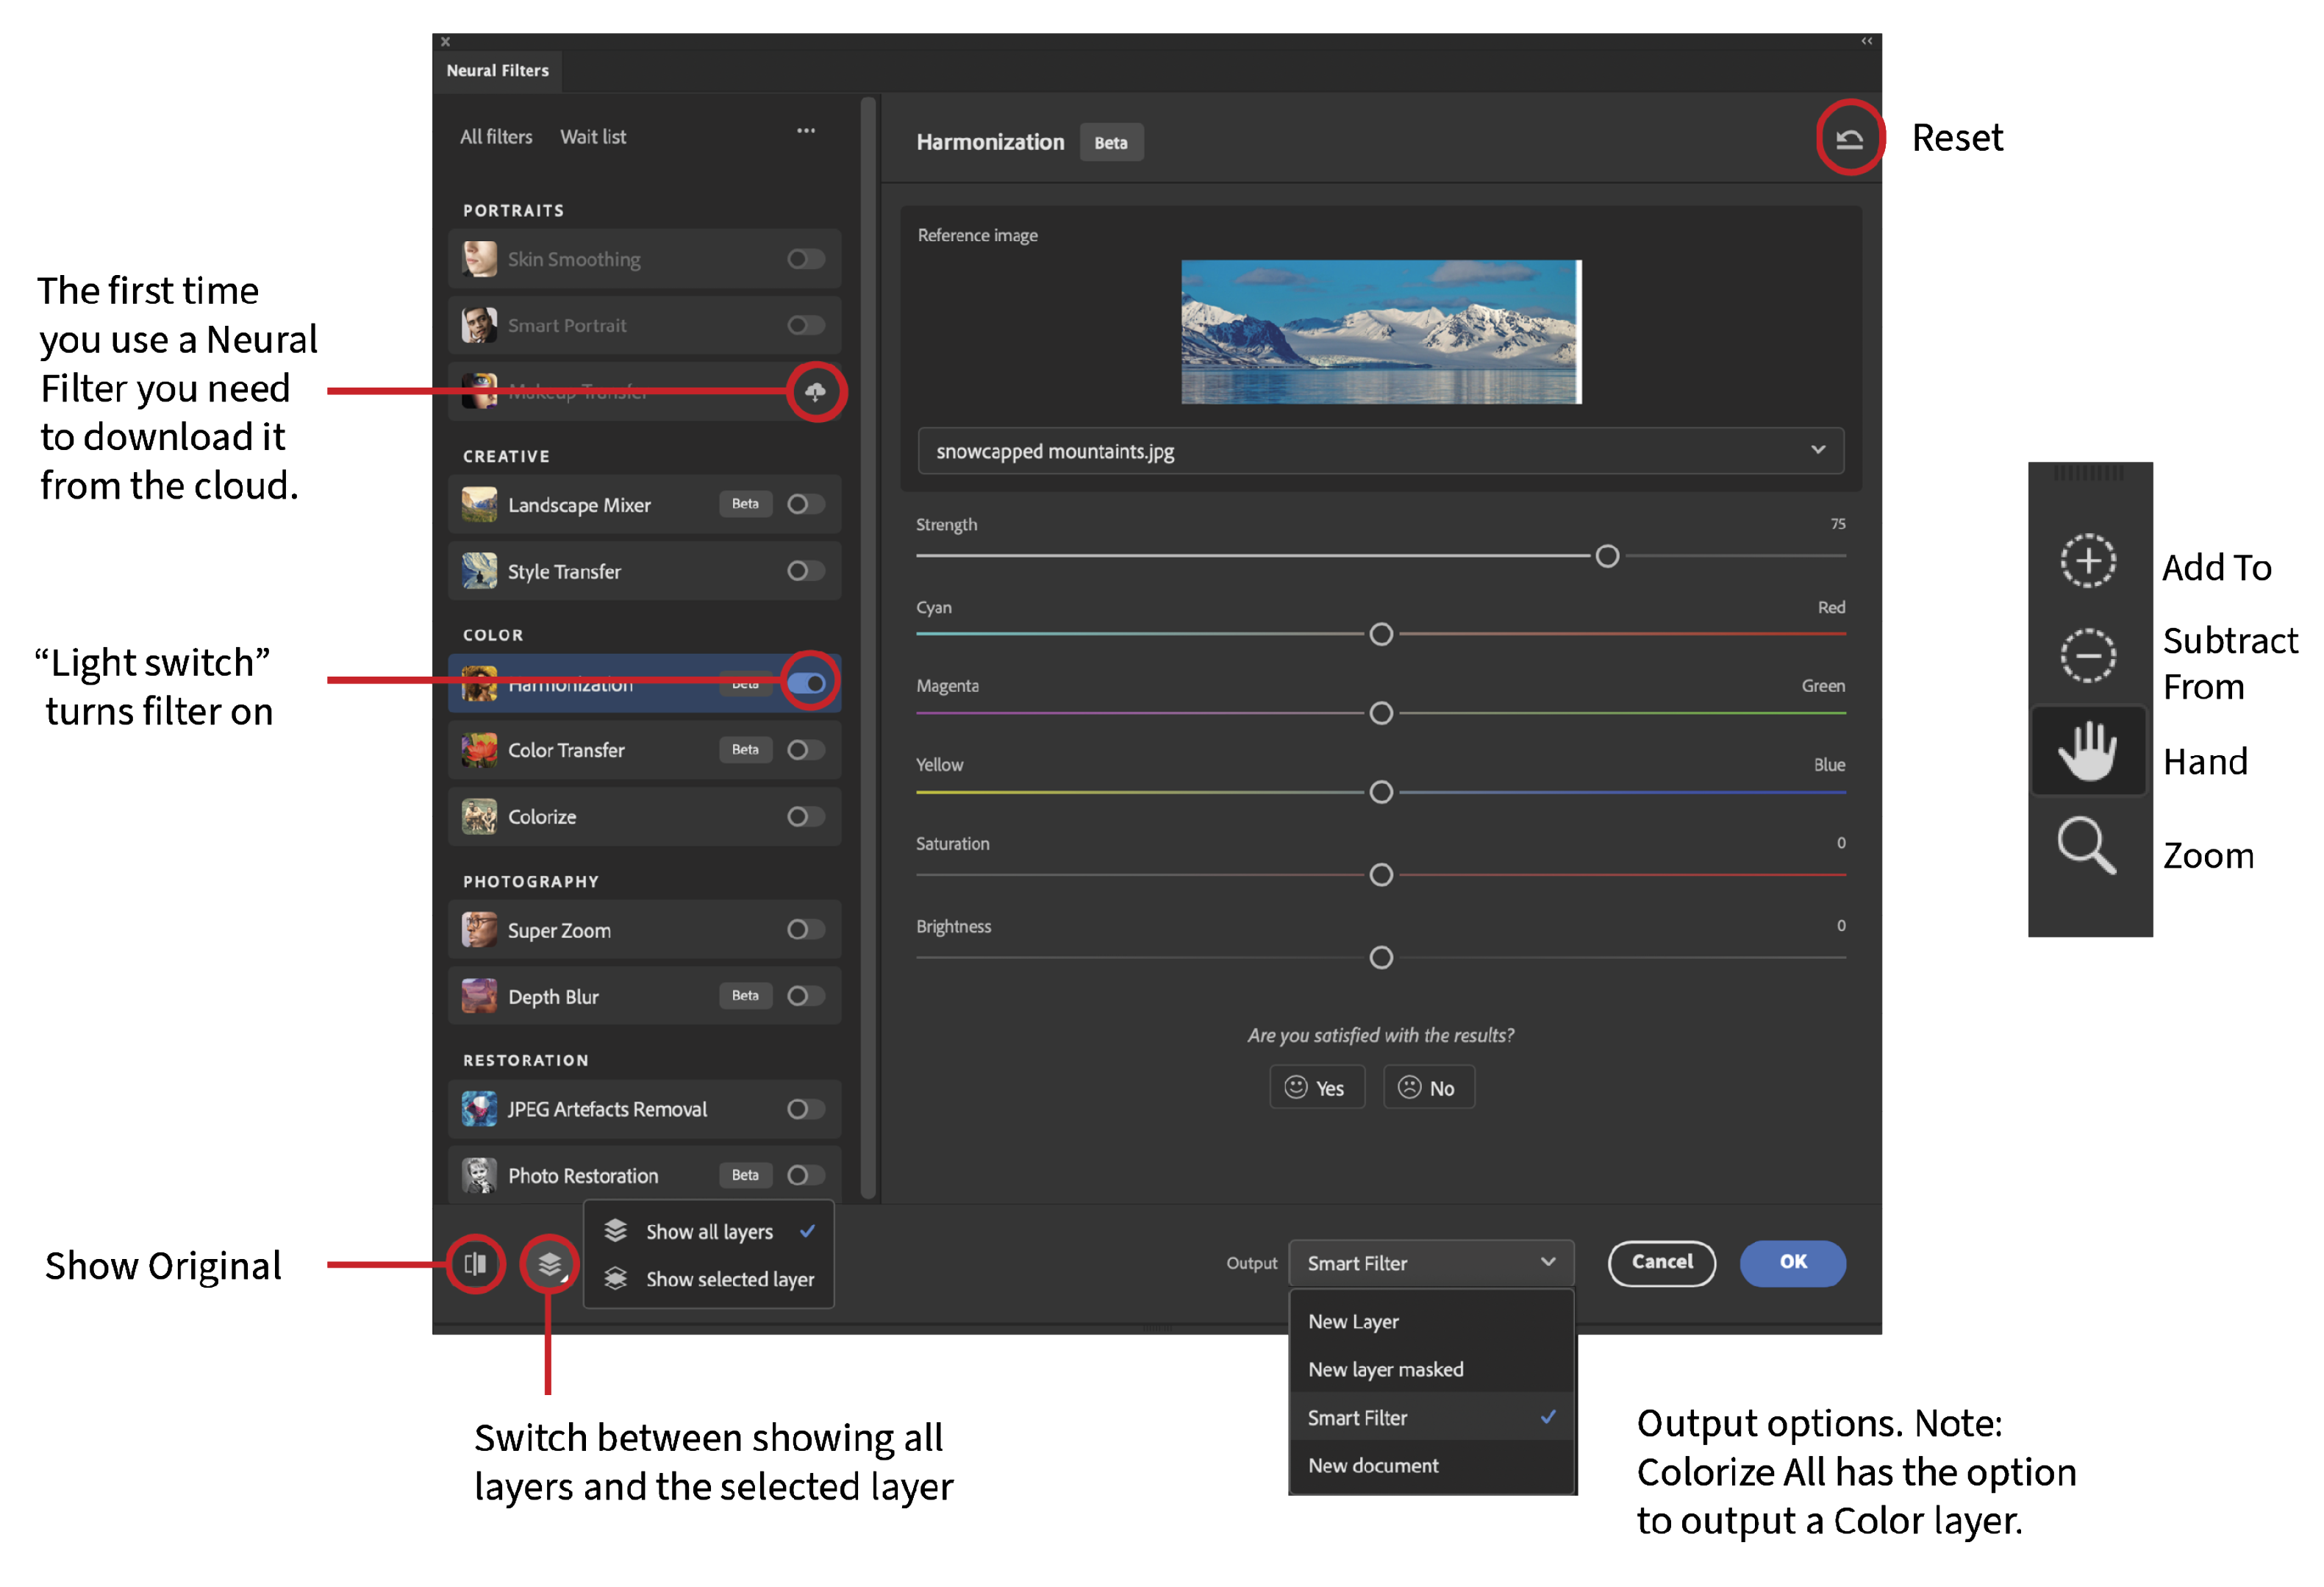
to layers icon reads "Switch between showing all layers and the selected layer." Output menu shown as drop-down with Smart Filter option checked. Labeled "Note: Colorize all has the option to output a color layer." Upper right icon (curved arrow pointing backwards atop a horizontal baseline rule); callout reads "Reset." Toolbar identified from top to bottom: Add to, subtract from, hand, zoom. ” width=”1000″ height=”683″ /> Figure 1. The Neural Filters workspace
- Featured: The behavior of these filters will be more stable.
- Beta: The machine learning models or workflows are still being improved, which means that some sliders and options may not work, and some results leave a lot to be desired.
- Wait List: These filters aren’t available yet, but you can be tantalized by seeing their name. Click the Interested button to be informed of future updates.
System Requirements
There’s no getting away from the fact that you need a lot of computing power to run Neural Filters. On my older iMac Pro (64 GB of RAM) the filters were erratic and very slow. On my 18-month-old MacBook Pro with an M1 chip, the performance was a lot faster. You can read the system requirements here.
Common Features
Before applying any of the Neural Filters, you can use the Add To Subject and Subtract From Subject tools to target the effect. In practice, I don’t recommend using these tools, except perhaps with the Colorize filter. You’ll get a lot more flexibility by outputting as a Smart Filter (see below). Note: For more on working with Smart Filters, see Steve Caplin’s article “Get Smart” in Issue 3.
Output
There are five choices for how to output the results of your Neural Filters.
- Current Layer: Destructively apply the filters to the current layer. Use this option only when you’re certain you’ll never want to revert back to the original content.
- New Layer: Apply the filters as a new layer.
- New Layer Masked: Apply the filters as a new layer with a mask of the generated pixel output (i.e., the mask shows only pixels affected by the filter). This is useful if you to need to add or remove the Neural Filter from parts of the image.
- Smart Filter: Usefully, you can output the results as a Smart Filter, even if you’d forgotten to convert the layer to a Smart Object before entering the Neural Filters workspace. With a Smart Filter you can change the settings at any time just by double-clicking it in the Layers panel. This would normally be my preferred option, but at present it doesn’t work with the Harmonization filter.
- New Document: Output the results of the filter as a new unsaved document.
There are also buttons for previewing the results, resetting the parameters to their defaults, controlling which layers are included in the preview, and offering feedback to Adobe. The Neural Filters are organized into five categories: Portraits, Creative, Color, Photography, and Restoration. Let’s look at them in turn.
Portraits
There are three filters for working with faces. Two are novelties, the third offers a quick alternative to a traditionally laborious task.
Skin Smoothing
The simple-to-use Skin Smoothing filter comes with two sliders: Blur and Smoothness. Blur softens the skin texture and remove spots and blemishes. Smoothness controls the tone and the colors, evening out patchy skin. For best results, remove large blemishes with the Spot Healing Brush tool or the Healing Brush tool before using Skin Smoothing. If you’re an expert at frequency separation, you’ll probably get better results doing it that way, but the Skin Smoothing filter is going to be easier and faster (Figure 2).

Figure 2. Going all-in with the Skin Smoothing Neural Filter. Because the filter works only on the detected face, the skin of the neck is ignored.
Smart Portrait
If you were an early adopter of Photoshop, you can probably remember the wonder you felt the first time you copied someone’s head onto another body. It was fun, jaw-dropping, and—beyond the mechanics of the technique—ultimately useless. How many heads did you really swap in your professional work? Smart Portrait is much like that: an amusing distraction with which you can add surprise or anger to someone’s facial features. You even can make people smile so much they grow teeth that weren’t visible in the original image—oddly and disturbingly they all seem to get the same set of teeth. And you can make people look younger or older. Of course, beyond a certain age, we all want to look younger, but after the novelty has worn off, you’re left with a creepy and discomfiting aftertaste. You may feel like you have glimpsed a brave new world of eternal youth and smiling faces, where everyone looks like a news anchor. Smart Portrait has some of the same functionality as the Liquify Face-Aware features (with which you can work on the eyes individually) and some similarity to Puppet Warp. Used with a light touch it may be just the ticket for improving a portrait where someone got out of the wrong side of the bed or is looking in the wrong direction, but for most part it’s just a twenty-first century hall of mirrors where you can laugh at the amusing distortions and then move on (Figure 3).

Figure 3. Messing about with the sliders in the Smart Portrait Neural Filter
Makeup Transfer
The Makeup Transfer filter has no sliders, you just choose an image where the model has the makeup you want and apply that to an image where the model is without makeup. For best results, the two images should have similar lighting conditions, and the models should have similar skin tones, with the whole face visible (Figure 4).

Figure 4. There are no sliders for the Makeup Transfer filter. You just point it at a reference image and get what you get.
Creative
The two Creative filters aren’t quick, but the results can be worth the wait.
Landscape Mixer
The Landscape Mixer is still in beta and can be really, really slow. But, the results can be spectacular. The filter mixes attributes from your image with those of a reference image. The reference image can be one of the presets or your own image (whether already open or on your hard drive). In addition to the reference image, you can use the sliders to change the season or the time of day. The result is a combination of elements from both photos, relit and retexturized. There’s a lot of trial and error and waiting—bring some knitting to pass the time while the filter is updating—and there’s a loss of resolution and detail. But even with these caveats, the results can be very impressive (Figures 5 to 7).

Figure 5. The result of using one of the Landscape Mixer presets
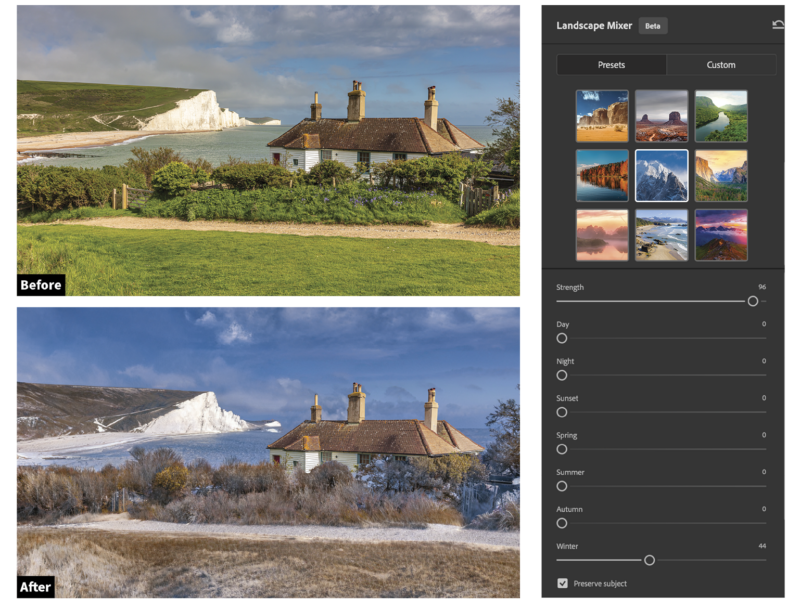
Figure 6. Wish it could be Christmas every day? Easily done with the Landscape Mixer.
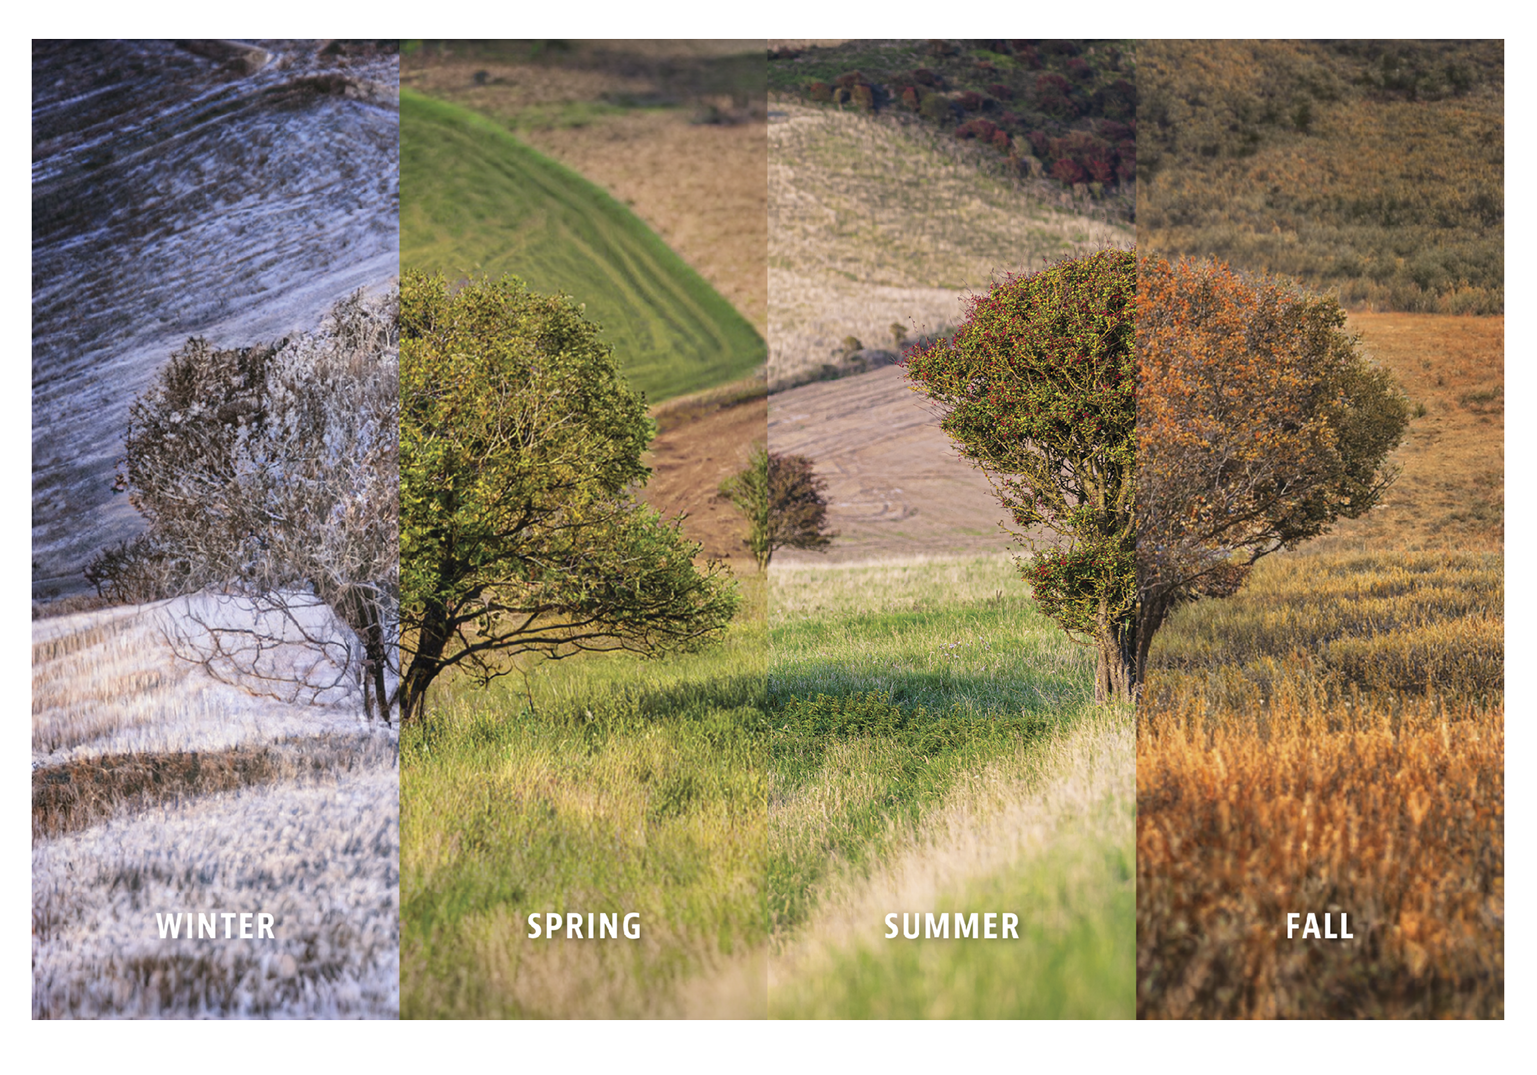
Figure 7. Experimenting with the seasons sliders in the Landscape Mixer (The original image is Summer.)
Style Transfer
As its name suggests, the Style Transfer filter lets you take the style from one image and apply it to another. Adobe includes several Artist and Image Styles as presets (the distinction between the two types of styles seems arbitrary), or you can copy the style from an image of your choice (Figures 8 to 10).
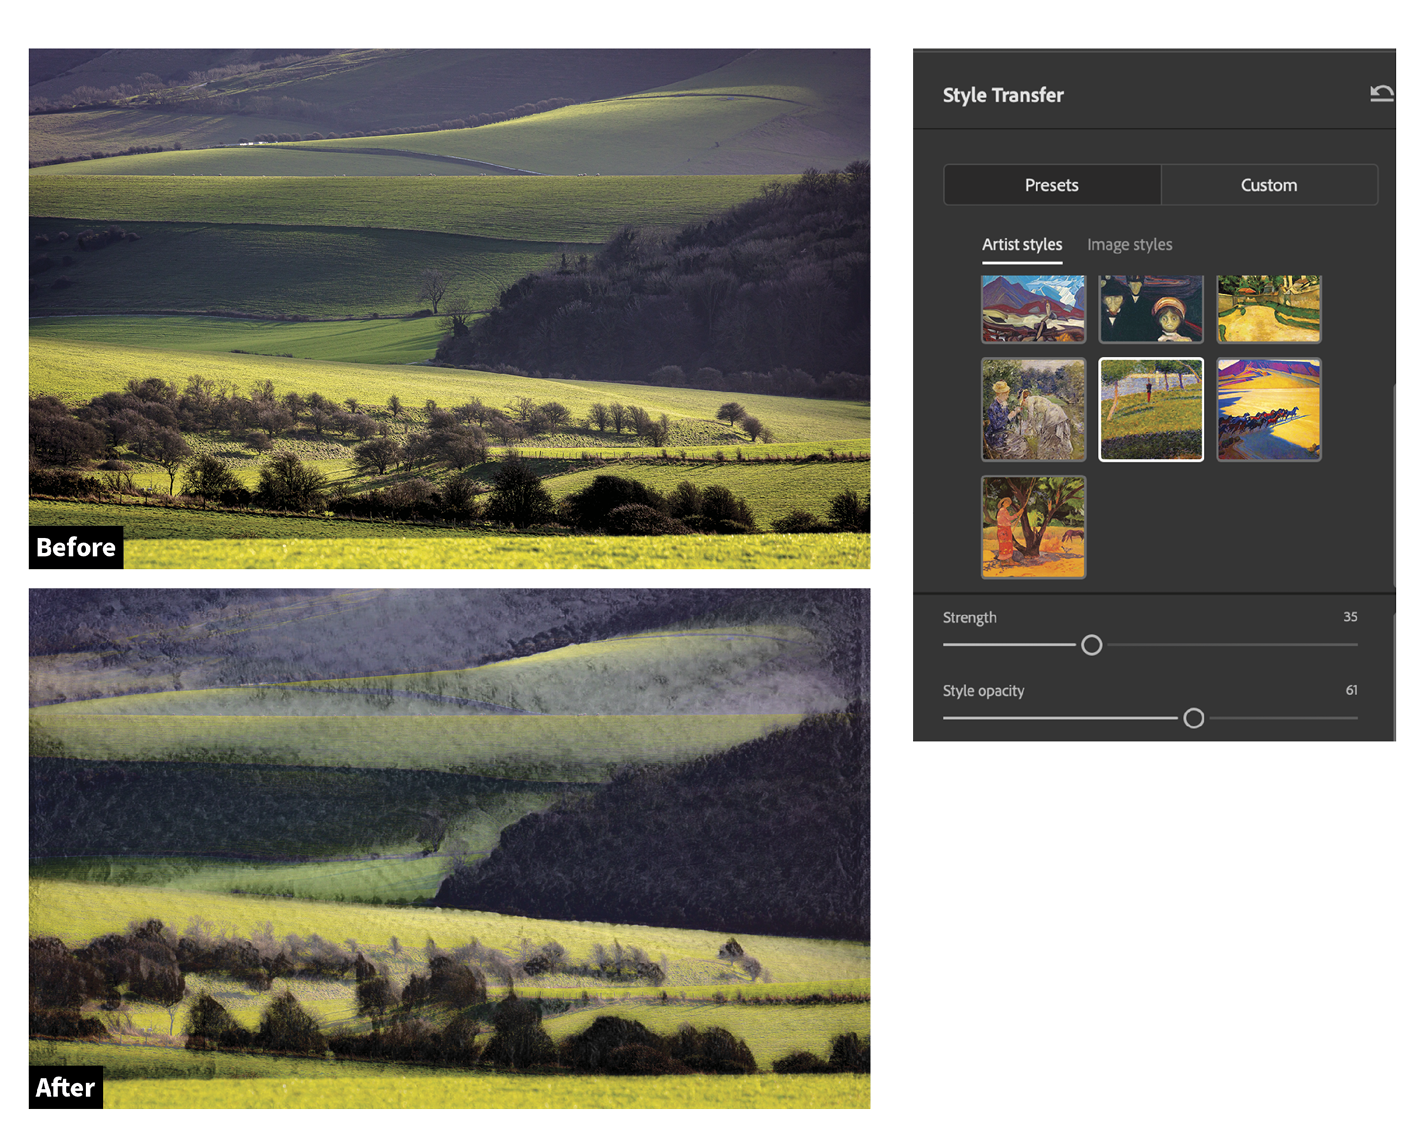
Figure 8. Applying an Artist Style using Style Transfer

Figure 9. Channel your inner Monet—the result of using the water lilies as the reference image
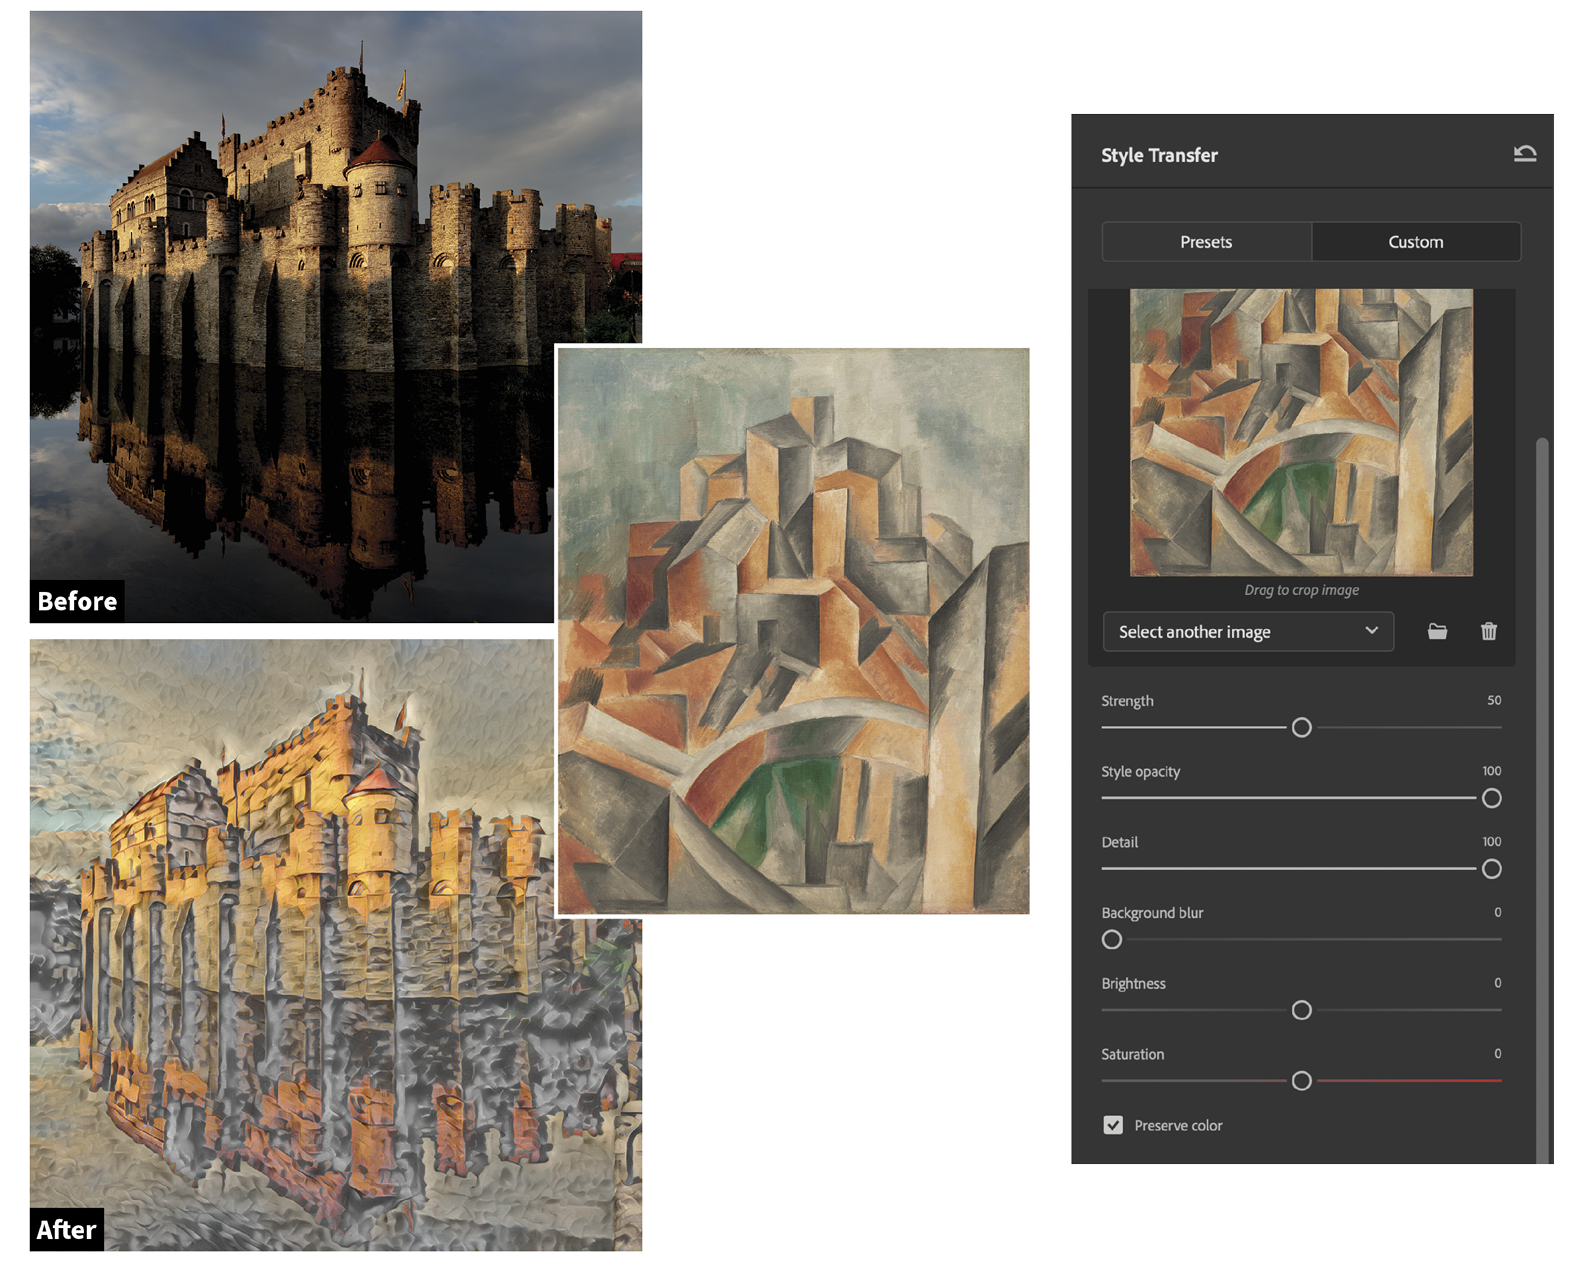
Figure 10. Or Picasso…
Color
The trio of Color filters can give you good results, and are well worth exploring, especially the Colorize filter.
Harmonization
The Harmonization filter lets you match the color and luminosity of one layer to another (Figures 11 and 12). The obvious use case is when you want to copy a subject into a different scene and match the color and lighting. Harmonization really simplifies this task. At this writing, however, if you apply it as Smart Object, you may have a problem turning the Smart Filter on and off. For that reason, you’re better off outputting to a new layer at least until this problem is fixed.

Figure 11. If you apply the Harmonization filter as a Smart Filter and then try to revisit the filter, you may see this error. Presumably, a fix is in the works.
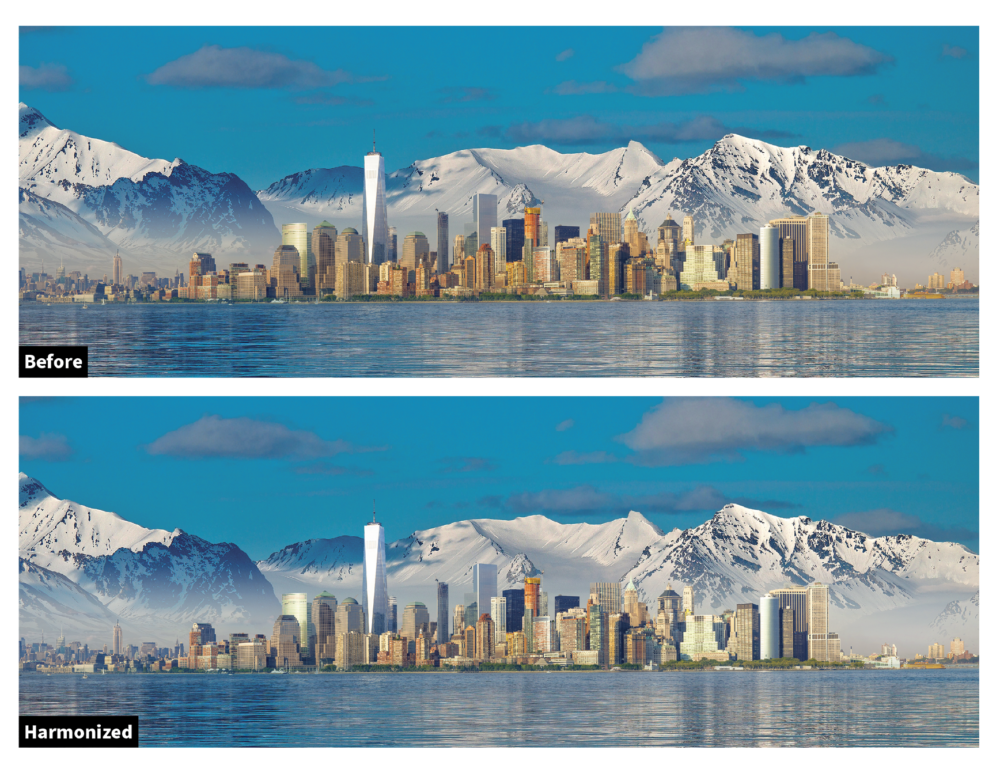
Figure 12. The Harmonization filter allows you to apply the color and tone from one layer to another.
Color Transfer
Color Transfer is like a LUT or Look Up Table. With it, you can copy the color and contrast from a reference image to your photo. There are nine presets to choose from (but the first row doesn’t work at present, so in practice there are six). Or, if you prefer, you can use your own image. I got better results transferring the palette of an image shot under similar conditions, to hone a subtle refinement rather than effect a complete transformation (Figures 13 and 14). Because you can use a specified portion of the reference image, an interesting potential use of this filter is to use an image of a swatch book as the reference image and highlight swatches to experiment with color treatments. If the initial result looks flat, select Preserve Luminance (only available in the Lab color space) to restore the punch. It’s an improvement on the old Match Color feature, and it lets you apply the effect nondestructively as a Smart Filter. Match Color still has its uses though—unlike Color Transfer, it allows you to Save Statistics, which is useful if you want to apply the same color matching to subsequent images.

Figure 13. This result is disappointing, but fair. Color Transfer applies only the color of the reference image, not its style.

Figure 14. An unlikely pairing of source and and reference image, but I like the result.
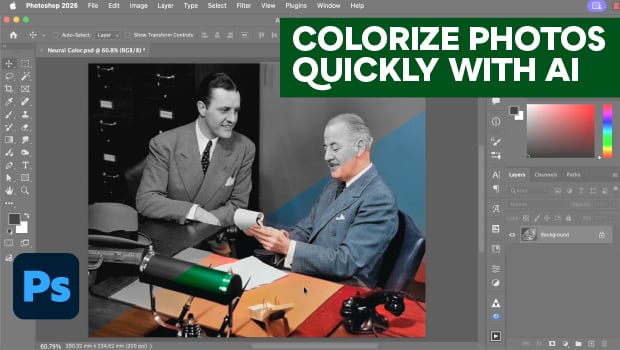
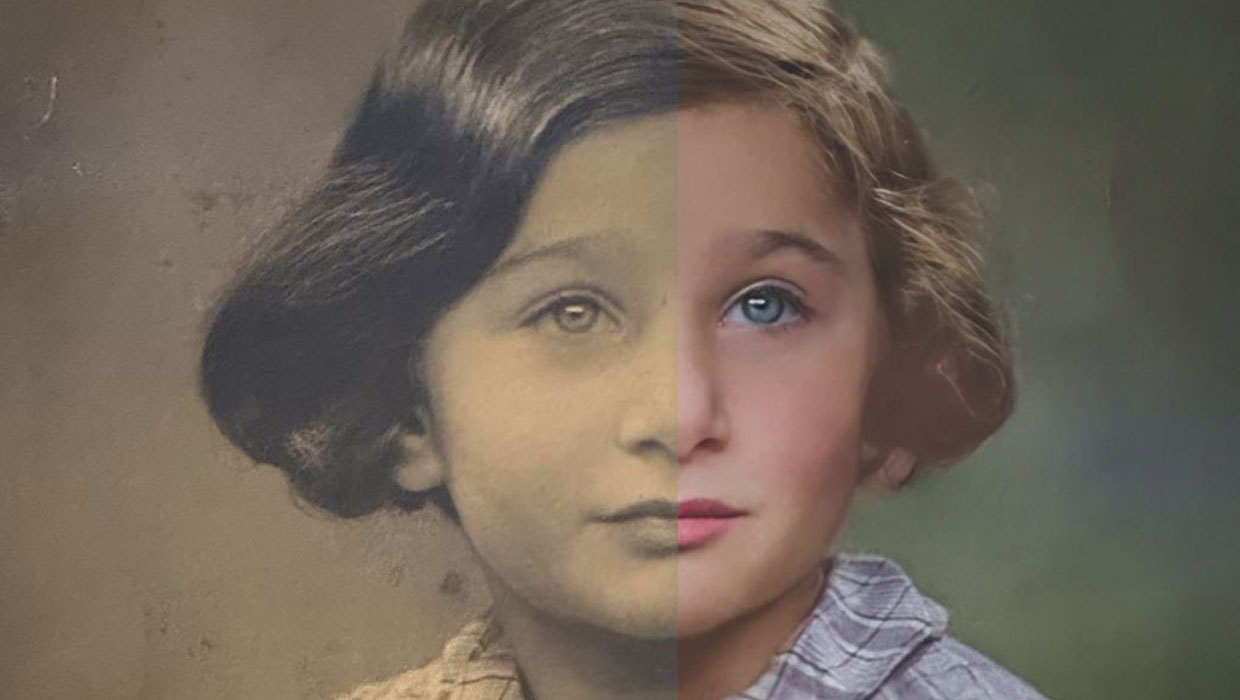
Colorize
One of the most impressive Neural Filters, Colorize lets you color a black-and-white photograph (note that the image must be in a color mode). The results are almost always promising, but seldom if ever complete, with parts of the image being missed. You can click those missed areas in the Navigation window and a Color Picker appears allowing you to choose a color. However, there is little in the way of real-time feedback. You can’t sample from an adjacent area in the Navigation window, for example, so finding the right color in the Color Picker can be hit or miss. You can also Option/Alt-drag to copy colors from one part of the image to another. There are several profiles to emulate various retro looks. However, at the time of writing, these don’t work, and instead return the message: “We’ve temporarily disabled the filter because of an error.” Despite its shortcomings, this filter is impressive. It can do a better job in seconds than you might get in hours using older methods, and it does an excellent job with skin tones. There is also the option to output a Color layer, which you can use thereafter to finesse the results by sampling and painting in adjacent colors (Figures 15 and 16).

Figure 15. Customizing the Colorize result by adding color samples, outputting a Color Layer and painting on that layer to fix areas where the color bleeds from one area to another. I’ve also added a Hue/Saturation adjustment.

Figure 16. While the Colorize filter makes a good guess in many cases, there are times when it won’t come close to the original colors.
Photography
The two Photography filters perform useful tasks as well as (but not better than) traditional methods.
Super Zoom
Super Zoom lets you upsample an image. Perhaps you need a tight crop and want to increase the resolution of the remaining portion of the image so you can use it at a larger size. Or perhaps you’re starting out with an original that’s at a lower resolution than optimal for your intended output. If necessary, crop the image first (with Delete Cropped Pixels selected) then use Super Zoom. Click the magnifier to go up to six times the original size. Output as a new document to leave the original image intact. While it’s useful to have this option, without resorting to a third-party plug-in, in my tests the results weren’t any better than those you can get using the Image Size dialog box with the Preserve Details 2.0 interpolation method. And be aware that every time you move a slider, you’re back to square one with processing time (Figures 17 and 18).

Figure 17. A 4X enlargement after an extreme crop

Figure 18. Compare the results of a 6X enlargement using the Preserve Details interpolation method in the Image Size dialog box versus the Super Zoom filter.
Depth Blur
Because Depth Blur lets you add blur in front as well as behind your subject, it offers a more sophisticated way of faking a shallow depth of field than using Iris Blur in the Blur Gallery or Gaussian Blur. The Focal Distance and Focal Range sliders adjust the range of focus, and the Focus Subject option keeps the subject in focus. You can apply the blurring automatically, or, if you deselect Focus Subject, you can click the image to set a focal point. You can even add haze to the blur area, further drawing the viewers eye to the subject. Depth Blur is still in beta, but even so, the results are good (Figure 19). Keep in mind that, just as with the other filters, the result can be refined with a filter mask. If the depth of field bleeds into the subject, consider putting the subject on its own layer. If the blurred areas start to look too smooth, you can introduce texture with the Grain slider, or for more control, add a noise layer in Soft Light blend mode above the image and paint this in with a layer mask as required.

Figure 19. The initial, Auto, result is promising, but the front of the tram isn’t quite focused and the side of the tram falls too quickly into soft focus. Specifying a focal point and moving the Focal Range slider to the right improves things. The haze is just for fun.
Restoration
The Restoration filters can do a great job of fixing photo defects when they actually work.
JPEG Artifacts Removal
If you have a low-resolution, heavily compressed JPEG with artifacts, the JPEG Artifacts Removal filter will reduce or eliminate them. The only options are the strength: Low, Medium, and High (Figure 20).

Figure 20. The JPEG Artifacts Removal Neural Filter does a significantly better job than the older Reduce Noise filter.
Photo Restoration
Often used in conjunction with Colorize, the Photo Restoration filter offers some impressive results. Unfortunately, it’s also prone to the message: “We’ve temporarily disabled this filter because of an error.” If you run into this problem, turn down the Enhance Face slider (even though enhancing a face may be what you want from this filter). The filter dramatically improves the contrast, and, when it works, Enhance Face will sharpen the eyes and bring out facial details—assuming that is, that the filter identifies a face in the image, which is not a given. Scratch Reduction performs as expected, but just like the old Dust & Scratches filter, the removal of scratches comes at a price: the loss of detail and texture. If scratches overlap areas of detail, they are best removed with a second layer. Mask them out, then paint back in where needed. For larger areas of blemish, use the Remove tool, the Spot Healing tool, or Generative Fill before applying Photo Restoration. If you’re an experienced photo restorer, you’ll get better results doing it by hand, but the Photo Restoration filter can be used as a starting point to accelerate your process. And if you need a fast way to dramatically improve a batch of damaged photos, this will save a lot of time (Figure 21).

Figure 21. The worst blemishes are removed with the Spot Healing brush on a separate layer. Along with the image, this is stamped into a layer above, to which the Photo Restoration filter is applied. I was aggressive with the Photo Enhancement and Enhance Face sliders (some of the eyes are too sharp), but light with Scratch Reduction. Further spot healing was added, and I applied a Generative Fill layer to remove some persistent creases and blemishes.
Hit (or Miss) a Nerve
At present, Neural Filters are a mixed bag, so employ them judiciously—and don’t forget older, more established workflows that may still yield the best results. On the one hand, Neural Filters can be a huge time suck, not least because of the processing time required to view each iteration. On the other, they are a creative playground with limitless possibilities. What’s certain is that they will improve, and my gripes about their performance, erratic behavior, and interface shortcomings may soon be irrelevant. But having said that, it’s been two years since their first release and progress has been gradual rather than breakneck.
Commenting is easier and faster when you're logged in!

Recommended for you

How to Use Photoshop’s Harmonization Filter
A quick and remarkably effective way to make images from different sources look...
Colorize an Image with AI in Photoshop
Use Photoshop's Neural Filters to add color to a black and white photograph with...
Using the Photo Restoration Neural Filter in Photoshop
This Neural Filter uses AI to remove scratches and other damage, and enhance fac...