

At Adobe MAX in October 2018, Adobe announced a major rebranding and restructuring of the Typekit service included in most Adobe Creative Cloud subscriptions. And this brings with it a name change (to Adobe Fonts), a newly revamped website, and major changes to the previous Typekit plans. As the new Adobe Fonts service, all previous plans are combined into one streamlined service that gives you the entire library of 14,000 fonts as part of all Creative Cloud plans.
Easier Selection and Activation of Fonts
Here are some of the main changes in this new incarnation as Adobe Fonts:
- There are no more limits on how many fonts you can sync. Syncing is now called activation, and you can activate as many fonts as you need.
- There are no more “web-only” fonts. All the fonts are available for both web and the desktop.
- There are no more web font page view and domain limits.
To learn more about the new Adobe Fonts features, check out the Adobe Fonts FAQ page.
Selecting Fonts on the Adobe Fonts Website
Currently, most Creative Cloud members will continue to preview, select, and activate their Adobe Fonts from the refurbished website (Figure 1): You can get to it from the Adobe Creative Cloud desktop app found on the menu bar in macOS or the taskbar on Windows. Click the Fonts tab and choose Browse All Fonts, and your web browser will take you to the new location (Figure 1). The methods to view, filter and activate fonts on the website remain essentially the same as they were before.

Figure 1: The Adobe Fonts service includes an updated website but the methods of choosing fonts remain essentially the same.
In many Creative Cloud applications—for example, Adobe Photoshop CC 2019—you’ll also have a button at the top of the application font menus that is still labelled “Add fonts from Typekit”. It’s unchanged from previous versions, and clicking it also opens to the new Adobe Fonts website.
In-App Preview and Activation in InDesign and Illustrator
InDesign CC 2019 and Illustrator CC 2019 offer some new font features—Live Font Preview and Activating New Fonts In-App. These provide new solutions for two problems: How can I preview and pick the best fonts for my project? And how can I find and try new Adobe fonts? (Other CC 2019 applications—like Photoshop—still use the previous font menu interface and old icons as before.)
Both InDesign CC 2019 and Illustrator CC 2019 introduced a new font interface to make this possible—including the addition of Live Font Preview when hovering, new filters in the app for filtering font features, and the ability to preview and activate new Adobe Fonts you’d like to use within the application.
Live Font Preview
In InDesign CC 2019 and Illustrator CC 2019, you can now preview type you have selected in a layout in any font by hovering your mouse over the font name in a list of fonts. This feature works in the Control panel, Character panel, and Properties panel menus of both applications. For example, in Figure 2, the heading is selected on the page, and in the font family menu, Aachen Bold is being previewed. You can also preview the currently selected text directly in the font family menu by setting the sample text options pop-up menu to Selected Text.
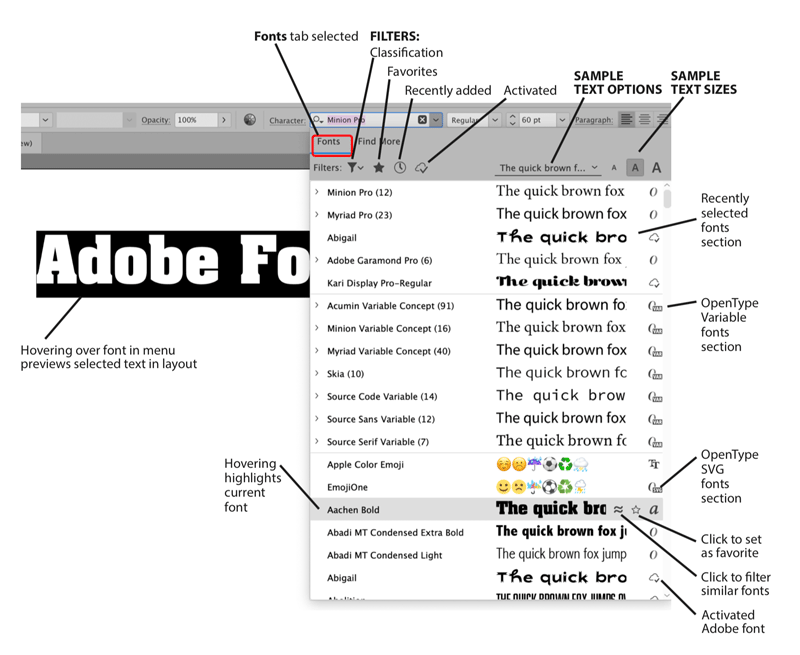
Figure 2: In InDesign and Illustrator CC 2019, new filters and options for previewing fonts have been added to the Font Family menus.
Previewing and Activating New Adobe Fonts
In the current versions of InDesign and Illustrator, there is an enhanced display of choices when browsing fonts in the Control, Character, and Properties panels font family menus. When you click the Font Family menu, there are two tabs at the top left (Figure 2): the “Fonts” tab shows currently installed or activated fonts. But here’s the cool one that is easy to overlook: the “Find More” tab previews Adobe Fonts that can be activated. Yes, that means instant access to thousands of fonts from within InDesign and Illustrator, without having to visit Adobe’s website. (You can still go to the Adobe Fonts website and activate from there if you wish.)
In both tabs, already activated Adobe Fonts show a cloud icon with a checkmark instead of the familiar TK icon. If you activate some (but not all) of the fonts from within a font family, you’ll see a cloud icon with an ellipsis (…) next to it. Non-activated Adobe Fonts show the regular cloud icon (Figure 3).

Figure 3: In InDesign and Illustrator CC 2019, the new Find More tab shows all available Adobe Fonts and allows you to search, preview and activate fonts directly within your application.
New Filtering Choices
New filtering options for fonts (in both tabs) are available: A new filter shows recently added fonts. The updated Classification filter (Figure 4) shows the same categories and icons that are found on the Adobe Fonts website for filtering fonts. There are icons for each of eight classifications that were available in earlier application versions, such as Serif, Script, and so on. You can also select properties for weight, width, x-height, contrast, standard or CAPS only, and Default Figure Style. The previous Typekit filter is renamed Show Activated Fonts. The Add to Favorites star icon and View Similar filter option are now available in-line with the font names. You now have three options for the size of preview text. Plus, the preview text can be the text you have selected on the page, or you can select between five preset text phrases.

Figure 4: The Classification font filter has been expanded to show both the classifications previously shown and the properties found on the Adobe Fonts website for selecting fonts.
Preferences to Control Font Previews
Both InDesign and Illustrator CC 2019 include some new Type preferences to control what you see on your screen:
- In InDesign (but not Illustrator) CC 2019, you can uncheck Preview Font on Hover if you don’t like the hovering preview.
- In both InDesign and Illustrator CC 2019, you can uncheck Enable in-menu font previews, which is turned on by default
- In both applications, if you don’t like a list of recent fonts at the top of the Font menu, select the Number of Recent Fonts to be zero (this is not a new feature).
- By default, Japanese Adobe Font previews are turned off because they are resource intensive; you can turn them on if you wish.
More Power to Use the Adobe Fonts
The new Adobe Fonts service gives you more power to choose your fonts. It increases both the availability and ease of use when previewing, choosing and activating fonts for all Adobe Creative Cloud members. Hopefully, the new font features found in InDesign CC 2019 and Illustrator CC 2019 will soon be added to the other Adobe CC applications.
This article was last modified on February 5, 2019
This article was first published on February 5, 2019
Commenting is easier and faster when you're logged in!

Recommended for you

How to Set Up Your Documents So That Your Printer Won’t Hate You
I work for a large commercial printing company (see my bio below for details) an...

TypeTalk: Spot OpenType Fonts Fast
TypeTalk is a regular blog on typography. Post your questions and comments by cl...

FontStruct Turns Five
FontStruct, the free font-building tool sponsored by FontShop just celebrated it...