

Original Thoughts
Certainly, one should also clean the original hardcopy document that will be scanned. There’s usually some dust on the surface and even some dirt, depending on the image and its age.
However, I admit that in this department I’m chicken. Perhaps it’s the 15 years I spent working in a library with concerns over preservation of paper, media, and photographs. I hate to do something potentially irreparable to an original document. Looking through many dozens of pages on the subject, I was no closer to having confidence over the subject.
I use compressed air to blow off the dust. However, be careful to do it far away from the scanner you’ve just taken the time to clean!
After cleaning the original piece, make sure that the hardcopy is perfectly flat on the platen, especially if it’s on glossy-coated paper. If part of the paper pulls away from the glass, the shiny surface and reflect the bulb’s light in places resulting in tiny white speck on the scan.
I use a book for larger items and a piece of thin plate glass covered by a nylon stocking for smaller items. My scanner is a dual-mode machine with a plate of glass on the top, so it’s important to avoid scratching the top plate.
Calibration Zone
Most scanner owners, even professional content creators, don’t have a clue about the calibration strip on their scanners. All of them have one and its proper functioning can affect the quality of a scan.
At the beginning of the scan, the scanner measures its light output bounced off a special reference strip usually found under the front cover. This routine lets the scanner compensate for small changes in the glass and other factors.
Any problems with calibration strip, such as marks or moisture (like bubbles from a cleaning fluid), can change the reflectivity of the strip. I understand that this can create a vertical band down the scan.
Dual-mode scanners that handle both reflective and transparent art have a glass area for calibrating the transparency scans. You can see this on my venerable SCSI-based Linotype-Hell Saphir Ultra scanner (see Figure 2), the strip has its own piece of glass below the ruler.
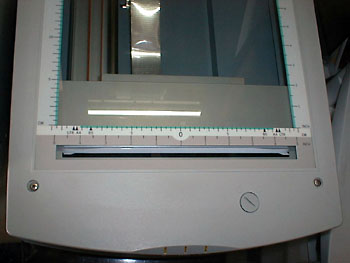 Figure 2: You can see a number of things in this photo of my scanner. It handles both hardcopy and slides, so there’s a piece of glass in the lid. You can see its bulb reflected in the large glass platen. There’s the calibration area for transparencies in front below the ruler with a strip of glass.
Unfortunately, this calibration area is also a natural place to park items, since it’s off the main platen. I have seen many people place pieces of masking tape and notes about scans on it. Or they simply cover it with another piece of paper or an image that’s waiting to be scanned. Bad idea.
These items can totally screw up the calibration for transparencies. Even a small contamination could be problematic. However, I found that the colors and shadows of these items appeared to be transmitted through the glass to the reflective calibration strip.
I tested this conclusion by scanning twice, once with a yellow Post-It note covering just an inch of the calibration glass and once without. The color reflected through the glass appeared to cause a 4 to 5 percent change in the colors (Figure 3). Not much of a change but still a visible shift.
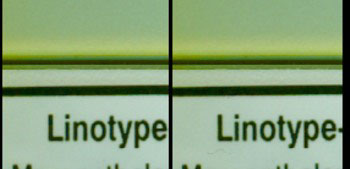 Figure 3: Before (left) and after (right) illustrates the color shift caused by placing a Post-it note on the calibration strip of the Saphir Ultra flatbed scanner. Keep junk off of the front of the scanner.
Of course, this action also defeats the scanner’s standard color profile or worse, any color management and profiling you’ve done on the scanner. If you use an expensive calibration system such as GretagMacbeth’s Eye-One Pro with Eye-One Match, the resulting custom profile will be foiled by covering even a portion of the calibration strip.
Scanner Short List
Here are a final couple more miscellaneous tips for the scanning generation:
- Warm up the scanner. Almost all hardware peripherals work better after a warm up period. Make sure the scanner is on for at least a half hour before you begin a job.
- Check the cables. According to the fine print of most printer manuals, lines running horizontally through the image are a sign of electromagnetic interference or cable problems. In some cases, the flow of information for each CCD element is being balked, perhaps intermittently, causing horizontal streaks or distortions.Check your cable and see if it’s the problem, this could be a first sign of a problem cable. In addition, better cables incorporate robust shielding from electromagnetic sources; the cable could also be picking up signals from a strong electrical source, such as a transformer outside the room and moving the scanner setup may improve the problem (I uncovered this situation in a site visit once).Some of you may consider that these tips are superfluous, since you’ll likely still have to edit the image after scanning. However, why make extra work for yourself? If you have more scanner tips, share them with me and creativepro.com readers by posting them in the Vox Box to the left of this story.After all, as the Talmud says: “No labor, however humble, dishonors a person.” Whatever the quality of your scanner, these suggestions have the possibility to improve your scanning experience.
This article was last modified on January 18, 2023
This article was first published on March 13, 2003
Commenting is easier and faster when you're logged in!

Recommended for you

How to Fill Text with Images in Photoshop
The next time you need to place an image inside text in Photoshop, try one of th...
Create Beautiful Contact Sheets Easily With DiapoSheet
If you need to build a contact sheet of images you have lots of options. You can...

Modeling a 3D Bracelet with Photoshop
Photoshop’s 3D modelling environment has matured to the stage that with CS6 Exte...