

Monitoring Colors
Most content creators are familiar with some form of monitor calibration, whether with a visual method, such as with Apple’s ColorSync utility software or from a hardware sensor on monitors that come with an integrated calibration system.
CRT calibration can be a tricky, since it requires accessing the monitor’s on-screen display (OSD), to adjust the brightness, contrast, and color settings. Each display has a different OSD interface that’s controlled by buttons on the front or side of the monitor. Many manufacturers let Windows users bypass the external buttons with convenient access to the settings in the Display control panel; Mac users are out of luck here.
Following the directions, I locked the sensor to the suction cup adapter and mounted both on the screen (see figure 3).

Figure 3: This screen looks like the color calibrator Neo would use in The Matrix. In real life, the suction cup and calibrator are gray plastic.
Eye-One Match asks users to select either a Mac or Windows gamma, as well as a target white point, here dubbed Warm, Medium and Cool (D50, D65, and D75, respectively). Since I output to both hardcopy and web, I chose the middle setting.
The software then requires users to access the OSD to adjust settings for brightness and contrast as well as each of the RGB electron guns for the color temperature. If one or more of these controls aren’t accessible on the display, there’s a checkbox to skip the step. Each test provides a small readout window with little arrows to line up.
There’s a lag of a few seconds between your changes to the OSD and the readout from the sensor, which can make adjusting things tricky, especially with the RGB controls. Since the monitor’s OSD window can mess with the sensor’s accuracy (or just make it so you can’t see the tests), Eye-One Match conveniently lets you move its windows freely around the screen and away from the OSD (see figure 4).

Figure 4: Many monitors’ on-screen displays have a preference setting for their position on the screen, with the default usually smack dab in the middle. Here, I moved the Eye-One Match windows to a corner (FYI: the OSD is inserted directly by the monitor’s firmware so it can’t be captured in a screenshot.)
Finally, the software presented a series of colors for the sensor to evaluate, and then created and installed a new color profile.
After all this work, one would expect some tremendous change in how the monitor looks. But that’s not the case. In the past, I’d employed a visual calibration method, which must have compressed the color gamut. But there’s no side-by-side comparison with this process and my short-term memory is unreliable.
Certainly, images appeared nicely colored following the sensor-driven calibration, since the Eye-One made many changes to the settings from the earlier visual calibration. After checking the numbers in the OSD, the previous brightness and contrast settings were off by 10 to 20 percent. And the visual method made no adjustment to the RGB color guns.
For flat panel displays, the kit provides an adapter with a rubber band and a counter weight. The suction cup used for the CRT calibration will ruin any LCD. The adapter lets the sensor hang over the top of the display and rest lightly on the surface of the screen. The Eye-One Match software is the same for CRTs and LCDs.
I experimented with the Eye-One Pro on my iBook running Mac OS X. Of course, there are no hardware OSD controls for contrast and white point on the notebook, and while there are buttons to change brightness, that action is really a much different thing than on a CRT. Regardless, the little Brightness meter was unaffected by my pressing the buttons.
After moving through several steps by clicking Doesn’t Apply checkboxes, it entered the color evaluation step. The sensor seemed to read the colors presented and created a profile.
Again, it looked fine (depending on my viewing angle, of course).
Spanning the Scanner Gap
My greatest hope for the Eye-One Pro was its scanner calibration. My scanner is an old SCSI-based Linotype-Hell Saphir Ultra flatbed model and it’s been giving me dodgy results for more than a year. The colors are whacked and images have a variable cast that plays havoc with yellows, greens and reds (and all the rest). I’ve tried lots of things to fix the problem to no avail.
Without color calibration, I’ve used software such as Vivid Details’ excellent TestStrip plug-in for Photoshop to create a variety of settings to improve different kinds of images and media. Still, I would make better use of my time if I weren’t trying to leap such a huge color chasm.
The calibration process was easy — to a point. First, I read the accompanying Eye-One Scan Target 1.4 (see figure 5) with the sensor. This requires the use of yet another adapter that guides the sensor as you pull it across the target (see figure 6). This is a two-handed process and it takes about 10 seconds to measure each row. (Color maven Bruce Fraser said with practice that number can drop to 5 seconds — I found my error rate climbed when I stepped up the pace.)
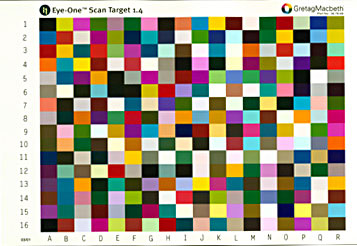
Figure 5: No, the target is not a detail of a Chuck Close portrait.

Figure 6: The target comprises 16 rows with 18 colors in each. The Eye-One Match software alerts you if its reading of the row was successful with both a green OK sign and a beep.
This article was last modified on January 18, 2023
This article was first published on March 21, 2002
Commenting is easier and faster when you're logged in!

Recommended for you

InPerson: Roger Black
David Blatner caught up with world-renowned designer and font entrepreneur Roger...

A Holiday Card with a Clever Twist
Or rather, fold. The “Deer Card” campaign over on Kickstarter lighte...

TypeTalk: Biting the Bullet
TypeTalk is a regular blog on typography. Post your questions and comments by cl...