Typing Out the Complete File Path for Proofs

B. wrote:
My employer recently instituted a new rule at our agency that requires us to include, among other things, the complete file path of the InDesign file on all proofs. Obviously, this isn’t part of the info included in the “File Information” option in the Print Dialog. Do you know of any way to automatically add the file path when printing?
While there are some very good plug-ins that can help with this kind of thing (those from Triple Triangle and Gluon come to mind), it’s extremely easy to do this in InDesign CS3 without any help from outside sources. The trick is to use text variables.
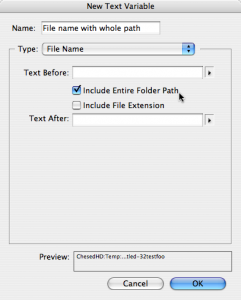
First, choose Type > Text Variables > Define. Click New and choose File Name from the Type pop-up menu. Pretty cool, but before you click OK, note that you can select the Include Entire Folder Path checkbox!
Now click OK. From the Define Variable dialog box, you can click Insert to tell InDesign to “type” the variable right away at the current text cursor position. Or you can click Done. When you want to insert the variable (perhaps in a slug area off the side of the page), you can choose Type > Text Variables > Insert Variable > and then choose the name of the variable you defined.
By the way, you may not see the variable update immediately. Text variables only update on screen when you change the view (zoom in/out, change pages, and so on). One other thing to watch out for: Variables cannot break across two or more lines. They’re always treated as a single character. So if your file path is really, really long, you might see some weirdness.
I love text variables; they’re incredibly helpful when you have data such as this that can change.
This article was last modified on December 19, 2021
This article was first published on July 1, 2008
Commenting is easier and faster when you're logged in!
Recommended for you

This Week in InDesign Articles, Number 17
A dozen articles, videos, and blog posts that you should know about (one for eac...

Making Patterns with Conditional Text
Besides being an full-time InDesign user, I’m also avid knitter. Whil...

How to become an Adobe Certified Expert (ACE)
Keith, who has taken many more Adobe Certified Expert (ACE) exams than he cares...


