
Turn a QuarkXPress Document into a Web Page with BeyondPress

![]()

Version: 4.1
Operating systems: Macintosh, Windows
If you’re pulling double duty as a desktop publisher and a Webmaster, you may be laying out pages for print in QuarkXPress and then re-creating them in an entirely different Web authoring application. If that’s the case, you’re also probably mumbling under your breath, “There’s got to be an easier way.” Well, there is. Extensis’ BeyondPress 4.0, for example, enables you to create Web pages from new or existing QuarkXPress documents, with a minimal amount of effort. BeyondPress is an XTension that exports QuarkXPress documents in their entirety into DHTML format, resulting in fully-functioning Web pages. To show you just how easy it does this, we’re going to create a new page in QuarkXPress and then use BeyondPress to export it to DHTML; after which, we’ll be able to view the page with an Internet browser, as shown in Figure A.

Figure A:
You can easily export a QuarkXPress document to DHTML with the use of Extensis’ BeyondPress XTension.
About BeyondPress
BeyondPress 4.0 provides both authoring and conversion modes. The authoring mode enables you to create and edit Web pages from new and existing page documents. The conversion mode is for turning existing QuarkXPress documents into Web pages. With this mode, you can alter and edit the content of the Web pages without altering the original page documents. To get you started, we’re going to cover the authoring mode in this article. We’ll discuss converting existing page documents in a future issue.
Get it Together
Let’s assume you already have your page layout plan completed. Any images you’ll be using that were created in other applications are also finished, and all of your files are compiled in one central location. Typically, Web images should be saved as RGB GIFs or JPEGs and placed in a subfolder. When you’re using BeyondPress, though, it doesn’t matter what the format or color mode your images are because the XTension converts them into the appropriate format and places them in an image folder when you export the page document to DHTML. This is a real timesaver when you’re creating a Web page from an existing print document that contains TIFF and EPS images in CMYK mode.
Set the Stage
The first thing BeyondPress requires you to do is select a browser with which you’ll view your Web pages. This means that you must have the browser software you intend to use loaded on your computer. If you have Internet access, you already have browser software. The most commonly used browsers are Netscape Navigator and Microsoft Internet Explorer. To select a browser, begin by launching QuarkXPress, but don’t create a new document just yet. If the Document Content palette isn’t visible, select Extensis > BeyondPress > Show Document Content. Click on the Preferences icon located on the Authoring tab of that palette, as shown in Figure B.
Now, click on the Application icon and then the HTML Browser button, which is on the Application Preferences dialog box, as shown in Figure C. Locate and select the browser loaded on your computer, which can be found in the Internet folder (installed browser folder of Program folder, in Windows). Deselect the Show Hidden Text check box, and then click OK to close the dialog box.
Figure B:
Click on the Application icon to activate the Application Preferences dialog box.
Figure C:
Select the HTML browser in which you want to view your Web pages.
Now you can create a new document by selecting File > New > Document, and entering the page dimensions in the New Document dialog box. We’re using the standard browser window size of 7 inches wide by 9 inches high. As you can see in Figure D, we’ve also set the margins to 0 inches and deselected the Facing Pages and Automatic Text Box check boxes.
You’re almost ready to begin laying out your Web page. Before you start, however, you need to change the measurements to points. Select Edit > Preferences > Document to activate the Document Preferences dialog box, as shown in Figure E. Then, change the Horizontal Measure and Vertical Measure to Points. Click OK. Now, save and name your document something like home page.

Figure D:
The standard size for Web pages is 7 inches by 9 inches.
Figure E:
Change your document’s measurement preferences to points, which is what’s used on the Web.
Building the Page
Now you can begin to add all the elements on the page just as you would any publicationalmost. BeyondPress is capable of exporting lists, tables, images and stylesheets, but if you want to create a form in which data can be entered, you’ll have to use another Web authoring program.
One other feature that could cause a problem is that BeyondPress exports to DHTML (a newer version of HTML) by default. If the browser you’re using to view your Web page is earlier than Netscape or Explorer’s 4.0 versions, you may not have good results with DHTML. To fix the problem, you can change the export preference to HTML. Go to Extensis > BeyondPress > Preferences, click on Export, and deselect DHTML (in Windows, verify the Readable HTML check box is selected). Unfortunately, this creates a whole new problem. If you try to overlap text or image boxes when exporting to HTML, you’ll likely end up with missing data. The only solution we know of is to avoid overlapping elements on the page.
To be on the safe sideeven though we left the export preference set at DHTMLwe decided to steer clear of overlapping any of the elements. We imported four TIFF images and three EPS graphics. Then we entered the text right on the page.
Once you have your page set up the way you like, you can get a sneak preview by clicking the Preview button located on the Document Content palette. BeyondPress then converts your page into DHTML (or HTML) and shows you what it will look like in the browser you selected previously–without actually creating a new file.
Finishing Touches
Once you see what the rest of the world will see, you may decide you want to make some changes. You can alter the appearance of your site, such as changing the background and text color, in the Application Preferences dialog box. Press [C][ctrl]Y ([Ctrl][Alt]Y in Windows) to activate the Preferences dialog box and click on the Web Page icon. To choose a new background color, select the Background Color check box and click in its color option box to bring up the color selection window shown in Figure F. You can select a color or create your own. Once you’ve chosen a color, click OK. Within this dialog box, you can also change the color of the text, links, visited links and the active link. We chose to keep the background white and text the colors we previously selected while laying out the page.
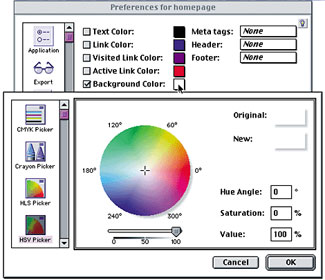
Figure F:
You can edit your Web page further by changing the background and text color.
Naming Pages
Before we move on, we think it’s important to discuss how you should name and organize your files. The functionality of your Web site hinges on these two factors. Regardless of whether you’re using Web authoring software or writing code, the way in which you name and organize your files is the same. By using BeyondPress when you export your pages, much of the filenaming and organizing is done for you, as shown in Figure G. However, you still have to know what to name the home page. Previously, we instructed you to name your document home page. However, that’s nothing more than a title that will appear in the browser window. The actual filename you’ll use when it comes time to export the page can only be determined by calling the ISP (Internet Service Provider) with whom you’ll be posting your site. They’ll tell you to name the main file something along the lines of Index.html or Default.htm. Whatever extension (.html or .htm) you’re given should also be used for all other linked pages you may create for the site.

Figure G:
BeyondPress converts CMYK TIFF and EPS files to RGB JPEG and GIF files and organizes your files for you.
Get Connected
Since we’re only creating a one-page Web site, we’re ready to export the document to DHTML. However, most Web sites contain more than one page. To move from one Web page to the next within a site, you must establish a link between those pages. Though we didn’t create any pages to link to for this article, let’s look at how links are created with BeyondPress.
To create links, open the Attributes Inspector by selecting Extensis > BeyondPress > Show Attributes Inspector. Let’s start by creating a link to the home page with the word Home, located in the upper-right corner of the page. When you click on the word, it appears in the Name text box in the Inspector.
Each link, by the way, must be a separate image. If, for example, you select a word within a paragraph, the entire paragraph will contain the link. Now, select the As Image check box and then click the triangle at the bottom of the Text Box Settings window to expand it and show the Image Map and Transparency window. The text becomes visible within this window, as shown in Figure H.
Now, select the Rectangle Link tool from the Image Map area and drag it across the word in the window. This activates the Link Editor dialog box. Click Locate File and select the Index.html (or whatever you were told to call it) file. Click Open to link the Index.html page to the word Home. Then, click OK to accept the selection. Your Link Editor dialog box should look something like that shown in Figure I.
Note: In order to test a link between two or more pages, each page must be exported to DHTML (or HTML).
Figure H:
For text links, select the As Image check box and then select the Rectangle Link tool.
Figure I:
To establish a link, just select the HTML file with which you want to link.
You can set text and image links to the home page and all other pages for the remainder of the Web site in this way. For example, the photo of the skiing gondola would link to the page that pertains to winter, and that page would link back to the home page, and so on. Once all the links are established, you can preview the page again or move on to exporting.
Export to DHTML
All that’s left to do is export the page to DHTML. To do so, just click on the Export button on the Document Content palette, and save the page, replacing the previous version. You can watch the conversion process in the Export Progress window, as shown in Figure J. This palette also shows you file size, how long the files will take to download, and if there are any potential problems–such as kerning or tracking errors.
If your page contains any links, once the exporting is done, open the home page in the browser and test them to make sure they’re all working. With that done, you’re ready to upload your Web page folder to an ISP who will post your Web site online.
Figure J:
You can view your page as it’s being exported and see if there are any problems.
Instant Web Page
Creating a Web page isn’t an easy taskso why make it more difficult than it has to be? BeyondPress makes creating Web pages, be they from new or existing documents, very easy. And you don’t have to go back to school to learn how to write code! You do, however, have to come up with some cash. BeyondPress 4.0 retails for about $300. For more information, check out the Extensis Web site at www.extensis.com.

Copyright © 2000, Element K Content LLC. All rights reserved. Reproduction in whole or in part in any form or medium without express written permission of Element K Content LLC is prohibited. Element K is a service mark of Element K LLC.
Extensis, publisher of BeyondPress, is owned by ImageX.com, which also owns creativepro.com.
This article was last modified on March 12, 2022
This article was first published on December 18, 2000
Commenting is easier and faster when you're logged in!

Recommended for you

The Art of Business: Mastering Meetings
They’re fun sometimes, even productive now and again, but group meetings c...
Markzware Q2ID v3 for Macintosh Allows Adobe Creative Suite 3 Users to Open QuarkXPress 7 Documents
QuarkXPress To InDesign (Q2ID) Conversion Tool Is A One-Stop Shop Solution To Ea...
Tip of the Week: Controlling the Glyphs Panel Display
This tip was sent to Tip of the Week email subscribers on March 26, 2015. Sign u...