

This article appears in Issue 45 of CreativePro Magazine.
As part of your Creative Cloud subscription, the Creative Cloud desktop app provides access to services that enhance the desktop, mobile, and web-based apps you licensed. Adobe Fonts, Adobe Stock, Creative Cloud Libraries, and Publish Online all offer a wealth of resources—once you know to take advantage of them. Let’s take a closer look at what each offers, how to get started, and how to work around some common problems. Along the way, I’ll also point you to where to find more help if you need it.
Adobe Fonts
Adobe Fonts is a subscription service offering more than 30,000 fonts that you can use for personal or commercial projects. You can add fonts to web projects or install them locally on your system for desktop use in a wide range of applications, including Photoshop, Illustrator, and InDesign. You then can access them directly from your app’s Font menu (Figure 1).

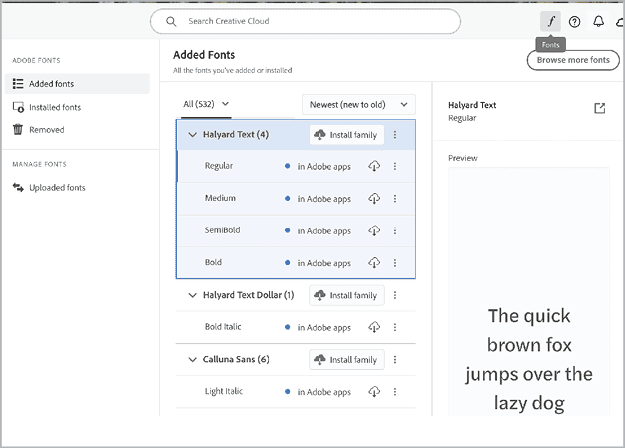
To see the list of your currently installed or added Adobe Fonts, click the Fonts button at the top right of the Creative Cloud desktop application (Figure 2).
To learn more about how to use Adobe Fonts, you can visit the About Adobe Fonts page.
What if I have trouble adding fonts?
Assuming that you already have your Creative Cloud desktop app installed, follow these steps:
- Make sure that you are signed in with the same Adobe ID that you use for your Creative Cloud subscription. Your account information is at the top of the Creative Cloud desktop; check your profile icon to reveal the name and email address of the account you’re using.
- To switch to a different account, click Sign Out. After you are signed out, you will see the option to sign in with another Adobe ID. You can also click the Account option in the Creative Cloud desktop profile menu to visit your Adobe Account page and confirm that you are signed in with the Adobe ID that has your Creative Cloud subscription on it.
- Check if the fonts are successfully added. The Fonts menu is updated when the fonts are added. A red dot will appear next to any font with an installation issue. Hover over the dot for more information about the issue. For example, it could have occurred because of a network interruption. Or it could be because a font with the same name is already installed.
- Toggle the Adobe Fonts setting. From your Account icon, choose Preferences > Services. Toggle Adobe Fonts to turn it off and back on.
- Sign out of Creative Cloud and restart the computer. This turns off any font-related processes that may not be working correctly. When the computer has restarted, start Creative Cloud desktop and sign back in to Creative Cloud.
What if Manage Fonts is stuck?
Syncing fonts can sometimes take a few minutes. If you get stalled at the “Loading Adobe Fonts…” message for longer than that, run the Creative Cloud Cleaner tool, and reinstall everything again. For more information on when and how to use the tool, check out this Adobe Help article. You can also consult Adobe Fonts Learn & Support, which provides access to other troubleshooting and help files as well as links to forums and subforums about Adobe Fonts and typography.
Adobe Stock
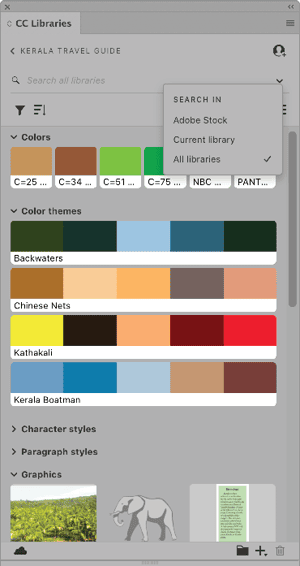
Adobe Stock is a service that provides designers and businesses with access to millions of high-quality, curated, royalty-free photos, videos, illustrations, vector graphics, audio, and 3D models for all their creative projects. Some Adobe Stock assets are free. Most assets are not free, but if you’re a Creative Cloud subscriber, you can download watermarked, low-resolution files using the Libraries or CC Libraries panel in InDesign, Photoshop, Illustrator, and many other Adobe applications. You can use the search field in these panels to find an asset for a project and then save it to a library. Figure 3 is an example of an unlicensed Adobe Stock image shown in InDesign.

If you use a free trial or purchase a subscription to Adobe Stock, you can automatically replace the low-resolution image with a high-resolution, watermark-free version. Figure 4 shows the licensing process. Figure 5 shows the licensed high-resolution version of Figure 3.


This tutorial explains how choosing an asset and licensing from Adobe Stock works.
What if I’m unable to download Adobe Stock assets?
Here are some things you can try if you have trouble downloading Stock assets:
- Visit the Adobe Stock page and sign in with your Adobe ID and password. In the upper-right corner, click your Account icon, then click License History. The License History page lists the Adobe Stock assets you’ve purchased. Click the down arrow next to Save To My Library. Click the Download button to re-download the asset. If that doesn’t work, you can click the ID number to the right of the image you want to download. The asset’s page will open in a new browser tab, and from there you can click Re-download for Free.
- If the problem still occurs, ensure that a pop-up blocker is not blocking the download page.
- Ensure that your browser accepts cookies and your firewall doesn’t block outgoing information.
- Sign out from Adobe Stock, sign back in again, and try downloading the asset again.
- Try using a different browser.
- Clear your browser cache and delete your internet history.
- Check out the Troubleshoot Adobe Stock page for more troubleshooting tips.
How do I cancel my Adobe Stock membership?
You have two choices: Cancel your membership outright, or drop Adobe Stock from your Creative Cloud membership. This help page explains the difference, as well as how to do each.
Creative Cloud Libraries
Creative Cloud Libraries (aka CC Libraries) let you share design assets (graphics, styles, brushes, colors, and several other asset types) across your Creative Cloud apps—desktop and mobile alike.
Each application has its own way of accessing libraries. In desktop apps, you can access them from the CC Libraries panel (as in InDesign, shown in Figure 6) or the Libraries panel (as in Illustrator or Photoshop). For a deeper discussion of working with libraries, check out Keith Gilbert’s article in Issue 43 or Adobe’s introductory tutorial on libraries, which links to app-specific help. For quick troubleshooting tips, read on.
How do I view my libraries in the Creative Cloud desktop app?
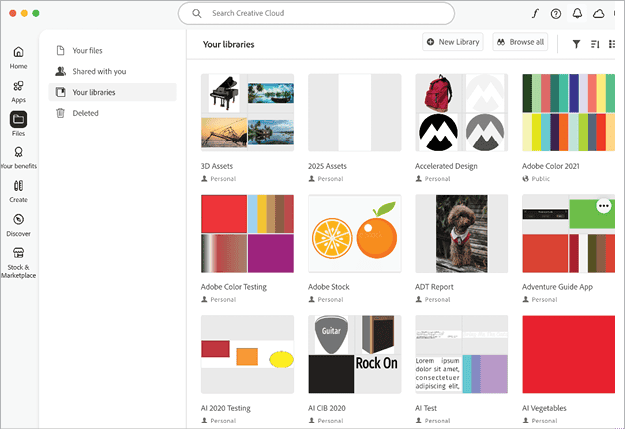
In addition to viewing your libraries within your apps, you can view and manipulate libraries in the Creative Cloud desktop app. Open the desktop app, and choose Files > Your Libraries on the left menu bar (Figure 7).
What if my app’s Library panel is blank?
Here are some things you can try if your Library panel is blank in your application:
- Make sure you’re updated to the latest version of your application.
- Restart your computer.
- Make sure you’re logged into your Adobe ID in the Creative Cloud desktop app. Go to Preferences > General. Sign out, and then sign in again with your Adobe ID.
If you still have a problem, post it on the Adobe Collaboration Experiences forum. A fellow user in the community may have an answer.
Publish Online in InDesign
Publish Online is an InDesign feature that provides a way of publishing your InDesign documents online as HTML web pages by storing them on Adobe servers. Once they’re published, anyone can view these pages from a browser on a computer, tablet, or smartphone. They support built-in navigation and many of the interactive features you can create in InDesign, including buttons, animation, slideshows, video, and audio.
Figure 8 shows the InDesign dialog box for publishing a new document, and you can learn more about Publish Online, here.

Some users have noticed visual glitches when exporting complex layouts with transparency effects like drop shadows to Publish Online. If this happens to you, try turning off the effects and/or choosing PNG as the Format under Advanced > Image Settings.
If the PDF download button is missing in the Publish Online version of your document, go back to the dialog box in InDesign and look in Advanced > More Settings. Make sure the option to Allow viewers to download the document as a PDF is turned on.
Nonstandard characters in file names have also been known to cause trouble in Publish Online. Use only alphanumeric and basic punctuation in your file names.
If you see numeric error codes, check this page to diagnose and fix them.
Other problems, such as extremely slow exports, have been solved by bug fixes to InDesign, so be sure you’re running the latest version that’s appropriate for your workflow.
If you have other problems publishing documents with Publish Online, post about it in the Adobe InDesign forum.
From Creative Clouds to Sunny Skies
Although they may not be why you subscribed, Adobe Creative Cloud Services give you more for your money with resources and tools to improve your creativity. Usually, they work as advertised for most users, but when they don’t, using the tips in this article may improve your local forecast.
This article was last modified on June 27, 2025
This article was first published on April 13, 2016
Commenting is easier and faster when you're logged in!

Recommended for you

How to Uninstall or Reinstall InDesign CC
Adobe keeps fine-tuning the Creative Cloud app. One recent change that you may h...
Announcing the InDesignSecrets Adobe Font Pack
Fonts are like voices, or like facial expressions: each one tells a story and ex...
Tip of the Week: Turning Off Typekit
How to turn off Typekit font synching in the Adobe Creative Cloud app if you don...