Tips and Tricks: Winter 2023
Time for another round-up of tips and tricks from your favorite creative pros


This article appears in Issue 26 of CreativePro Magazine.
We’ve been scouring all the great info that creative folks have shared at our past events. And now—like a holiday gift to you—we present some of the best tips and tricks for making your workflow more efficient and your projects shine just a little bit brighter.
Quickly Apply Artifact Properties for Accessibility in InDesign
At times you may need to hide decorative items from a screen reader because they do not relay any meaningful information to the user. A quick solution? Set up an object style to automatically set the artifact properties (Figure 1).
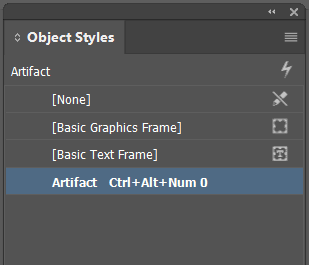
Figure 1. An object style with image artifacting built in
You can even take it one step further and assign a shortcut combo like Ctrl+Alt+Num0 (Windows) or Command+Option+Num0 (macOS) to assign those artifacts in an instant.
—Dax Castro
Extend Photoshop Backgrounds with Generative Fill
You can use Photoshop’s Generative Fill feature to extend a photo’s background. To do so, follow these steps:
- Select the Crop tool. Then extend your canvas by dragging the corner and edge handles outward (Figure 2). Press Enter/Return or click the commit checkmark in the Crop options bar.
- Use the rectangular Marquee tool to select the extra canvas. Shift-click to include extra areas of the canvas.
- From the Contextual Task Bar, click Generative Fill. Leave the text entry prompt box blank, and click Generate.

Figure 2. Setting new crop boundaries
If you want to fill the
area with something specific, you can enter a prompt before clicking the Generate button (Figure 3).

Figure 3. The same image with background created with Generative Fill
—Jesús Ramirez
Saving Colors to a CC Library
The easiest way to add most items to a Creative Cloud Library is by selecting the item and then dragging it into the Libraries panel. You can find the Libraries panel in Photoshop and Illustrator by choosing Window > Libraries. In InDesign, choose Window > CC Libraries.
Saving colors to a Creative Cloud Library works slightly differently. In InDesign, make sure your desired library is selected in the CC Libraries panel, then select the color swatches in the Swatches panel. Click the Add Selected Swatch button in the lower-left corner of the Swatches panel. In Illustrator, you can add a new swatch to a Creative Cloud Library when creating it by selecting the Add to My Library checkbox in the New Swatch dialog box. And finally, in Photoshop, you can simply drag a swatch into the library. In all three apps, you can also add colors from selected items.
Note that libraries support both individual colors and color themes from InDesign or Adobe Capture. Clicking a saved color will add it as a swatch in an InDesign document but won’t in Photoshop or Illustrator, where it will only apply the color instead. It’s important to learn these differences when managing branded assets in multiple programs.
—Bart Van de Wiele
Illustrator’s History Panel
You can use Illustrator’s relatively new History panel (Figure 4) to avoid having to perform endless undos.
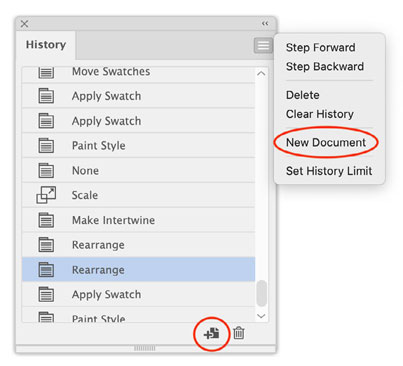
Figure 4. The Illustrator History panel
Choose Window > History and click the state you want to jump back to.
Caution: When you select a state, Illustrator shows the document at that state. If you make any changes to the design at that point, the history ahead of the selected state is overwritten, and you can’t get it back. As a fail-safe, choose the last state in the panel, and then click the plus button or use the panel menu to create a new document from your selected state before editing.
Note that the History panel records document changes, but not application-based changes, like changes to panels and preferences.
—Laura Coyle
Navigate Your Way Through InDesign Pages
A critical part of interactivity in digital publishing is adding page navigation in multi-page documents. Think of a company brochure or magazine where navigational wayfinding would make it easier for viewers to get through a document. Using the Buttons and Forms panel (Window > Interactive > Buttons and Forms), you can create a button to help them.
Select the item, and click the Convert to Button option at the bottom of the panel. Next, assign an action to the button to take viewers to next page, previous page, or other specific page: Click the plus sign next to Action and choose the appropriate option.
Another way of adding page navigation in a document is to use the Hyperlinks panel. Open it (Window > Interactive > Hyperlinks), then select the text you want to link (for example, Click Here). In the Hyperlinks panel, click the + icon, set the Link To type to Page, and then choose the page you want to send the viewer to.
—Angelo Montilla
InDesign’s “Intertwine” Feature
People have been oooh-ing and ahhh-ing over the Intertwine feature in Adobe Illustrator, but I’ve been creating this same effect in InDesign for years! Okay, I admit that it’s more straightforward in Illustrator, but this InDesign trick—first shown to me by our Editor in Chief, Mike Rankin—is so easy that anyone can do it.
- Draw a rectangle over the part you want to intertwine (Figure 5).
- Select the object in the back (in this case, the green circle), and copy it to the clipboard.
- Select the blank frame you just created, and choose Edit > Paste Into (Figure 6).

Figure 5. Selecting the area where the intertwine will occur

Figure 6. The result after pasting a copy into the overlapped rectangle
—David Blatner
Inspecting InDesign and Associated Files in Bridge
With Bridge, not only can you view thumbnails of your Photoshop, Illustrator, InDesign, and PDF files, but for InDesign documents and PDFs with multiple pages, you can preview the different pages! Just select the file, press the spacebar, then use your Up and Down Arrow keys to flip through the pages. (The size and number of pages included in the preview is set from within InDesign under Preferences > File Handling > Saving InDesign Files.)
Another cool trick in Bridge is being able to instantly browse all the files that are linked to a particular InDesign document—no matter where they’re saved—without moving or copying anything. Somewhat like an instant virtual folder.
To see this in action, find an InDesign file in Bridge and right-click on the link icon in the top right of the thumbnail, then select Show Linked Files (Figure 7).
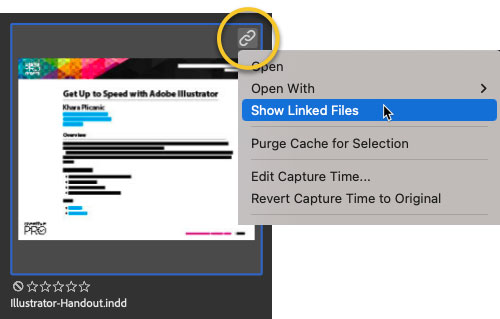
Figure 7. Showing files linked in an InDesign file
—Khara Plicanic
Use Acrobat in a Web Browser
Acrobat.com will take you to a web-based version of Acrobat (Figure 8). All the features are available to you with a Creative Cloud membership.

Figure 8. Acrobat in the web browser
Suppose you are using someone else’s computer or a public computer somewhere. You need to edit a PDF file, add comments to a PDF, or use another of Acrobat functions, but the computer you are on doesn’t have a full version of Acrobat installed. How will you make your deadline? Don’t panic. Just log in to Acrobat.com with your Adobe ID, and you’re good to go.
—Keith Gilbert
How Many Times in a GREP Expression
Sometimes when writing a GREP expression you don’t want to find something one or more times, but rather a specific number of times. Or at least a minimum number of times. Brackets [] are used a lot in GREP, but in this instance braces { } or “curly brackets” come into play.
To indicate an exact number of times a specific text string should occur for it to fit the GREP pattern, put that number within braces immediately after the string. To indicate a minimum number, put that number in the braces followed by a comma. If you want to search for a range of occurrences of the preceding string, put the minimum number, followed by a comma, followed by the maximum number.
Here are some examples:
{3} finds where there are exactly three occurrences
{3,} finds three or more occurrences
{3,5} finds three, four, or five occurrences
—Erica Gamet
Converting SVGs to Shapes in PowerPoint
One of the advantages to using SVGs in your PowerPoint document is that they can be converted to pure PowerPoint vector shapes should you wish to break them apart, delete parts, or edit the vector points.
Select the SVG, and under the Graphics Format tab, click Convert to Shape (on the far left). Don’t forget that you can always right-click a vector shape and select Edit Points to edit the Bézier curves (Figure 9). Vector editing is not quite as smooth as it is in Illustrator, but you can still do it!

Figure 9. SVG file converted to PowerPoint shapes
—Nolan Haims
Turn Off Specific Ligatures in InDesign
Ligatures, which are enabled by default with every paragraph style, are considered a typographical nicety. But sometimes, depending on the font, a particular letter pair, when turned into a ligature, looks weird to your client. Or to you.
Here is how to “turn off” the ligature setting for just one or a few letter pairs, but keep the rest.
Let’s say the offending ligature is Th, as in this example:

If you simply turned off all ligatures (from the Control panel menu or by editing the paragraph style), you’d end up with this:

The problem is that you also lose the ffi and the fi ligatures, making the phrase affiliate figure look clunky.
The answer is to create a character style that turns off ligatures, and then to add a GREP style that applies the character style to the letter pair.
- With nothing selected, create a new character style.
- Turn off the ligature setting in the Basic Character Formats section.
- Name the style (No Ligature, for example), and click OK.
- Edit the paragraph style where the offending ligature appears.
- Add a GREP Style, selecting the No Ligature character style, and entering Th in the To Text field.

And it works!
—Anne-Marie Concepción
Animation in Adobe Fresco
Adobe Fresco offers two animation methods: frame-by-frame and motion-path animation. With frame-by-frame, you can transform any layer into a timeline, similar to Photoshop. This allows for limitless frames to add dynamic movement to your work. Motion paths, on the other hand, are ideal for beginners. You can make any element follow the path of a drawn stroke, and then adjust its properties in the Properties panel. This includes making it sway, shrink, grow, and more.
To create a motion-path animation:
Select a layer or a layer group.
Tap the Animation icon.
Tap Path.
Draw animation path (Figure 10).
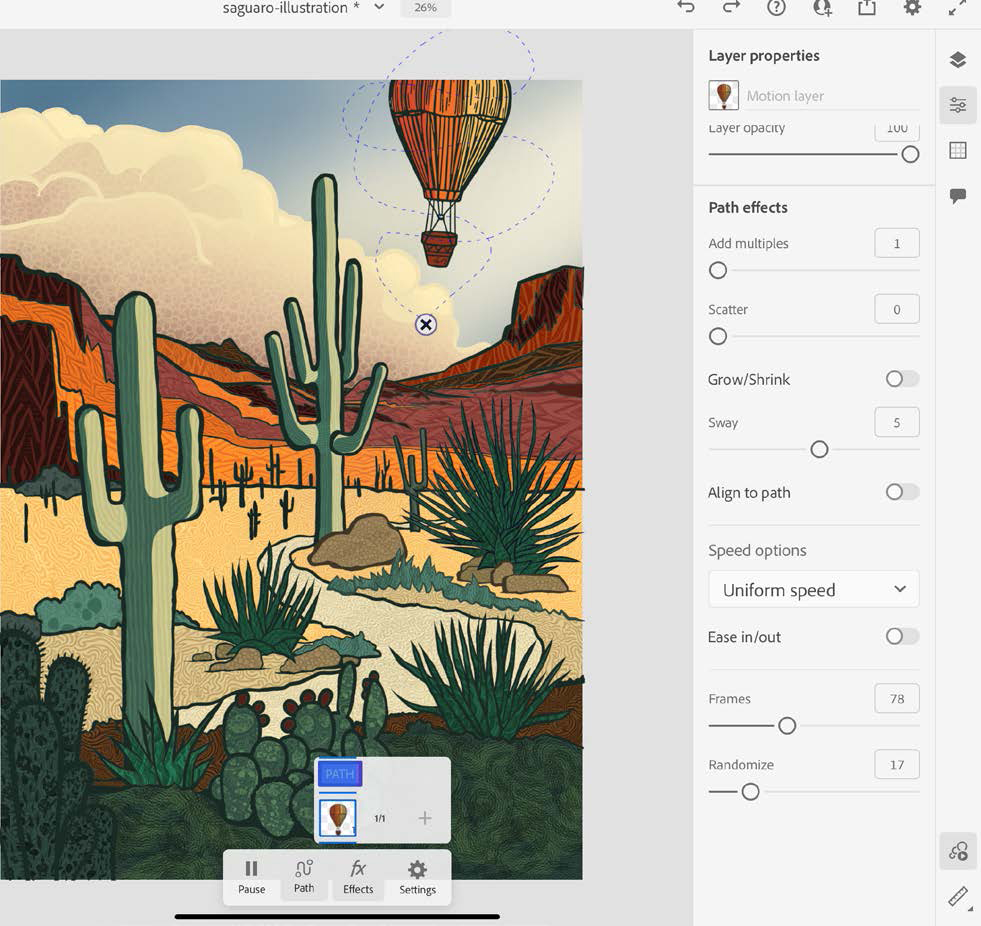
Figure 10. Drawing motion paths is a great way to get started creating animation in Fresco.
Adjust Path Effects in Properties panel.
Choose Publish & Export > Motion > MP4, GIF, or PNG Sequence.
—Theresa Jackson
Commenting is easier and faster when you're logged in!

Recommended for you

25 Years of Tips and Tricks
A look back at a quarter century of tips reveals some timeless treasures
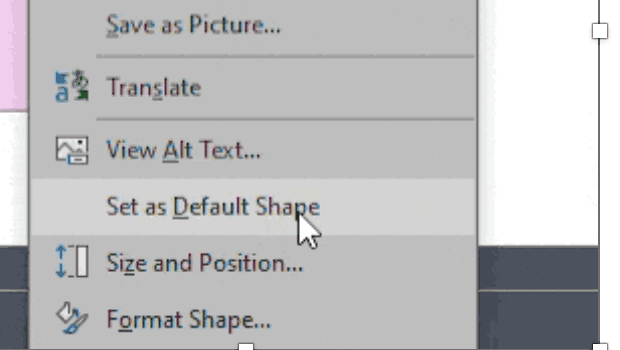
How to Set Default Shapes, Lines, and Text Box Styles in PowerPoint
One way to make working in PowerPoint smoother is to set default shapes, lines,...