
The Secrets to Smoother Paths in Illustrator
Don’t let poorly placed points ruin your designs.


This article appears in Issue 32 of CreativePro Magazine.
In the world of vector design, the quality and simplicity of your paths can make or break the aesthetic and functional success of your artwork. A lumpy logo or a multitude of messy jagged lines in your illustration tends to pull focus, and not in a good way.
Smooth paths are not only important for maintaining a clean and professional overall look. They also play an essential role in keeping file sizes manageable and performance optimized. A few extra points (also known as nodes) might not seem like a big deal when working with a single icon or simple graphic, but that added complexity can multiply fast, particularly in more complex designs such as repeating patterns or highly detailed image-traced artwork.
Optimizing the number and placement of your nodes can also significantly simplify the editing process. Trying to reshape a curve with a dozen nodes can cause a major headache versus the ease of adjusting one or two well-placed points (Figure 1).
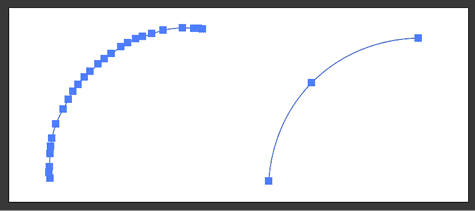
Figure 1. Editing a path with many extra points (left) is a much more tedious process than editing a cleanly built path with a minimum number of points (right).
In this article, we’ll explore the essential tools and techniques for achieving super-smooth paths in Illustrator and ensuring your designs stand out for all the right reasons.
Method One: Setting Yourself Up for Success
It’s always easier to create clean paths in the first place than to do a lot of tedious clean-up work later, so let’s take a look
at a few ways that you can craft simple, efficient paths right from the start.
Intentional point placement with the Pen tool and Curvature tool
The Pen tool and the Curvature tool both allow for precise control of point placement as you create lines and shapes. With either of these tools, the best strategy is to use as few points as possible to create your initial curves. While efficient point placement does take some practice, it’s definitely a skill worth developing that will serve you well, speeding up your future workflow and expanding your creative capabilities.
Tip: For practice with these tools, I recommend tracing over some basic shapes (circles, triangles, more organic curves) while challenging yourself to use as few points as possible. You can also try a more structured interactive approach to learning by using tools like The Bézier Game by Mark MacKay.
If you find you’ve added too many points to your path with either of these tools, it’s not hard to remove the extra nodes. While using the Pen tool, you can easily switch to the Delete Anchor Point tool using the minus (-) key, and then click once on the offending point to remove it (Figure 2).
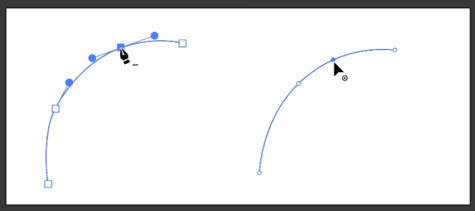
Figure 2. Use the minus (-) key shortcut to access the Delete Anchor Point tool when drawing with the Pen tool. When drawing with the Curvature tool, you can select the point you wish to remove and press the Delete/Backspace key.
While using the Curvature tool, you can remove specific points equally easily: Select the point you wish to eliminate, and press the Delete/Backspace key.
Auto-smoothing options for the Pencil and Brush tools
When freehand drawing with the Pencil tool or Brush tool, you can fine-tune the auto-smoothing settings by double-clicking the tool in the toolbar and adjusting the Fidelity slider. This allows you to control the level of auto-simplification Illustrator will perform in real time as you draw. Setting the Fidelity all the way to Smooth (far right) will result in very simplified paths with a minimum number of points (Figure 3).
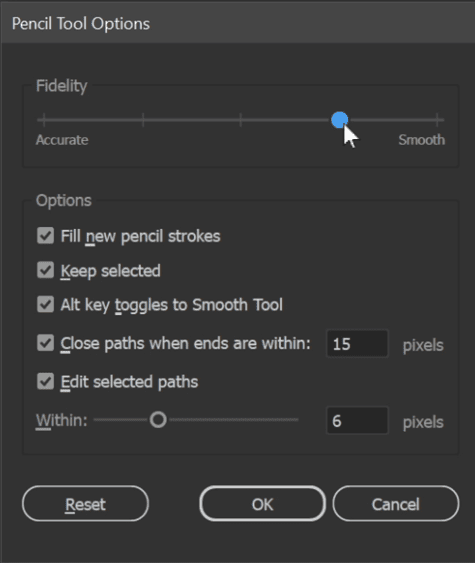
Figure 3. Double-click the Pencil or Brush tool to access the Options panel. There you can experiment with the Fidelity slider to adjust the level of auto-smoothing on the paths you draw with that tool.
Building with shapes for a clean foundation
Another way to create a clean base for your vector art is to construct your designs from basic geometric shapes using the Ellipse, Rectangle, and Polygon tools. You can combine and subtract these simple shapes, using the Shape Builder tool and the Pathfinder panel, to create much-more-complex paths. Because the initial primitives are made up of perfect geometric curves and lines, you’ll easily avoid the issue of creating too many points or irregular curves up front (Figure 4).

Figure 4. Using simple shapes and combining them with the Shape Builder tool or Pathfinder panel allows you to quickly build complex shapes with smooth paths and minimal points.
Method Two: Strategic Smoothing Solutions
What if you already have paths that need to be further simplified, such as paths created by Image Trace, Text to Vector, or another automatic vectorization process? Two standout tools built right into Illustrator can help you fix things up quickly and efficiently.
Using the Smooth widget and the Simplify dialog box
The first and easiest-to-use smoothing tool at your disposal can be found by choosing Object > Path > Smooth. A widget will pop up on your screen with a simple slider with which you can control the smoothing of the path manually, as well as a handy Auto Smooth button. Click it, and Illustrator will attempt to calculate the proper level of smoothing that your path needs and reduce points automatically (Figure 5).
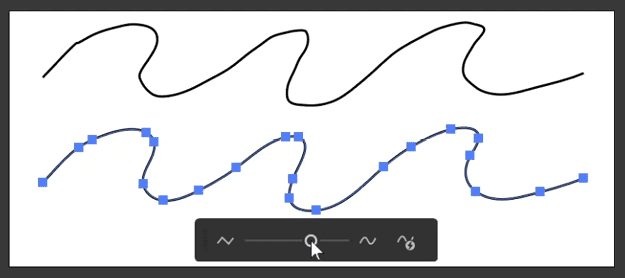
Figure 5. You can access the Smooth widget by choosing Object > Path > Smooth. You can manually drag the slider to simplify your path, or try the Auto Smooth button.
If you find that you don’t have enough control with the Smooth widget, you can access advanced options by choosing Object > Path > Simplify. The dialog box that opens offers additional options and settings to keep corner points sharp, convert path segments to straight lines, and manually set the exact percentage of smoothing you wish to apply to your art (Figure 6).
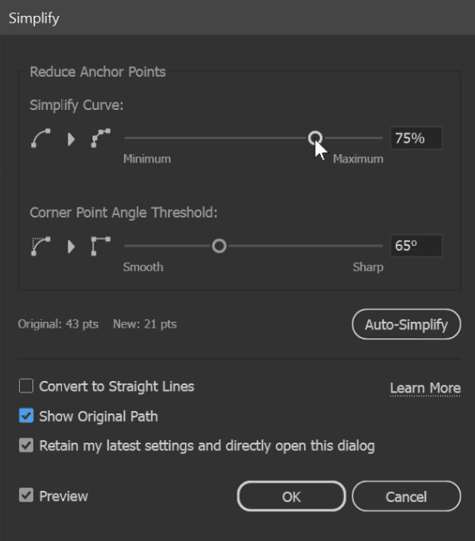
Figure 6. In the Simplify dialog box you can set additional options.
Tip: Keep in mind that you can use these smoothing functions on single paths or groups of paths. Plus, you can target a specific area of your art by manually selecting a group of points to be reduced using the Direct Selection tool or a more targeted selection tool like the Lasso tool.
Using the Smooth tool for targeted smoothing
If you’d like to perform some very targeted manual touch-ups on your paths, you can use the Smooth tool (found in the toolbar). With your art selected, just drag the Smooth tool along the path that you want to simplify (Figure 7). To further simplify and refine your curves, drag again over the same segment.
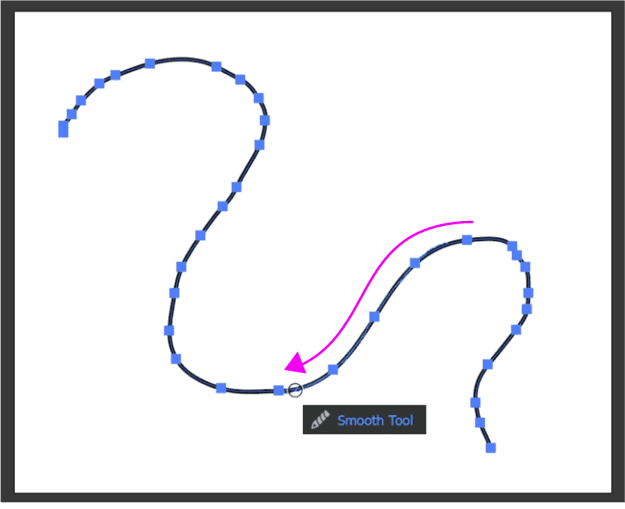
Figure 7. You can drag the Smooth tool over any part of your selected path to manually target a section for smoothing.
Notice that the Smooth tool adds and removes points as it recalculates each time you drag it over a path. If you’re unhappy with where the points fall after your first round of smoothing, feel free to make a few more passes until you get the number of points and path placement that you’re happy with.
You can adjust the strength of the Smooth tool via its Options panel. Double-click the tool in the toolbar to open the panel, then adjust the Fidelity slider. It ranges from Accurate, which will produce the lowest smoothing strength, to Smooth, which will produce the strongest smoothing (Figure 8).
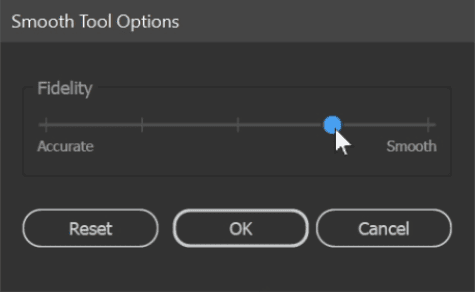
Figure 8. As with the Pencil and Brush tools, you can double-click the Smooth tool in your toolbar to open an Options dialog box. The Fidelity slider enables you to adjust the strength of the smoothing action.
Tip: If you’re using the Pencil or Brush tool for freehand drawing, you can use a handy shortcut to temporarily toggle on the Smooth tool: Hold the Option (macOS) or Alt (Windows) key. Your cursor will switch to the Smooth tool so that you can make quick adjustments to your paths. Release the modifier key, and you’ll be able to continue drawing with the tool that you had selected.
Manual adjustments and converting anchor points
Although the options above are usually adequate for improving the quality of most paths, in some cases you can better optimize a shape or line by manually adjusting individual nodes.
For instance, if a curve or path segment has a very jagged appearance, the problem may be that the anchor points are the wrong type (Corner versus Smooth), rather than areas having too many points. In this case, use your Direct Selection tool to select individual points and convert the Corner points to Smooth points by clicking the button in the Convert section of either the Properties panel or the Control bar (Figure 9).

Figure 9. Sometimes path smoothing requires manual adjustments of individual points such as converting the point from a Corner point to a Smooth point.
Tip: Aside from being a useful tool for creating custom paths, the Curvature tool can also be used on any existing shape or path for quick point conversion and manual adjustments. Using the Curvature tool you can double-click a point to toggle it between Smooth and Corner types. You can also use the tool to select any point on your path and drag it to manually reshape the path segment.
Additional tools for industrial-strength path simplification
It’s definitely possible to get great results using only the built-in tools in Illustrator when it comes to perfecting your paths. If this is a task that you need to perform often, however, you may prefer one of the very helpful third-party plug-ins that offer even more path-smoothing power tools to help get your art production ready in no time.
The Astute Graphics Suite includes two plug-ins that offer extended controls and options for point removal and path smoothing. The VectorScribe plug-in adds the Smart Point Removal Brush tool, and the VectorFirstAid plug-in includes a smart point reduction feature. These tools work very similarly to the Smooth tool and the Simplify dialog box, respectively, but offer some extended options and fine-tuning for those who want to dig in and customize the process.
Final Thoughts: Practice Perfecting Your Paths
Mastering the tools and techniques for creating smooth paths in Illustrator is an important foundational skill that will help improve the overall quality of your vector artwork and naturally lends a more professional look to your finished pieces.
Using these methods to create clean art will also endear you to anyone else who may need to edit or work with these files in the future. As an added bonus, well-optimized art can significantly reduce the chances of any issues or mistakes popping up when you pass along your files for physical or digital reproduction.
By starting with clean, simple path-building methods, taking advantage of Illustrator’s powerful smoothing tools, and understanding when and how to manually tweak a point or path, you can achieve smoother, more refined results in your future designs.
Commenting is easier and faster when you're logged in!

Recommended for you

CreativePro Video: Recolor Artwork with Pantone Swatches
In this week’s CreativePro video, Theresa Jackson shows you how to easily find a...
InDesign Magazine Issue 110: Illustrator and InDesign
Issue 110 of InDesign Magazine include articles on Illustrator, designing with g...
A Script to Make Vector Drawing Easier in InDesign
Script puts useful vector path commands in a top-level menu of their own