


While setting up a template for a complex XML workflow today, I was reminded of a point of confusion for many users about how InDesign’s Styles function.
InDesign features Paragraph and Character styles, of course, as well as Object, Table, and Cell styles. Paragraph styles are different than the other four types of styles. How? Paragraph styles must specify all the formatting for a paragraph to which it’s assigned. In other words, it’s impossible to create a Paragraph style that only specifies paragraph alignment, but not type face or left indent. So as you create a Paragraph style, every option in the Paragraph Style dialog box is filled in one way or the other.
But Character, Object, Table, and Cell styles behave differently. These styles may specify only the formatting that you want them to. In other words, their scope can be limited to a single attribute or group of attributes. For example, you can have a Character style that only applies an underline to text, leaving the type face, color, and style intact. Or you can create a Cell style that only applies a 10% gray tint to a cell, leaving the rules around the cell and the text inset from the edges of the cell untouched.
The mechanism for setting or ignoring attributes can be confusing. The interface varies in how you tell InDesign to “ignore” certain formatting and not include it in the style definition.
In the example below, from the Character style dialog box, to make the Character style ignore the Font Family, Font Style, or Size, you simply select the Family, Style or Size with the text cursor and hit the delete key to make the field blank. Easy enough.

But in the example below, Kerning, Case, and Position currently are ignored as part of the style, that’s why they are blank.

If I click on the Kerning field, I see three choices. “None” sounds like it will ignore the Kerning. But don’t be fooled. If you choose this option, a Kerning method of “none” will become part of the Character style.
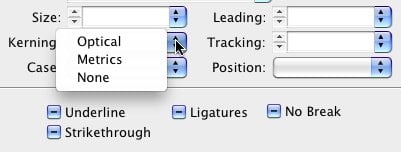
Only after you actually choose either Optical, Metrics, or None, and return to the drop-down menu do you see the option to Ignore the Kerning method as part of the Character style.

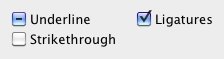
In the example below, we see a different type of widget. In this case, Ligatures are on as part of the Character style, Strikethrough is off as part of the Character style, and Underline is ignored. In other words, when this style is assigned to a block of text, Ligatures will be activated, any Strikethrough that the text may have will be removed, and the underlining of the text will be ignored. These “three state” check boxes appear throughout the Character, Object, Table and Cell style dialog boxes.
This article was last modified on December 20, 2021
This article was first published on August 10, 2010
Commenting is easier and faster when you're logged in!

Recommended for you

Reshaping Objects
You don't have to limit your designs to use just the few basic shapes you can dr...

Add Variety with Glyphs and Text Alternates in InDesign
Learn how to find and activate type alternates in InDesign to add variety to you...
Secrets of the Control Panel Revealed
The Control panel is teeming with hidden shortcuts to other panels, preferences,...