
The Photoshop User’s Guide to Motion and Video
Get your design work moving with an app you already know and love!


This article appears in Issue 18 of CreativePro Magazine.
By combining motion graphics and video into your work not only can you produce more engaging content for a wider range of media, you can also enhance your creative skills. Even better, you can do all this from within the comfort of the Photoshop interface you already know.
In this article, we’ll go over the top seven principles you should understand when working with video and motion graphics in Photoshop. At the end, you can practice your new-found skills in a brief tutorial that puts these key techniques to work.
The Timeline Panel
Before we get into importing files and creating animations, let’s take a quick look at the Timeline panel in Photoshop and its workflow options. The Timeline panel has two modes: One is a frame-based workflow, and the other is a video/keyframe-based workflow (Figure 1). Although you can use either workflow to create motion graphics, you must use the video timeline with video files.
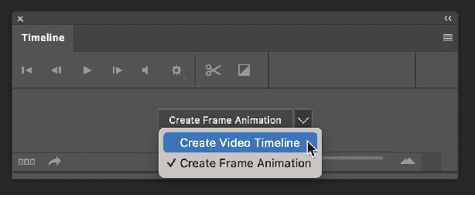
Figure 1. When creating a new timeline in the Timeline panel, you can choose either a frame-based or a video-based workflow.
Photoshop presents you with this choice of workflows only if you add a timeline to an existing Photoshop file that does not already have a timeline.
Frame animations
In a frame-based animation workflow, you manually control the contents of each frame of your motion graphic to achieve an animation effect (Figure 2). Frame-based animations give you more precise control over every frame of an animation and are mostly used to create animated GIFs that need to conform to specific playback options or fit within a file-size limitation. Unlike in the early days of film animation, however, you no longer have to draw each frame yourself. Photoshop offers several tools that make the frame creation process go more quickly and easily.

Figure 2. A frame-based timeline, where every step of the animation is represented in a separate frame
Video/keyframe animations
The video-based workflow allows for the use of keyframes to generate animations along your timeline. In a keyframe workflow, you need to set up animated properties on only the first and last frames of an animation. Photoshop generates all of the in-between frames automatically to create the animation. This animation workflow is used by many of the industry-standard animation applications, including After Effects, Maya, and Cinema 4D (Figure 3).

Figure 3. A video-based timeline, where the animation comes from changing nondestructive layer properties, such as position, opacity, and effects, on keyframes
Creating an Animation with Frames
The frame-based timeline works in conjunction with the Layers panel to change specified properties of your layers over time. Any nondestructive layer property can be part of your animation, including opacity, position, and layer effects. Anything that actually changes the pixels on the layer, such as scaling, rotation, text edits, and filters, cannot be animated.
Figure 4 shows an ad for a coffee shop. Each element is on its own layer. so we can easily add a frame animation in which the coffee cup and the tagline start out invisible and then fade in, while moving slightly into place.

Figure 4. We can add life to this static ad by animating certain elements so they move and fade in.
First, open the Timeline panel from the Window menu. Click the button in the center of the panel to create a new frame-based timeline. Arrange your layers in the Layers panel to show what you want to see in the final frame of your animation.
Click the Duplicate Frame button in the Timeline panel. For each layer you intend to animate, turn off the Propagate Frame 1 option in the Layers panel (Figure 5). In this case, that’s the coffee cup image layer and the type layer with the tagline. Then select the first frame.

Figure 5. The Propagate Frame 1 option appears in the Layers panel when you work with a frame-based animation.
Propagate properly
Now it’s time to set up the starting frame of the animation: Move the type layer with the tagline to the center of the canvas, and set its Opacity to 0%. For the coffee cup layer, set Opacity to 0% and move the cup to the left about 50 pixels.
With the first frame still selected in the Timeline panel, click the Tween button. Here’s where Photoshop saves you time by generating the in-between frames based on your instructions. In the Tween dialog box, set Tween With to Next Frame, set Frames to Add to 6, and enable the Position, Opacity, and Effects options. Click OK. Between the first and last frames, Photoshop adds six additional frames, one for each intermediate animation state of the properties you specified (Figure 6).

Figure 6. In this frame-based animation, frames 2–7 were created automatically by tweening the starting and ending frames. Note how you can select specific layers and parameters to animate.
Next, set the timing for each frame using the Delay menu. Set the first seven frames to a value of .01 seconds, then set the last frame to 3 seconds. Finally, set the looping value to 3, which will make the animation play three times before stopping on the last frame.
Creating an Animation with Keyframes
Now let’s try using a video timeline to animate the same coffee shop ad. The video timeline workflow enables you to capture layer properties from two keyframes that you define: the animation’s first frame and last frame. With this method, you don’t need to use the Tween dialog box to generate the sequential, in-between frames; Photoshop creates the full animation from just the keyframe definitions.
To create a video timeline, click the arrow to the right of Create Frame Animation to expand the menu and choose Create Video Timeline. Click the button to create the new timeline. The duration of the timeline defaults to 5 seconds.
With keyframes, it’s often convenient to work backwards, setting up the end of the animation first. To do that, arrange the layers and artwork so you see what you want for the end state of your animation. In the Timeline panel, open the properties under the text layer to reveal the Transform, Opacity, Style, and Text Warp properties. Drag the playhead in the Timeline panel to three seconds, then click the stopwatch next to Transform and Opacity to add a keyframes for the appearance of the text at the end of the animation. Open the properties for the photo layer and enable keyframes for its Opacity and Position properties.
With the properties set for the end of the animation, it’s time to set up the beginning of the animation. Move the playhead to the beginning of the timeline and move the text upward toward the center of the canvas. Notice Photoshop creates another Transform keyframe automatically. In the Layers panel, change the Opacity setting of the text layer to 0%, which will create another keyframe for Opacity on the timeline. Now we have a three-second animation with Photoshop dynamically creating all of the frames for the text opacity and position changes between the first and last keyframes (Figure 7).

Figure 7. In this workflow, keyframes for Opacity and Position are used to animate the coffee cup and text layers.
With the playhead at the beginning of the timeline, set the position of the photo layer to the left and its Opacity to 0%. This will create two more keyframes on the photo layer in the Timeline panel. Now we have a similar animation as we created with the frame-based workflow, but it took fewer steps and is easier to edit.
Another aspect of keyframe-based animation workflows is the flexibility to change the timing of your animations. For example, to make the photo animate into place faster than the text, simply move the photo’s ending position keyframe toward the left. Now the photo animation ends before the text animation. This flexibility is why so many popular animation applications adopt this workflow for motion-graphic artists.
Working with Video and Video Groups
When you import a video by clicking the plus sign in the Timeline panel, Photoshop creates a layer group called a video group. Because a video group aligns the multiple videos it contains along a single layer, or track, you can edit the videos just as you would in a nonlinear editor (NLE), such as Premiere Pro, DaVinci Resolve, or Final Cut.
The Transition menu in the Timeline panel enables you to quickly add effects, such as a cross fade, to the videos (now referred to as clips) without creating keyframes. To apply a transition, open the Transition menu, then drag your desired transition to the beginning or end of a video. When using a cross dissolve, for example, drag the transition between two video clips to apply the effect to both clips. The Duration option enables you to change the amount of time the transition takes to complete—again, without the need to create keyframes. The result is a smooth transition between the clips as they play. You can add as many videos to a video group as you like, and Photoshop will extend the duration of the timeline to accommodate the total length of all the clips (Figure 8).

Figure 8. You can add nondestructive transition effects, such as a cross fade, to clips within a video group via the Transition menu in the Timeline panel.
If you ungroup video layers using Command+Shift+G/Ctrl+Shift+G, Photoshop converts the videos back to individual layers, just as when you ungroup a layer group. Your videos become design elements you can stack on top of each other, intermingle with motion graphics, or combine with layer masks (discussed in the next section). To create a video group, simply drag one video layer onto another in the Timeline panel.
Masks, Blend Modes, Filters, and More
One of the great things about working with video and motion graphics in Photoshop is that you can use the same editing and compositing tools you currently use for your projects. For example, Figure 9 shows how I composited a video of smoke against a background with a flattened Photoshop image of a family grilling. To try something like this yourself, first create a video timeline in the Timeline panel. Next, choose File > Place Linked to import the video into your layout without creating a video group. Scale the placed video to fill the screen and press Return/Enter. Photoshop imports the video as a Smart Object, which enables you to transform the video in the layout (more on Smart Objects in the next section).

Figure 9. A realistic smoke effect is added to this animation by painting a layer mask on the smoke layer and using the Screen blend mode with lowered opacity.
The goal is to create an animated photo in which the moving smoke appears to be coming from the grill. First, let’s change the video layer’s blend mode to Screen (which makes the dark pixels transparent), then nonproportionately scale the width to get the smoke to align with the edges of the grill. Next, set Opacity to about 70% and apply a layer mask to the video layer.
On the video mask, paint with a medium-sized soft brush with the foreground color set to black to conceal the video in areas of your layout. For my example, I painted with black to mask the video at the bottom edge of the image (up to the food on the grill), around the family’s faces, and toward the top of the canvas. As you make adjustments to your mask and layer opacity, click the Play button in the Timeline panel to check how the overall effect is looking. As with any project, continue to refine your mask until you’re satisfied with the results.
You could also apply a motion blur to the smoke layer. Because that layer is a Smart Object, Photoshop applies the effect as a nondestructive Smart Filter. What makes Smart Filters so amazing is that they are applied to every frame of a video.
In Figure 10, I imported a video of a sunset from Adobe Stock and applied various filters as Smart Filters. Using this technique, you can achieve some beautiful effects that can transform your video into a work of art.
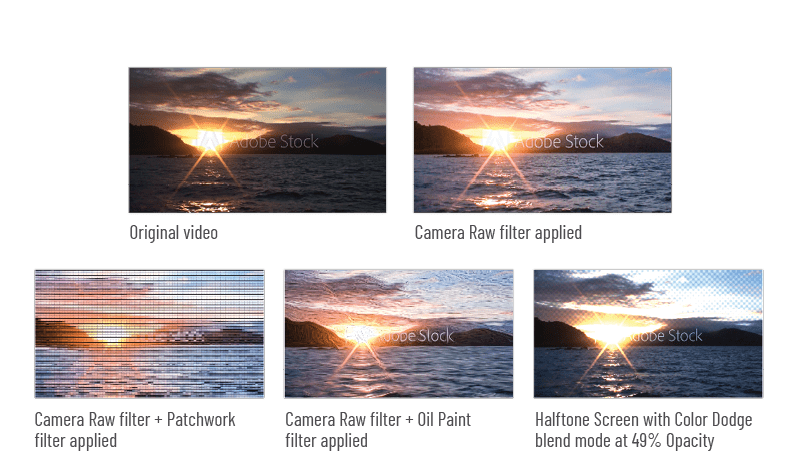
Figure 10. You can apply nondestructive filters to video when you work with Smart Objects.
Extending Functionality with Smart Objects
We’ve discussed a few ways that Smart Objects can help with video and motion graphic workflows in Photoshop, but we’re not done yet. In addition to adding nondestructive Smart Filters and video transformations, you can perform a few more tricks with Smart Objects.
Animating transformations
When animating artwork, or a video, converting it into a Smart Object will convert the Position property in the Timeline panel into a Transform property. This, in turn, enables you to animate the Transform tools to adjust the Scale, Position, Rotation and Skew properties. Photoshop will include all of these properties in a single keyframe for the Transform property. Here’s how: Move the playhead to the beginning of the timeline and activate keyframes for the Transform property. Then, move the playhead to 2–3 seconds and add a second keyframe for the Transform property (Figure 11).

Figure 11. Animating a Smart Object converts the Position property into a Transform property, letting you animate the object’s Scale and Rotation in addition to its position.
Move the playhead back to the first keyframe position (at the beginning of the timeline), select the Smart Object layer, and choose Edit > Free Transform or press Command/Ctrl+T. Rotate and scale the artwork as desired, and press Return/Enter to apply the transformation. When you preview the animation, you’ll see that the Scale and Rotation properties are both animated with a single keyframe.
Reusable animations
One of my favorite aspects of using Smart Objects is that you can include an animation inside of a Smart Object. What makes this special is that the Smart Object will still animate in the main Photoshop file. Furthermore, you can duplicate the Smart Object, and each copy will play the animation. This allows you to create more complex animations with Photoshop.
Seeing is Believing: Watch a free three-minute video featuring this example from CreativePro Week.

Figure 12 demonstrates: I created a simple rotating animation of an orange slice and then converted the animated layer into a Smart Object, which also included the animation. Next, I duplicated the Smart Object, scaled the copies, and positioned them across the layout to create an entire design with rotating oranges. On some of the Smart Object instances, I scaled the width to –100%, which flipped the animation to make those orange slices animate in the opposite direction. Finally, I applied Levels and Hue adjustments to some of the Smart Objects to create more variation in the final design.

Figure 12. Complex effects are made possible by including animations inside Smart Objects.
The creative options are limitless when you combine the powerful compositing and retouching tools with video and motion graphics features available in Photoshop.
Exporting and Rendering
Once you complete your animation or video project, it’s time to render (export) it to a file you can use in your email, on a website, as a social media ad, in a presentation, or anywhere else that supports video or animated GIF.
Exporting to animated GIFs
Yes, I said GIF. The animated GIF format still has advantages—even in 2023! One of the most widely supported file formats, GIF offers the most compatibility with social media platforms, text messaging, and email. You can export an animated GIF from either a video timeline or a frame timeline by using the Save for Web feature.
From a frame animation timeline, for example, choose File > Export > Save for Web (Legacy). This feature is still one of the most versatile tools for creating the best quality, lowest-file-size animated GIF files that I have ever used (and I have tried a bunch of ’em!).
In the dialog box, choose GIF from the Format menu, then adjust the settings to see both a real-time preview (if the Optimized tab is selected) and a file size readout (Figure 13). This is an indispensable tool if you need to create a GIF file that is under a specific size for a web advertisement. Typically, I set the colors to 128, the Dither setting to a value under 50%, and the Lossy setting to about 11% to start. With these settings, the file size decreases dramatically. If the quality still looks good, I lower the settings even more. If the quality looks bad, I increase these settings; usually setting Colors to 150 or 200. If that doesn’t do the trick for you, try increasing Dither to about 60%, and finally, try lowering the Lossy amount.

Figure 13. The sheer number of conversion settings available in the Save for Web feature in Photoshop make this one of the most advanced GIF compression tools on the market.
Once you’re happy with the quality and file size, click the Save button to export your final file. If you use Save for Web with a file that includes a timeline, the resulting GIF file will automatically be animated.
Render to video
If you’re working with a video timeline to create motion graphics or to edit or composite video, you can render your final project as a video file. Photoshop uses the Adobe Media Encoder to convert your timeline to a video file. Choose File > Export > Render Video. To create a video with the highest compatibility for web, social media, and presentations, set Format to H.264. This will create an MP4 video file (Figure 14).

Figure 14. With the Render Video dialog box, you can convert your video timeline, using the Adobe Media Encoder, to a video file suitable for web, social media, presentations, and more.
If the video you are working with in Photoshop contains audio, then the resulting video file can also contain audio—allowing you to add motion graphics to an existing video.
Try it Yourself!
Up until this point, you’ve just been following along, but now it’s time to download the project files (here), fire up Photoshop, and practice with the tools. The steps below will give you a chance to try out animating the extra properties you get with Smart Objects, as well as the flexible workflow the keyframe-based video timeline provides. So, let’s get started!
- Open the file named gift-card-promo-begin.psd in Photoshop.
- Choose Window > Timeline to open the Timeline panel, and click Create Video Timeline.
- Toggle open the properties for the two gift card layers, and click the stopwatches next to the Transform and Opacity properties to enable keyframes for them.
- Move the playhead to 3 seconds and click the keyframe icon (the small diamond to the left of the property name) to add additional keyframes (Figure 15).
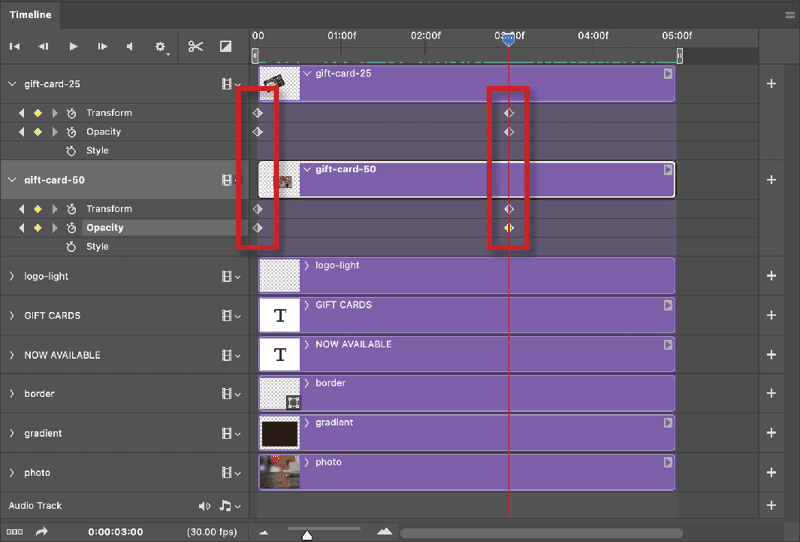
Figure 15. Adding keyframes for the Transform and Opacity properties of the gift card layers allows you to animate changes in those properties.
- Move the playhead back to the beginning, select the gift-card-25 layer, then press Command/Ctrl+T to activate the transform controls.
- Scale the card down to about 25%, move it to the center of the canvas, and set Rotation to 22° (Figure 16).

Figure 16. At the start of the timeline the top gift card layer is scaled down and rotated.
- For the gift-card-25 layer, set Opacity to 0%.
- Drag the playhead back and forth to preview the animation.
- Move the playhead to the beginning and select the gift-card-50 layer.
- Again, press Command/Ctrl+T, center the card on the canvas, set Scale to 25%, and Opacity to 0%.
- Adjust the timing, so the bottom card animates slightly behind the top one: Drag the second Opacity keyframe (at 3 seconds) for the top gift card layer to the 1-second mark (drag to the left).
- Drag the second Opacity keyframe for the bottom gift card layer to the 2-second mark.
- Move the first two keyframes on the bottom gift card layer to the 1-second mark, so the timeline looks like Figure 17.
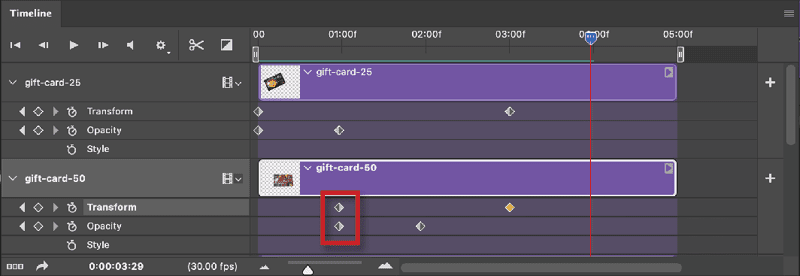
Figure 17. Moving the first two keyframes for the bottom gift card layer to the
1-second mark delays the start of those animations.
- Move the playhead to the beginning of the timeline, and click the Play button. Watch as the top card begins to animate and the bottom card moves out from behind (Figure 18).

Figure 18. This sequence of frames shows the effect of animating the two gift card layers.
- For further practice, adjust the timing to make the animation faster or slower and animate the text’s Opacity and Position.
- Follow the rendering steps discussed in the “Exporting and Rendering” section to create your final video or animated GIF file.
Coming Attractions
The most exciting thing about working with video in Photoshop is the fact you’re using an application you’re already familiar with. All the cool things you love to do in Photoshop can be applied to video and motion graphics. And once you develop a real taste for motion design and want to take your skills further, After Effects is right there waiting for you, with full support for Photoshop files. Now, get moving!
Commenting is easier and faster when you're logged in!

Recommended for you
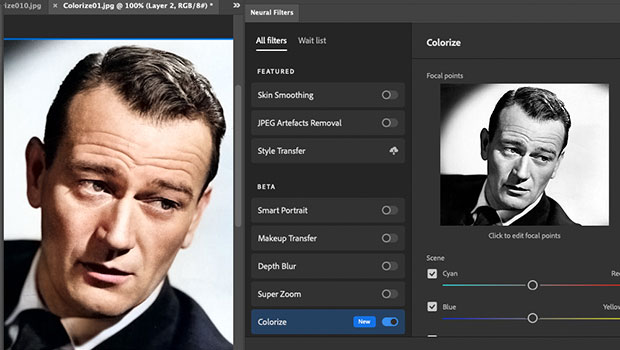
Colorizing Images in Photoshop with Neural Filters
See the strengths and limitations of Photoshop's ability to automatically colori...

Tip of the Week: Controlling the Position of a New Layer
This InDesign tip on controlling the position of a new layer was sent to Ti...
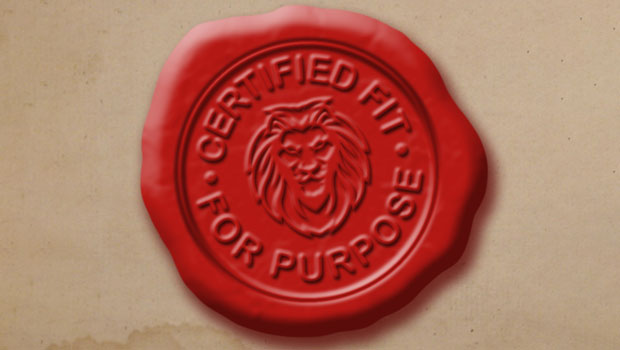
How to Create a Wax Seal in Photoshop
Learn how to combine layer effects in Photoshop to simulate any design pressed i...