


Whenever a new version of Photoshop comes around, I look forward to exploring and uncovering the newly added features and to figuring out how I can exploit them in my day-to-day work. Unfortunately, with the release of Photoshop 7, there’s not a lot to write home about. Although there are some noteworthy features that will no doubt save you countless hours, for the first time in a long time, you can practically add up all the features in a new Photoshop upgrade using just your hands (not your feet).
When comparing the features in this release to the laundry list packed in Photoshop 6.0 or even 5.0, one has to wonder if marketing now deems what version number a release should be. In truth, this release really should’ve been considered Photoshop 6.5, not 7.0. It’s even rumored that early builds carried this version number. To add some perspective, the recently released After Effects included a comparable amount of features and OS support, yet was appropriately labeled After Effects 5.5.
No doubt the standout feature in this release of Photoshop is the Healing Brush, a sort of intelligent clone stamp tool; the incredibly helpful File Browser comes in a close second. (After reading the review, find out more: Discover the Top 7 Photoshop 7 Tips PDF.)
But this version really isn’t as much about new features as it is about supporting Mac OS X. Many Mac users wouldn’t even consider switching to Apple’s new operating system until a fully compatible version of Photoshop was available. This put Apple in a tough spot: having to rely on another software company in order to gain widespread adoption of their latest operating system. But what if you don’t use or plan to use OS X any time soon? Or what if you don’t even use a Mac for your Photoshop work? Although Windows XP users gain an XP-certified upgrade with Photoshop 7.0, Photoshop 6.0 runs just fine in Windows XP.
With all this in mind, does this major release of the definitive “killer-app” offer enough compelling features to make it worthwhile to upgrade? This is Photoshop we’re talking about, so many of us will upgrade without thinking twice. But for those of you on a budget who need to be shrewd about upgrades, read on to see if the additions and enhancements will truly benefit your day-to-day Photoshop work to warrant plunking down the money for the upgrade.
The Power of X
Adobe seemed to have one goal in mind with this release: Get a native Mac OS X version out the door. Totally rewriting existing software to make it work on a brand new operating system is no small feat in and of itself. Adobe really should be commended for putting out an OS X version just nine months after Photoshop 6 shipped. Not only does Photoshop run exceptionally well under OS X, the application continues to work fine in Mac OS 9. This is good to know because if you have third-party plug-ins that haven’t been updated for OS X you may need to start up in OS 9 or Classic mode in order to use them.
Following along in the X theme, Photoshop 7 has also been written to take advantage of system enhancements found in Windows XP. Improved memory management and stability are really the stars here. Both Mac OS X and Windows XP provide Photoshop with a new level of stability and performance we’ve never had before. Soon you’ll find yourself reminiscing about those times when Photoshop would crash, bringing your whole system down or the constant tweaking of the memory settings in order to get Photoshop to play nice with other open applications. In my limited time with Photoshop 7, I don’t recall it crashing in OS X. Even if it did, I wouldn’t be the least bit unnerved since it wouldn’t bring my whole system and current work in other applications to a grinding halt. With Photoshop 7, Adobe appears to have figured out how to overcome most of the sluggishness that plagues many other OS X applications as a result of the inherent speed issues of OS X 10.1.4, which is the current release.
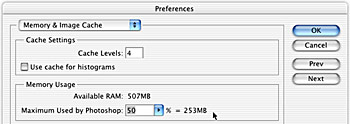
Figure 1: Windows users are familiar with seeing maximum memory usage in the Preferences dialog box of Photoshop, but this will be the first time Mac users find it — but only in OS X.
This update is also graced with the dimensional, shaded-icon treatment that showed up in Illustrator 10‘s toolbar and palettes and which complements the eye-catching user interfaces found in the two new operating systems (as well as OS 9). Make no mistake about it: Modern operating system support is really the point of this upgrade and rightly so. Finally we have versions of Photoshop and operating systems that work well together to let us do what’s important. That is, be creative by freeing us from the hassle of memory management and system crashes.

Figure 2: As with Illustrator 10, Photoshop’s icons have a new shaded dimensional look.
Healing and Brush Dynamics
As mentioned earlier, the standout feature with this release is unquestionably the Healing Brush tool along with its selection-area counterpart, the Patch tool. These new tools represent a natural evolution from the Clone Stamp tool. What sets the Healing Brush tool apart and takes it to a whole new level is that it takes into account and preserves the destination’s luminosity and other tonal values. You pick the sample origin just as you would with the Clone Stamp tool, but when you begin to paint (or heal) the destination area, a bit of magic happens. With the Clone Stamp tool, you had to carefully choose just the right patch for its color and tonal detail. But the Healing Brush tool only requires you pick up the proper coloring area, then it blends the sample origin’s color information with the destination’s highlights and shadows, providing seamless blending and ridiculously easy removal of blemishes, dust, wrinkles, etc. This remarkable tool is sight to behold. The very first time I watched this tool in action, I saw years of tedious option-clicking clone stamping flash before my eyes. The art of clone stamping will soon become lost just as channel operations became obsolete with the advent of layers in Photoshop 3.0.
A reinvented Brushes palette arrives back on the scene in a big way after being tucked away into the Options bar in Photoshop 6.0. The Brush selection pop-up still exists as it did in 6.0 but the Brushes palette is now devoted to tweaking brush settings and dynamics to tap into the new painting engine’s power. There are so many settings and controls to work with in this palette that you may grow tired of exploring before you’ve tried them all.
As with the painterly effects found in procreate Painter 7, Photoshop’s Brushes palette makes it possible to create dry and wet brush effects along with natural-looking, repeated occurrences such as grass or leaves on a tree. You can also combine two entirely different brushes for an endless amount of unique effects. Although a Wacom graphics tablet isn’t necessarily required for the new painterly brushes, you’ll want one in order to take full advantage of the brush dynamics controls. For those of you who yearned for more Painter-like brush features in Photoshop, the new painting engine goes a long way toward satisfying this.
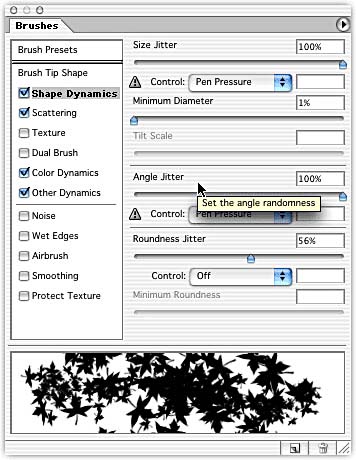
Figure 3: The new Brushes palette lets you create any type of brush your heart desires.
This article was last modified on January 3, 2023
This article was first published on May 7, 2002
Commenting is easier and faster when you're logged in!

Recommended for you

Create Your Own Photoshop Filters With Filter Forge
Recently, Filter Forge, Inc released version 4.0 of their unique Photoshop plug-...

The Digital Art Studio: Illustrator’s New Crop Image Button
The 2017 release of Adobe Illustrator added a new feature you can use to permane...

How to Make a Manga Character in Photoshop
The recent film Alita: Battle Angel stars Rosa Salazar as a cyborg, a human brai...