The Creative Toolbox: Photoshop Cosmetology

Finishing Touches
Once you’re completely satisfied with your retouching work, it’s time to sharpen up the final product. It’s best to save the sharpening of your image for the last step to give the overall portrait a consistent look. And if you were able to start with an unsharpened image as recommended, your retouching work should blend with the original nicely. Here’s my suggested recipe for sharpening the final image:
- First, create a layer copy of all the layers merged. Not only is this necessary to apply the sharpening filter to the entire image but it allows you to go back to the underlying working layers without fear of sharpening artifacts creeping up. To make a merged copy of all visible layers, create a new layer above the rest and select Layer > Merge Visible while holding down the Option or Alt key. This makes a flattened copy of all your layers on this new layer.
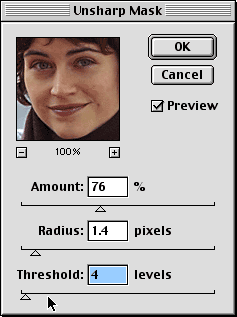
- With this new merged copy layer, select Filter > Sharpen > Unsharp Mask. For Threshold try a percentage between 40 to 85 for Web use or 50 to 110 for print. The radius should be around 1.4 pixels, and Threshold level should between 3 to 6, depending on the softness of the person’s face. For a baby’s face try 6. For a scruffy man’s face go for 3.

Here’s a good example of unsharp mask settings for Web use.After you’re done sharpening, you should be staring at an ideally retouched portrait. If there is anything that juts out at you, remember that you can always paint back using your saved Snapshot. Just click into the box next to the Snapshot to target the History Brush and use the brush to paint back the areas you want.
We may still cringe at the mere thought of “picture day,” but knowing you now have the techniques of a digital makeup artist should lend some sort of comfort to the thought. Mastering these few touch-up techniques may also help bring your subjects back for more.
This article was last modified on January 18, 2023
This article was first published on August 22, 2001
Commenting is easier and faster when you're logged in!
Recommended for you

Soft-Proofing: Benefits for the Graphic Designer
There is a very useful, but often overlooked, feature in Photoshop relating to c...

How to Mask Hair Using Today’s Techniques in Photoshop
Using Photoshop features like Generative Fill and Select and Mask makes the job...


