The Creative Toolbox: Photoshop Cosmetology

Check Those Bags at the Front Desk
Now that we removed the clues of your subject’s recent chocolate binge, why not eradicate the signs of a bad night’s sleep as well, by getting rid of those slight bags under the eyes. To diminish the appearance of dark circles and undesirable lines around the eyes, apply a method similar to the removal of blemishes. Again the idea here is to practice minimalism with your retouching.
- With the Clone Stamp tool still selected, change your brush’s blend mode to Lighten in the Options bar, and change Opacity to about 50 percent. Pressing 5 on your keyboard will instantly select 50 percent in the Opacity box. These adjustments to the brush will allow you to make several passes with the tool to reduce dark areas elegantly.
- Now set a sample point by Option-clicking or Alt-clicking at a point that appears similar to the area you’re retouching.
- Different from the single-click method used to remove the blemishes, here we want to make a few passes, clicking and dragging on the circles or crow’s feet until they begin to elegantly fade away. Try to follow along the path or curve of the wrinkles or circles, using a smooth sweeping motion.
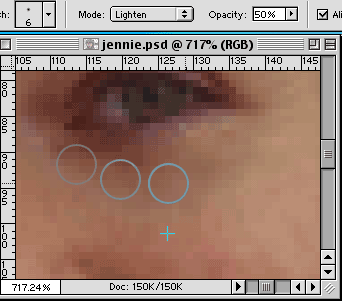
When removing bags or wrinkles, click and drag along their path.
Whiter Teeth Without Those Messy Gels
It’s somewhat strange that our eyes see really, really white teeth faster than yellowish teeth. This is a perfect example of how we pick up on the unnatural faster than the natural. This is also exactly what you want to avoid when you attempt to whiten a person’s teeth. While taking away some of the yellow tinge is fine, leaving your subjects with blindingly white teeth is just as bad as leaving their teeth yellow and dingy — maybe worse. And when you’ve finished whitening the teeth, this same technique can be used to reduce the redness of eyes as well.
- First create a selection of the teeth, or the white of the eyes, using the Lasso tool or whatever selection tool you’re comfortable with. Feather the selection 1 or 2 pixels (Select > Feather…) to avoid drawing attention to your retouching endeavors with a hard edge.
- Choose Layers > New Adjustment Layer > Curves from the main menu or from the Adjustment button pop-up menu found in Layers palette. Since you had a selection loaded, Photoshop uses this as the mask for the Adjustment layer.
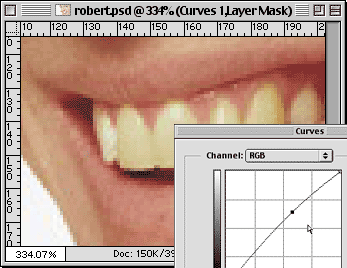
No need for bleaching. Just a slight adjustment in the Curves dialog and teeth are whiter and brighter. - Click just a bit above the middle of the diagonal line to add a curve point and then move the point slightly upward. When the adjustment looks right, click OK.
- Step back from the image (physically and/or mentally) and try to see if the adjustment is obvious. If it is, double-click the adjustment layer icon to call up the Curves dialog and edit the curve to be a little gentler. The ability to go back anytime to change settings is the true beauty of the adjustment layer. For an even more dynamic approach to fine-tuning your adjustments, try bringing down the opacity to the adjustment layer in the Layers palette.
Once comfortable with the Whiter Teeth technique you can use it with slight variation to adjust color in a subject’s lipstick choice or to help bring out their eye color.
- Create a selection of the lips or eyes as described in step 1 of the Whiter Teeth technique. Remember to feather the selection a few pixels.
- Choose Layers > New Adjustment Layer > Selective Color. Again a mask of the selection is automatically created.
- Most likely you’ll want to adjust the Reds — the default — but if you would like to adjust a different set of colors, say Magentas, simply select it from the Colors pull-down menu. Tweak the settings for a particular color set or sets until you’re satisfied with the adjustment.
- Toggle the visibility of the adjustment layer on and off to compare the adjustment’s effect on the overall portrait. Use the Opacity trick mentioned above if you feel the adjustment needs to be taken down a notch.

Don’t like the shade of lipstick your subject is wearing? Change it using a Selective Color adjustment layer. - If you find the Selective Color isn’t providing the type of controls you need for a particular adjustment, change the adjustment layer by selecting Layer > Change Layer Content > [Your Desired Adjustment Layer]. Don’t worry about losing your selection mask in the switch — it remains intact.
This article was last modified on January 18, 2023
This article was first published on August 22, 2001
Commenting is easier and faster when you're logged in!
Recommended for you
Improve Your Talent for “Eyeballing It”
I’m kind of a stickler for neat and tidy layout; blame it on my printing b...
Photoshop How-To: Aging Metal Textures
If, like me, you like the patina of aged, rusty metal, then this Photoshop trick...
Using Photoshop’s Plastic Wrap Filter
Photoshop’s Plastic Wrap filter is great at creating liquid effects of all...


