
Take Your Shot in Lightroom
With a handle on the fundamentals of Lightroom—in its multiple forms—you can work with your photos like the pros do.

This article appears in Issue 2 of CreativePro Magazine.
You’ve decided it’s time to elevate your photography and move up to Lightroom, but it’s a professional tool with an abundance of features and controls… and “Lightroom” isn’t even a single application. Where to start? Right here, of course! With a handle on the fundamentals, you can work with your photos like the pros do.
Before we get into specific features, we need to break down just what Lightroom is and what it’s designed to do. Many photo-editing apps take a Photoshop approach by opening individual files to edit, but Lightroom is a broader package designed to store, organize, edit, and share your photos in an ecosystem that spans platforms.
Welcome to the Lightroom Family
Three separate apps fall under the banner of Adobe Photoshop Lightroom (the full, official name you’ll never hear unless you read Adobe press releases). While Photoshop is designed to manipulate any image file you throw at it, using layers and compositing and a host of other features, Lightroom is designed to edit photos from a photographer’s perspective. It’s focused on such core edits as adjusting tone and color, cropping for composition, healing spots or blemishes, and generally bringing out the best version of the photo you captured.
The three Lightroom apps all share the same basic capabilities and can work together. They’re all actively developed and updated, but each has its own strengths. Here’s a quick family snapshot:
- Lightroom Classic. The original incarnation of Lightroom (now at version 11.0), Lightroom Classic is the most full-featured one, with such capabilities as managing multiple separate libraries, extensive keyword and filtering options, advanced printing, and more. It can also sync photos from your computer to Adobe’s Creative Cloud for sharing with other devices, but with some noteworthy limitations (more on that shortly). The most common complaint about Lightroom Classic is performance. The app is built on legacy code that has accrued over time, and it can be slow on older machines running large photo libraries or performing complicated adjustments, such as merging high-resolution panoramic images. You can create multiple Lightroom Classic catalogs to keep separate projects, well, separate. Lightroom Classic runs on macOS and Windows.
- Lightroom desktop. The Lightroom desktop app for macOS or Windows is the “new” or “cloud-centric” edition (currently at version 5.0). It’s designed to automatically sync your entire photo library with Creative Cloud, which unlocks such features as easy photo synchronization among devices, sharing full-resolution images online, and Adobe Sensei-powered abilities like intelligent image search and people recognition. Lightroom desktop is built on a more modern code base, so it tends to be more responsive, but it doesn’t include all the features found in Lightroom Classic. Contrary to widespread belief, Lightroom desktop does not require you to solely sync your photos to the cloud; they exist on disk, too. In fact, it implements my favorite method of managing offline image files. That said, Lightroom desktop is designed for that symbiotic connection to the cloud, and works with just one catalog tied to your Adobe ID.
- Lightroom for mobile. The Lightroom apps for phones and tablets running iOS, iPadOS, and Android sync with Creative Cloud so you can organize and edit your library anywhere. The main editing features are there (tone, color, many effects, presets, and so forth) and more closely track to the feature set and interface of Lightroom desktop. But some desktop capabilities are yet to migrate from the mobile version, such as creating panoramas and HDR (High Dynamic Range) composites from multiple image files. However, the mobile editions feature something their desktop brethren don’t: photo capture. Because they run on devices that all feature built-in cameras, the Lightroom for mobile apps can shoot images directly, including automatic HDR-bracketed exposures that are blended remotely in the cloud, and add them to your library.
One could argue that there’s also a fourth version of the software, Lightroom for web, which runs in a web browser and resembles Lightroom desktop and Lightroom for mobile. It, too, has core editing tools, but isn’t as extensive as the other versions. Let’s call it the third-and-a-half version.
Speaking broadly, folks who’ve used Lightroom Classic for years are often more comfortable sticking with it. If you’re brand new to the Lightroom family, the cloud-based Lightroom desktop is the friendliest version to learn. Whether you’re using either desktop app, adding the mobile app for your devices just makes sense if you want to access your photos on them.
It is possible to use only Lightroom for mobile, but since we’re talking about the whole group, I’m treating the desktop versions as the primary ones. Adobe’s Photography Plan includes both Lightroom desktop and Lightroom Classic (and Photoshop, too!), along with the mobile editions, so you can try both desktop versions and see which one fits you best.
Pricing for the apps starts at $9.99 per month for either Lightroom desktop alone with 1 TB of cloud storage or a bundle that includes Lightroom desktop, Lightroom Classic, Photoshop, and 20 GB of cloud storage. That bundle is also available with 1 TB of cloud storage for $19.99 per month.
Visit the Lightroom Library
Each Lightroom app stores your photos in a central library, letting you browse your images without opening individual files on your disk. Having them all in one place also gives you the ability to rate, tag, and organize them (Figure 1).

Figure 1. The library gathers all your photos in one place.
Want to quickly view your better-quality photos that contain a specific family member in a particular location? A quick filter makes them visible. You could also group photos from a recent vacation in an album for easy reference.
This type of organization is known as digital asset management, and it makes a huge difference when you want to sort and locate photos. Each edition of Lightroom stores this information in a central database file, called the catalog, which keeps track of where image files are located on disk and which edits have been applied to them.
In Lightroom Classic, the image files themselves can be located anywhere on disk or on external volumes. Lightroom desktop prefers to store everything in a central repository, but you can change that location in the app’s preferences.
For example, the bulk of my Lightroom desktop library is stored on an external hard disk; in the app’s preferences, I specified that as the location to store originals. The feature I particularly like in Lightroom desktop is that if the disk is not connected to my laptop when I import new photos—such as when I’m away on a photo trip or workshop—the app temporarily stores the image files on the computer’s internal storage. When I return to my office, connect the drive, and launch Lightroom desktop, it automatically moves the imported files to my external drive. In Lightroom Classic, I need to manually move images using the app’s Folders panel to get them onto that external storage.
Import photos
Each of the Lightroom apps can import photos from a memory card, connected camera, or local folders and track them in the library. You can preview the shots before copying them, letting you discard obvious clunkers or just pick and choose the ones you want to work with.
Lightroom Classic, however, goes the extra mile—and then continues driving to the next county—with its import options (Figure 2). You can add keywords to the incoming images, automatically make backup copies to a second location, apply edits, add the images to a collection, convert raw files to DNG format, and rename files—all in one import pass. It’s great for folks who need to import and process hundreds or thousands of shots at once; they can also create presets to ensure that the next batches are imported the same way. Lightroom desktop’s only other import option is to add the incoming photos to an album.

Figure 2. The Import window in Lightroom Classic is a work of complicated brilliance.
Because we all capture photos using our phones as well as our other cameras, the Lightroom for mobile apps include an optional setting, Automatically Import Mobile Photos, to pull those shots from the device’s internal photo storage and add them to your Lightroom library. That way, even your mobile images reside in your library.
How syncing works
Lightroom desktop and Lightroom Classic take different approaches to syncing. In fact, many photographers never sync from Lightroom Classic, preferring to keep everything local. That said, syncing is possible in both, and they sync to the same source: your Creative Cloud account. Because Lightroom desktop leans heavily on working with photos in the cloud, it’s important to understand what’s going on.
After you import photos into Lightroom desktop, copies of the original image files (including raw files) automatically upload to the cloud. Edits you make sync as well; if you also use Lightroom for mobile on an iPad, for example, the edits are automatically reflected there. The same scheme applies if you import photos directly into Lightroom for mobile: Original images copy to the cloud.
The downside is that you need a pretty robust internet connection, or plenty of patience, to copy all that data to the cloud. If you have neither, you can pause syncing, though many cloud-based features will not be available.
In Lightroom Classic, syncing is not automatic and requires that you first create a collection (the app’s term for an album) and enable it to be synced. Then, any image in that collection copies to the cloud and is made available to Lightroom on other devices.
However, there is one limitation in Lightroom Classic: It syncs only lower-resolution Smart Previews to the cloud to save bandwidth. Edits you make on a mobile device still sync properly, but you wouldn’t want to export or print one of the photos until you’re back in Lightroom Classic (see sidebar).
By contrast, Lightroom desktop and Lightroom for mobile can access originals whenever they need to. They will use Smart Previews as needed to conserve disk space, but you can download originals from the cloud if the files are not available locally.
Ratings, flags, color labels, and keywords
The library provides a common area to access your photos, and the ability to tag them with additional metadata can help you sort and locate images. The Lightroom apps offer several ways to do this:
- Ratings. Mark the quality of an image using star ratings, from one to five stars (Figure 3). What the ratings mean is up to you. I mark any promising image two stars, then increase as I edit; a three-star photo is one I’ve edited, and I reserve four and five stars for shots that I think really stand out from the rest.
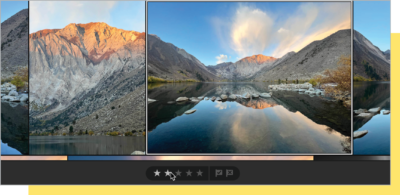
Figure 3. Rate your photos to mark the keepers.
- Flags. You can mark a photo as Picked or Rejected (or leave it unflagged). Some folks prefer this binary approach over star ratings: A picked image is good, a rejected image is bad. I mix and match, marking high-rated images with a Picked flag when I’m working on a project, such as identifying my favorites from a portrait session. I use the Rejected flag to easily identify the bad shots, then filter those later and delete them from the library.
- Color Labels. In Lightroom Classic only, you can additionally apply one of five colors to further organize your shots. Photos labeled in green could be the ones you’ll use for social media posts, while shots in red are destined for printing, and so on.
- Keywords. Adding keywords is an opportunity to apply words that describe the image, making it easier to find, say, all photos that contain waterfalls tagged with a waterfall keyword. The keywording system in Lightroom Classic is extensive, with the ability to create categories and subcategories of terms; the Lightroom desktop and Lightroom for mobile apps are basic.
The curious thing about keywords is that few people seem to actually use them. On one hand, it’s extra work, and most of us want to get right to editing photos, right? On the other hand, that extra work is front-loaded so you don’t have to spend time scrolling through your library trying to find one of those photos. (This is where the ability to add keywords to an entire import batch in Lightroom Classic is helpful.)
Lightroom desktop and Lightroom for mobile help by analyzing the photos in the cloud to identify scenes and objects in your photos using machine learning. That way, even if the images contain no keyword or other text that says waterfall, Lightroom still identifies shots that it has identified as containing waterfalls (Figure 4). The catch? Those apps require an active internet connection to perform the search.

Figure 4. Don’t go chasing waterfall keywords when Lightroom desktop can find them for you.
Time to Edit
The heart of Lightroom is the ability edit your photos to look their best. That can mean increasing exposure in too-dark shots, enhancing color so it pops, cropping to refine composition, converting color images to black and white, and many other sorts of adjustments.
The Lightroom apps contain many tools for making these changes—more than we can cover here. Instead of trying to hit everything, let’s walk through an edit that shows off the basics in a typical workflow. I’ll primarily use Lightroom desktop, but will point out notable differences in Lightroom Classic and Lightroom for mobile as needed.
The Lightroom editing approach
Because all your photos are in the library, editing one involves just selecting it and switching to the Edit panel (or pressing E); in Lightroom Classic, you switch to the Develop module (or press D) (Figure 5). Some of the interface items differ slightly among the apps, but the tools perform the same tasks.

Figure 5. The Edit panel in Lightroom desktop and the Develop module in Lightroom Classic
Lightroom applies all edits nondestructively, which means the pixels in the original image are never touched. The app keeps track of which settings are altered and reflects those in the preview you see. You can always apply or remove individual edits or revert back to the original if you want to start over.
Edit exposure and color
I said that Lightroom contains a lot of tools, but the tone and color controls are the ones you’ll turn to most regularly. Often when you start editing a photo, you can determine what it needs by asking some basic questions. Is it too dark or too light? Do the colors reflect what you remember from the scene, or are they too warm or cool? Are the colors drab or do some appear overly saturated?
Regardless of what those initial answers are, my first step is to always click the Auto button (Figure 6). I know, it feels like cheating—why possess all these tools when one button will do the job?—but it’s really not. I see it as a first baseline step to determine what Lightroom thinks the photo needs. The Auto tool is backed by Sensei machine learning, so it’s not just taking a stab in the dark.

Figure 6. The Auto button is a good first step in editing.
Tip: Press the Backslash () key to view the “before” version of the image when you want to compare your edits to the original. In Lightroom for mobile apps, touch and hold the image when the Edit panel is active.
Just as I always click Auto, I invariably also make further adjustments using individual tools. In the example here, Lightroom desktop has determined that the photo is underexposed, but I think the tones are still too dark. This is where I turn to the Light controls (labeled as Tone in Lightroom Classic).
You might think a dark photo needs a boost of the Exposure control, but use caution: Exposure indiscriminately blasts light across the entire image. Cranking it up removes most of the texture in the clouds and washes out the hills, blanching what’s most interesting about the photo (Figure 7). Double-clicking a slider resets a tool to its default value.

Figure 7. Exposure adds too much exposure to the scene.
A better approach is to increase the Shadows and Whites values to lighten the dark areas. As you do, keep an eye on two things: the brightest areas of the image, like the clouds, to make sure they don’t blow out to pure white; and the histogram at the top of the Edit panel. (Choose View > Edit Panels > Histogram if you don’t see it. In Lightroom Classic, click the Histogram disclosure triangle if the histogram itself isn’t visible.)
The histogram displays the strength of tones throughout the image, ranging from pure black at the left edge to pure white at the right edge. As you increase the Shadows value, the histogram levels rise in the middle. As you push the Whites value, the entire graph slides to the right. If you see spikes bunching against the right edge, it means the brightest pixels have clipped, or gone completely white. In general, you want the graph to stretch all the way from left to right without any bunching at either side (Figure 8).

Figure 8. The histogram reveals that the image isn’t clipped at either the dark or bright ends.
The two triangles at the top corners of the histogram are clipping indicators that illuminate if tones have gone fully white or black. Click them to view indicators on the image itself: red for clipped highlights and bright blue for clipped shadows (Figure 9).

Figure 9. With the shadows clipping indicator on, areas that have gone completely black appear in blue.
Tip: Hold Option/Alt as you drag one of the sliders to view only the areas that are clipping. When they appear, back off on the value.
Finding the right balance of light and dark requires experimentation. You might increase the Whites value and then find that you need to decrease the Highlights value to prevent clipping.
Edit color
With a handle on the tones, you can next turn your attention to color. Primarily, you want to establish a good white balance, which is the warmth or coolness of the overall image.
Expand the Color section of the Edit panel; in Lightroom Classic, the controls are at the top of the Basic panel. From the White Balance menu there choose Auto (Figure 10). If you’re editing a raw image, you may also see white balance presets that match what your camera produces.

Figure 10. Auto white balance sets Lightroom’s idea of the proper temperature and tint.
Just as I don’t accept the Auto button for applying edits to the entire image, I sometimes disagree with the Auto white balance setting and will manipulate the Temp and Tint sliders to adjust the color. Another option is to click the White Balance Selector (the eyedropper icon) and then click a neutral gray area of the image to take a new reading (Figure 11). Click the icon again to release the tool when you find a value you like.

Figure 11. The Auto white balance setting felt too warm, so I’m using the White Balance Selector to find a set of values I prefer.
The Color controls also contain the Vibrance and Saturation sliders, which affect how vibrant the colors are in the image; in Lightroom Classic, you’ll find the controls in the Presence group.
Saturation, like Exposure, is best meted out in small doses. Vibrance affects the overall color boost with a lighter touch, with the added benefit of mostly preserving skin tones of people in the photo. (If you use only the Saturation slider, your in-laws will not be impressed that they look like orange Oompa Loompas in the picture, no matter how lovely the flowers are behind them.)
But what about when you want to adjust a specific color in an image? A great example is autumn color, where you want yellows and oranges to pop, but not the blues and greens of the surrounding area. In Lightroom desktop, the Color Mixer gives you control over the hue, saturation, and luminance of colors; Lightroom Classic puts these controls in a separate HSL/Color panel.
So, you can select the Yellow color and increase the Luminance value to make just the yellows brighter and increase the Saturation value to deepen the color (Figure 12). Conversely, you could use the Color Mixer to reduce the saturation of dominant blues or greens in the same shot, drawing more attention to the vibrant yellows and oranges.

Figure 12. Increasing saturation makes the sky too blue (left). Using the Color Mixer, the yellows and oranges pop without affecting the sky (right).
I can’t talk about color without bringing up black-and-white photography. Our lake sunrise image might look pretty good in black and white, don’t you think? To convert it, click the B&W button at the top of the Edit panel (the Basic panel in Lightroom Classic) (Figure 13). The tool pulls the color from the image, leaving just the tonal values.
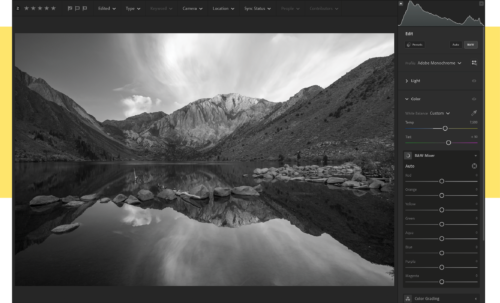
Figure 13. Black-and-white photos are still classic.
But is the color really gone? Notice that the Color Mixer is now called the B&W Mixer. Even though you don’t see the color in the image, the color information is still present in the file, which means you can adjust the tonal values associated with those colors.
For instance, reducing the Blue value darkens the sky and the water reflection, and increasing the Orange and Yellow values brings more illumination to the mountain peak, the trees around the shoreline, and the rocks at right (Figure 14).

Figure 14. You can manipulate the tonal values of each color, even in a black-and-white image.
Note: You will often need to adjust the Light/Tone settings after switching to black and white, because some colors translate as brighter or darker when their hues are no longer visible.
Crop and straighten
Sometimes I’ll nail a photo’s composition when I capture the shot, while other times I’ll think I’ve nailed it and then discover a branch or other object at the edge of the scene. It’s also not uncommon to discover entirely new compositions while editing. That’s when cropping an image is helpful.
Select the Crop tool in the right-hand toolbar in Lightroom desktop, or press C. In Lightroom Classic, click the Crop Overlay tool just above the Basic panel, or press R. Then, in the image window, drag one of the corner or edge handles to redefine the visible area of the photo (Figure 15). Drag within the box to reposition the image.
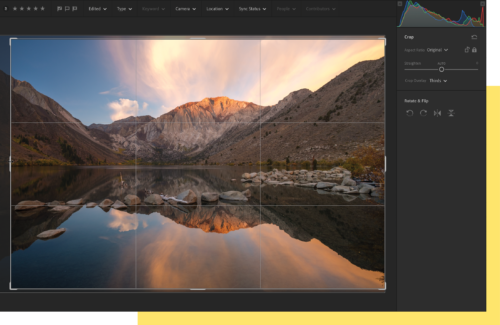
Figure 15. Drag one of the boundary handles to crop the photo.
You can constrain the shape of the crop by choosing common dimensions from the Aspect Ratio menu—if you’re planning to output a 5 × 7 print, for instance. Or, either choose Custom from the menu or click the Constrain Aspect Ratio button (the lock) so it appears unlocked to define the crop area without restrictions.
A new Crop Overlay menu gives you several choices for the guides that appear in the crop area as you make an adjustment. Normally it’s a grid, but other options include diagonal lines, a golden spiral, and a helpful Aspect Ratios mode that lets you see where the borders of a 2 × 3, 5 × 7, or 4 × 5 crop land (Figure 16).

Figure 16. Visualize the crop for common print sizes with the Aspect Ratios crop overlay enabled.
If the image isn’t level, you can drag outside the boundary edges, or use the Straighten slider, to turn the image on its central axis. If there’s an obvious horizon line (or vertical line), click the Auto button above the slider to let Lightroom figure the best angle.
Press Return/Enter to apply the new composition.
Apply presets
I’ve given you a quick tour of the essential editing tools, but we can’t move on until I mention presets, which apply adjustments to achieve specific looks.
I’ve traditionally ignored most presets because I prefer to edit a photo based on what the photo needs, not to try to force it to look like someone else’s shot.
However, the preset options have improved in the latest versions of Lightroom desktop and Lightroom for mobile. In addition to premium presets that are designed for some situations—portraits, food, landscape, travel, and the like—a new Recommended option broadens the possible number of options. When you click Recommended in the Presets panel, the app scans your image and then suggests presets from similar images (Figure 17).

Figure 17. Suggested presets hit seemingly every variation of looks.
Think of a preset as a starting point. When you apply one, you can go in and adjust the individual controls in the Edit panel. (Remember, you can always go back to the image’s original state if you don’t like the results.)
You can also use presets as an efficiency tool. If you do have a look or style you want your photos to share, you don’t have to reapply the same settings over and over (or even remember what they were). Simply create a custom preset to use on other images later.
Advanced Editing
Often, the basic tools are all you need to correct photos. But of course, the Lightroom apps have more editing capabilities than just those. This is where things get quite interesting as your creative opportunities unfold. You can use the Healing Brush tool to remove dust spots and some objects, for instance, or create masks to apply adjustments to areas of a photo instead of the entire image.
Heal and clone unwanted items
On your camera’s LCD screen, the image looked fine. In the Lightroom library it looked fine. But then, when you were editing, you spied it: a soft smudge caused by dust on the camera lens or sensor. And then it was impossible to see anything else.
When you need to do some retouching, from dust spots to skin blemishes to stray branches, select the Healing Brush in the toolbar (Lightroom desktop) or the Spot Removal tool above the Basic panel (Lightroom Classic). Adjust the size of the brush using the tool’s settings, and then click or drag to cover the offending item (Figure 18).

Figure 18. To remove a distracting reflection in the corner, paint over it with the Healing Brush.
The tool copies pixels from a nearby similar area and applies them to the spot you marked. In the Heal mode, it blends the pixels to be seamless; you can also switch to Clone mode, which pastes the pixels outright.
To identify things like dust spots more easily, select the Visualize Spots checkbox. A high-contrast grayscale overlay appears that makes them more obvious (Figure 19).

Figure 19. Spot spots using the Visualize Spots spotter.
Tip: Zoom in to 100% magnification when using the Healing Brush for more accurate retouching. And don’t forget to clean your screen, in case the spots you’re seeing are on the glass, not the image!
The Healing Brush is great for fixing spots, but sometimes the tool falls short. In that case, send the image to Photoshop for sophisticated healing attention (learn how just ahead).
Edit local areas using masks
One of the best new features in the latest versions of the Lightroom apps is a revamped and expanded masking system. I mentioned at the beginning that Lightroom doesn’t include a layers feature like Photoshop: The adjustments you apply affect the entire image.
But there are times when you need to be more specific. You may want to add definition or change the color cast of the sky, brighten a person’s face, selectively darken areas to deemphasize them, or bring up the shadows just in the foreground.
In our lake image example, I see a few specific corrections I’d like to make, such as adding more definition to the clouds, warming up the sun break on top of the peak and darkening the hills at the sides to bring more attention to the light show happening in the middle. We can do all of those with separate masks, which act like overlays on top of the photo that target their edits to specific areas.
Let’s start with the clouds. Select the Masking tool (or press M) and click the Select Sky button. Lightroom uses machine learning to detect the sky and automatically create a mask, indicated in red (Figure 20).

Figure 20. Did you notice how much work you didn’t do in creating a mask that applies only to the sky?
In the panel at right, you can use a collection of most of the adjustment tools to alter the appearance of just the sky. In this case, reducing the Highlights value and nudging the Texture and Clarity sliders adds drama to the clouds (Figure 21).

Figure 21. The mask limits the adjustments to the selected sky area.
To warm the peak, first click the Create New Mask button in the Masks panel and select Radial Gradient, and then drag an oval to cover the mountain top (Figure 22). The adjustments you make will be most visible within the inner oval area, with the effect blending outward to the outer oval. Increasing the Temp value and the Saturation slider makes the peak stand out and yet still look natural.

Figure 22. A Radial Gradient mask covers just the mountain peak.
Lastly, go back to the Create New Mask button, select Brush, and drag to cover the hillsides (Figure 23). You can adjust the brush size and paint settings (click the disclosure triangle to the right of the Size slider if the other options are not visible). If you accidentally paint an area you didn’t mean to, it’s easy to switch to the brush’s Eraser mode and refine the selection. With the mask in place, reducing the Shadows and Blacks values darkens the masked areas.

Figure 23. Paint selective areas using a Brush mask.
Each mask appears in the Masks panel; selecting one reveals its adjustments at right that can be modified at any point. And don’t forget that these edits, as with all the others, are nondestructive. You can return to the Edit panel and change the tone or white balance and know that the masks will interact with those changes.
Edit in Photoshop
If you do run into a situation where you need more help than what Lightroom can provide, such as more sophisticated retouching, you can send a version of your image directly to Photoshop.
Choose File > Edit in Photoshop (Lightroom desktop) or Photo > Edit In > Edit in Photoshop (Lightroom Classic). Lightroom creates a highresolution TIFF file and opens that in Photoshop. After you make edits there and save and close the file, the edited image is added to your Lightroom library and connected to the original as a pair of stacked photos.
In Lightroom for mobile on the iPad, you can tap the Share button and choose Edit in Photoshop, at which point the app creates a PSD file for handoff to the Photoshop app. After making edits, tap the Send to Lightroom button to add the adjusted photo to the library.
Get Those Photos Out There
With photos edited, it’s time to think about how to share them beyond Lightroom. That could be exporting files for posting on social media outlets, sharing albums of images to friends or clients, and making prints. The options vary among the Lightroom apps.
Export JPEGs
Despite advancements in file format technologies, the humble JPEG image remains the easiest, most compatible destination for your edited photos. In Lightroom desktop, the Share button includes presets for saving a small version (limited to 2048 pixels on the longer side and with 90% quality) or a large version (full size at 100% quality) (Figure 24). You can also choose Custom Settings and get more particular, picking the file type, custom dimensions and quality level, the color space, and whether to apply sharpening or include a custom watermark.

Figure 24. Export the file so others can see the results of your editing work.
Those same options appear in Lightroom for mobile when you choose Export As. The mobile apps also include the standard sharing options for their operating systems, such as the ability to save the edited photo to the Camera Roll or to the Files app on iOS and iPadOS.
Lightroom Classic, being the overachiever that it is, expands the capabilities by letting you create export presets and adding the ability to save the exported files in the existing catalog (Figure 25).

Figure 25. Lightroom Classic gives you many more export options.
Online shared albums
Earlier I mentioned that the syncing features of Lightroom desktop and Lightroom for mobile unlock additional features. With your library stored on Creative Cloud, it’s easy to share full-size edited versions of photos via the web.
You can share an existing album, create a new shared album, or share individual photos and get a link that your recipients can use to review and optionally download the photos.
Click the Share & Invite button that appears above the grid view when you’re viewing the contents of an album. In the dialog box that appears, you can invite people to grant them access to the page on the web (though they must have an Adobe ID to do so) or create a public link that anyone can use to view (Figure 26). There are also options for customizing the appearance of the page and whether to display information like metadata and location.

Figure 26. Share photos as a web page that anyone—or only certain people—can view.
I’ve found this to be the best way to share photos with a group, such as at holiday get-togethers. By creating a web page that anyone can access, and enabling the option to let people download JPEG files, folks can view and grab the photos they want on their own schedule. They can also comment and favorite images, which is helpful if it’s a client reviewing the shots (Figure 27). As you make edits to the photos, or add and remove images from the album, those changes are reflected in the online album.

Figure 27. When someone comments on a photo online, like here, you’ll see the comments in Lightroom desktop and Lightroom for mobile.
In Lightroom Classic, first you need to create a collection and enable the Sync with Lightroom option, which uploads the photos to Creative Cloud. Once that’s done, right-click the collection in the Collections sidebar and choose Lightroom Links > Make Collection Public (Figure 28). You can then right-click the collection again and choose Lightroom Links > Copy Public Link.

Printing
Let’s not forget the traditional way of sharing photos: paper! To make a print in Lightroom desktop… well, you can’t. Perhaps due to its zeal to work with Creative Cloud, Adobe has never included the ability to print photos in Lightroom desktop. There’s no File > Print command, and pressing Command/Ctrl+P does exactly nothing. You need to export an image to a file and then print that using other software.
Curiously, it is possible to print from the Lightroom for mobile app, but that’s because it hands off the print duties to the system-level print feature.
Lightroom Classic, by contrast, features an entire Print module that can output single prints, contact sheets, and picture packages (Figure 29). It also includes controls for setting the print resolution, sharpening, and more.

Figure 29. The Print module in Lightroom Classic is robust.
Regardless of whether you’re printing directly from an app, both Lightroom desktop and Lightroom Classic offer Super Resolution, which comes in very handy when you want to make a large print. This feature doubles the resolution of an image and uses machine learning to make the result look good. Choose Photo > Enhance in either app and, in the dialog box that appears, select Super Resolution (Figure 30). When you click Enhance, Lightroom creates a new DNG.

Figure 30. This Super Resolution preview doesn’t look promising, but it’s starting with an original measuring 6063 × 4042 pixels and enlarging it to a version that’s 12126 × 8084 pixels.
Next Steps
Not only is Lightroom three (and a half) separate apps, it also contains many more features than I’ve had room to cover here. Lightroom Classic, in particular, features dedicated modules for creating books and slideshows, supports several ways of viewing your photos on multiple monitors, lets you create Smart Collections that update their contents based on metadata, and enables tethered shooting, where a camera connected directly to the computer outputs its photos directly into the app for immediate feedback.
To learn more about Lightroom, here are a few suggested resources:
- Articles about Lightroom at CreativePro.com.
- Adobe’s webpages about What’s New in Lightroom and What’s New in Lightroom Classic.
- In Lightroom desktop and Lightroom for mobile, click/tap the Learn button (a lightbulb) to browse dozens of interactive tutorials that walk you through tasks in the apps themselves.
- In Lightroom Classic, choose Help > Lightroom Classic Tutorial for online video tutorials. In Lightroom desktop, choose Help > Online Tutorials.
- Click the Discover button (a globe) in Lightroom desktop or Lightroom for mobile to view edited photos from Lightroom users. You can step through the edits to see how they were accomplished.
 Syncing from Lightroom Classic can get you into trouble if you aren’t aware of an important limitation. The Smart Preview of an image that it sends to Creative Cloud is limited to about 2560 pixels on the longest edge and saved as a lossy DNG (Adobe’s digital negative format) file.
In terms of reviewing and editing photos outside Lightroom Classic, this usually isn’t an issue. Any edits you make to a Smart Preview are automatically reflected in the original. For instance, suppose I want to edit a batch of photos using my iPad on my couch instead of working on my computer in my office. I’d sync a collection containing those images with Creative Cloud, and it would appear in Lightroom for mobile on the iPad. I make some adjustments to the photos, and the changes are immediately synced with the cloud. The next time I’m at my computer, those edits are already applied. Slick!
However, because I am working with Smart Previews on the iPad, if I save an edited photo to the Camera Roll or export it to the Files app, the file that’s created has a dimension of 2560 × 1717 pixels, instead of the original resolution of 6240 × 4160 pixels that my camera captured.
Adobe implemented Smart Previews as a way to save disk space in Lightroom Classic, particularly as smaller-capacity SSD storage proliferated. You can choose to keep original files on a large external disk and store only Smart Previews on your internal drive, saving massive amounts of space while giving you all the same editing features. The expectation is that when you want to output finished photos, by exporting or printing them, you’ll use Lightroom Classic where the originals reside.
Commenting is easier and faster when you're logged in!

Recommended for you

Lightroom in Black and White
Learn multiple methods of making photos black and white and fine-tuning the appe...

Using Lightroom and Photoshop Together on the iPad
Sophisticated photo editing techniques using the iPad versions of Lightroom and...

Adobe Lightroom Mobile Comes to Android. Sort Of.
What was that loud rumbling noise I heard last week? That was the collective...