
Swapping Out Master Pages in InDesign
Knowing when to use Primary Text Frames and Layout Adjustment makes the difference


This article appears in Issue 55 of InDesign Magazine.
While InDesign makes so many aspects of document formatting easy, sometimes it can be baffling how to accomplish a seemingly straightforward task. Here’s a great example: You have three different master pages—each with a different number of columns and text frame size. Right now, all your document pages are set to a single column, but you want to apply the other master pages and have InDesign update the text frames automatically.
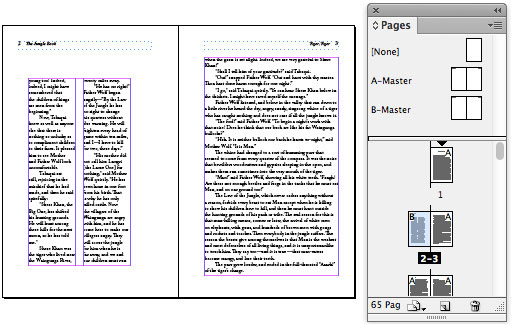
Simple, right? Change the master page, and the document page should update accordingly. But it’s not that easy. When you apply a master page that has a different number of columns (or margin size, or size of the text frame, or whatever, InDesign only changes the underlying guides on your document pages. Any text frames or graphic frames that have text or images in them are left alone (Figure 1)!

There are two solutions to this problem: Layout Adjustment and Primary Text Frames, each with its own pros and cons. But it’s important that you know about both of these features in order to choose the right approach.
Solution 1: Layout Adjustment
If you have already laid out your document-flowed the text, and so on—then your best bet is probably to turn on Layout Adjustment.
Make Frames Touch Margins
The key to making Layout Adjustment work is to ensure that every object that needs to change size is touching a guide. In general, I find this method works best with margin guides (page or spread guides are supposed to work, but it’s wonky and unpredictable). So, in the case of a book with one main text flow, you want the text frames to extend out to the margins.
Turn on Layout Adjustment
As I mentioned earlier, changing the margins or columns (on the page, spread, or master page) won’t affect existing frames unless you first enable Layout Adjustment. You can activate this feature in a couple of places. Choose Layout Adjustment from the Liquid Layout panel menu (to open this panel, choose Layout > Liquid Layout). Or you can choose Layout > Margins and Columns, click the Enable Layout Adjustment checkbox, and then click OK.

Note that if you enable Layout Adjustment in a document that uses Liquid Layout, the Liquid Page Rules become disabled—it’s one or the other. (Liquid Layout helps you manage your objects when the page size changes, but unfortunately it doesn’t help you when you need to change master pages like this.)
Apply the Master Page
Once you have enabled Layout Adjustment, you can apply your new master page to the document page:
» Drag the master page icon over the page icon in the Pages panel; or
» Select the page(s) you want to affect in the Pages panel and then Option/Alt-click on the master page you want to apply; or
» Select the page(s) in the Pages panel, and then choose Apply Master to Pages from the Pages panel menu.
If the margins or columns are different in the new master page, the document pages (and, more importantly, the text frames on those pages) are updated. For example, if you had one big text frame on a single-column page, it would be turned into two frames (threaded together) if you apply a two-column master page.
Technically, you don’t even have to apply this adjustment as a master page. You could just select the page in the Pages panel and choose Layout > Margins and Columns to make the change locally. But I think doing this via a master page is more elegant and flexible in the long run.
Solution 2: Primary Text Frames
The best option-better than relying on Layout Adjustment—is always to build your document from the ground up, ready for maximum flexibility. So if you think you may need text frames to change size, consider using primary text frames.
On the other hand, if you have already created your document and flowed text onto pages, then this solution might not work for you—it depends on how you built your document. This is geeky, but bear with me: This technique will work if, when you first set up your file, you put text frames on your master pages and then flowed text into those frames on your document pages. However, this solution will not work if you just flowed text into new text frames on your document pages (the way most InDesign users-including me—have worked for the past decade), because you cannot retroactively turn those frames into primary text frames.
Let’s look at how you can create primary text frames in a new document.
Use the New Document Dialog Box
When you first create a document, you can select the Primary Text Frame checkbox in the New Document dialog box.

With Primary Text Frame enabled in a new document, InDesign adds a new text frame on your master page (or, in the case of a facing pages document, linked frames on the left and right sides of your master page spread). Those text frames are then labeled as “primary text frames” automatically.
Make the Second Master Page
In this document, we’ll create a second master page (choose New Master from the Pages panel menu). This technique works only when there are primary text frames on more than one master page, but InDesign will only add them for you automatically to the first one. So we need to add primary text frames to this new master page.
If we want a 3-column page, and we can get it in one of two ways: by creating a single 3-column text frame or by making three frames that are threaded together. In this case, we’ll choose the latter, just because it helps demonstrate how primary text frames work a little better. First we’ll choose Layout > Margins and Columns, and increase the columns to 3 so that we have guides to help us draw the frames more quickly. We’ll also increase the margins on all four sides—this is not required, of course… I just want to show that you can.

Create a New Primary Text Frames
To add a primary text frame, draw out a regular text frame on the master page, and then use the Selection tool to click the Primary Text Frame icon in the upper-left corner of the frame. There can be only one primary text frame on each page, but you can thread more than one frame on a page together.
In this case, because I need six frames (one per column, three per page), I just make one, duplicate it five times, and put each frame in its own column (helped by the column guides). Then I thread them all together (click with the Selection tool on the out port of the first one, Option/Alt-click on the next four, and then just click on the last one). Finally, I select any one of these six frames and click the Primary Text Frame icon in the upper-left corner.

Flow the Document
Now that I have primary text frames on two different master pages, I can flow my text into the document. I choose File > Place to select the Word document I want to import. Because I know there is already a primary text frame on the first page of my document, I can simply click anywhere inside the page margins, and InDesign places the story. Also, because Smart Text Reflow is enabled by default in new documents, InDesign automatically adds additional pages and threads them together. (Sometimes it takes a few seconds after placing the story for this to work, because InDesign adds or removes pages only when you pause.)
Apply the Master Page
By default, all the new document pages are set to Master Page A (our one-column master in this example).

Now you can apply the second 3-column master page to one or more of your document pages (using the techniques | mentioned earlier in this article), and you’ll see that all the text automatically flows into the proper text frames!

Whichever solution you choose- Layout Adjustment or Primary Text Frames —you now have the power in your hands to update and reformat your documents much more easily and quickly than ever.
Commenting is easier and faster when you're logged in!

Recommended for you

Troubleshooting the Adobe Creative Cloud Desktop App
As Adobe has moved its software to Creative Cloud subscription services, the way...

CreativePro Week Conference Speaker Spotlight: Theresa Jackson, the Photoshop Junkie
Welcome to our Speaker Spotlight series, designed to highlight some of our Creat...

Using Envelope Distort in Illustrator
Learn how to mold vector artwork to fit any shape in Adobe Illustrator