
Spiderweb FX
Just in time for Halloween: here’s a web that’s easy to weave, with the help of a script.


This article appears in Issue 90 of InDesign Magazine.
If you’re working on a Halloween-themed design, there’s no shortage of graphics to choose from, ranging from silly to spooky. One that you can create in InDesign and customize to suit your design is a spiderweb. The two keys to making a spiderweb are a trick for making concentric objects and a script that comes with InDesign.
1. Create a polygon
Start by making a 12-sided polygon that is 100 pixels wide and tall. Give it no fill and a solid black stroke. 
2. Make concentric copies
Select the polgyon and make eight concentric copies by setting the reference point to the center , and then highlighting the Width field in the Control panel, and pressing Option+Shift+down arrow (Mac) or Alt+Shift+down arrow (Windows) eight times. 
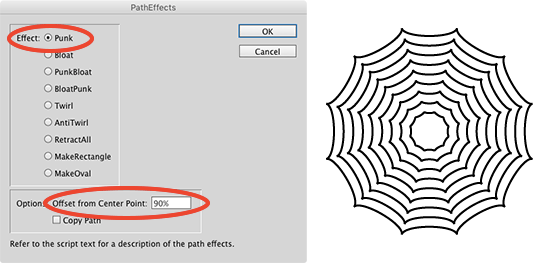
3. Run the Path Effects script
Make sure all the polygons are selected. Open the Scripts panel and locate the Path Effects script in Application > Samples > JavaScript. Double-click the script to run it. In the dialog box, choose Effect > Punk and Offset from Center Point: 90%.
4. Draw connecting lines
Using the Pen tool or the Line tool, draw separate straight lines between the corresponding points on the largest and smallest polygons. You may need to zoom in very closely to position the lines precisely. Tip: Extend the lines to other page elements or page edges.

5. Size, shape, and format
With the basic web in place,
you can start playing around to change the look. Resize the web. Rotate or skew it. Apply transparency effects. Change the stroke color, weight, or type.
Tip: For almost every type of stroke, you can specify a Gap Color in the Stroke panel to make more interesting web textures. You can also make your web seem a little more natural by adding some asymmetry. With the Direct Selection tool, select a set of corresponding points on the polgyons. Then move or rotate just those points to create a finished web.


Bootiful!
Commenting is easier and faster when you're logged in!

Recommended for you
InDesign’s Super Strokes
Jeff Witchel shows how to unlock the power of custom stroke styles.

InDesign Magazine Issue 97: Find/Change
We’re happy to announce that InDesign Magazine Issue 97 (May 2017) is now availa...

Transform a Frame Into a Grid of Frames
Splitting a frame into a grid of smaller frames isn't that hard... once you know...