
Setting Word Import Options in InDesign
Don’t let the choices in the MS Word Import Options dialog box overwhelm you. Changing some of its settings may work to your advantage.

This article appears in Issue 62 of InDesign Magazine.
You may never have seen the Microsoft Word Import Options dialog box. It doesn’t open by default when you import Word files. So it’s entirely possible to place thousands of files without ever seeing it. That’s not to say you’ll never need to change its options. You may save yourself some time and grief, if you understand what the options mean.
Opening the Dialog Box
The first thing you need to do is look at the Word options dialog box (Figure 1). There’s no way to get there without actually placing a Word file. Choose File > Place, and then navigate to the Word file you want to use. But don’t click OK just yet.
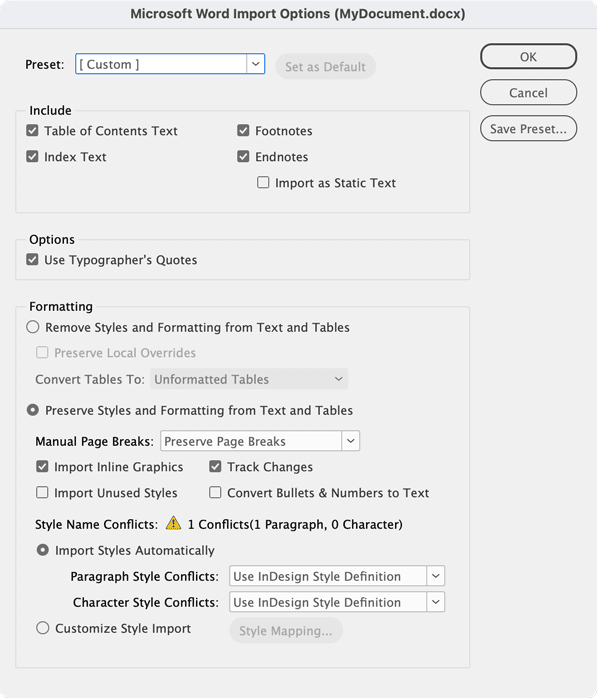
Figure 1: The Microsoft Word Import Options dialog box
selected, hold the Shift key to bypass the dialog box for just that one time. Most InDesign power users keep Show Options turned off and hold the Shift key just for those times they need to adjust the options for a specific file.
Include Settings
Now you need to decide which elements of the Word document will be included in the placed content. Obviously the main body of the text will always be included, but there are other options you can control. Look for them in the Include section (Figure 2).
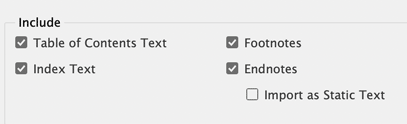
Figure 2: The options for what text to include from the file
Table of contents text
It seems a shame to throw away work that others have done, but including a Table of Contents from a Microsoft Word document isn’t necessary. Nine times out of ten you’re just going to have to throw the text out if you need a TOC in your InDesign file. The primary reason is that most likely the page numbers generated when the text was in Word will no longer be correct when the document is laid out in InDesign. So what was on page 3 in Word could wind up as page 2 in InDesign. Importing the Table of Contents from Word won’t adjust those numbers, and your TOC will be wrong. Not only that, but even if the page numbering was correct, the Table of Contents that comes from Word isn’t dynamic. It won’t update to reflect the actual numbers in the InDesign document. Nor will it create hyperlinks if the document is exported as an interactive PDF. In order to get a table of contents that updates automatically and exports with hyperlinks in a PDF, you’ll have to use the Layout > Table of Contents feature in InDesign. However, including the Table of Contents created by Microsoft Word won’t hurt your InDesign file. It gives you a very good idea of the outline structure that your author or editor wants for the table of contents. You can then delete that TOC and use InDesign’s TOC feature instead. Still, you might want to thank your authors and editors for taking the time to create the TOC, as it forced them to style paragraphs with the proper styles that you can use in the InDesign document. (Actually, it might be a good idea not to tell them that you had to totally recreate the TOC. That way, they’ll continue to generate the TOC paragraph styles for you.)
Index text
The Word index is similar to the Word TOC. In this case, the words to be included in the index are tagged with the index entry symbol. However, the page numbers in the index created by Word won’t necessarily correspond to the correct pages in the InDesign document. In addition, the page numbers won’t be hyperlinked to the pages when the document is exported as a PDF. However, it’s rather simple to create an index in InDesign once the text is imported from Microsoft Word. All the tags from the Word index translate to InDesign index markers. From that point, it’s rather simple to create a dynamic, interactive index. So don’t discourage your authors or editors from creating an index in Word, either. You may not be able to use the actual index text, but the tags are worth a fortune. After you import the file, just delete the index and use InDesign’s Index panel to generate a new one based on the tags in the story. Another practical yet often overlooked use of small caps is when the look of all caps is desired in small text. Consider using all small caps instead, set to the desired cap height, rather than all full caps. Why? Because they often have a higher degree of legibility at smaller sizes than full caps, due to their wider letterforms, more open spacing, and heavier appearance at the same cap height (Figure 5).
Footnotes
Happily, footnotes import exactly the way you want them to. The footnotes are retained. They are dynamic and they update if new footnotes are added using InDesign’s Type > Insert Footnote command. This is great, as most designers rely on authors and editors to insert footnotes.
Endnotes
InDesign doesn’t have an endnote feature. So any endnotes created in Word are imported under the heading (Endnotes) at the end of the text, but they aren’t dynamic (they won’t update automatically or link back to the original note location). In addition, a number format such as letters gets converted into Arabic numerals. There has been quite a bit of discussion about this topic at CreativePro as well as the user-to-user forums. Peter Kahrel has written what is probably the most comprehensive article on handling footnotes and endnotes, and he’s posted a slew of scripts to fix the import options. The bottom line is that you can decide to import endnotes, but they won’t behave as they did in Microsoft Word.
Typographer’s Quotes
This looks like it should be a no-brainer. When wouldn’t you want to convert any dumb quotes into proper typographer or “curly” quotes (“) and (‘)? But what if you are working on a book on basketball players, and the author has used dumb quotes to designate feet and inches for their heights? In that case, you want to turn off importing typographic quotes (Figure 3) so that the dumb quotes which are used to designate feet and inches aren’t converted into curly quotes.

Figure 3: The control to convert dumb quotes to typographer’s quotes

Figure 6: The differences between all caps and small caps set at the same height (here set in Classic Grotesque™) can make for a more legible treatment for cap text at small sizes.
Formatting
Formatting is the most complex area of the Word import options—and the area where you can save yourself hours of work cleaning up text. There are three categories in this area: removing styles and formatting from text, preserving styles and formatting, and handling style name conflicts. Let’s look at each one separately.
Removing Styles and Formatting
It’s very unlikely you will want to strip all styles and formatting out of a Word document, but if you do, there are options you will want to modify. First, click the Remove Styles and Formatting from Text and Tables radio button. When you do, the rest of the options in this category become available (Figure 4).

Figure 4: The control to remove styles and formatting from text and tables
Removing style from text
When you opt to remove the styles in a Word document, you are telling InDesign to discard any paragraph and character styles that were applied in Word. It’s unlikely you’ll want to do that; if an author/editor has taken the time to tag paragraphs and text with styles, they are trying to tell you the desired look for the text. So even though you may not use the appearance that they set for the style, you generally still want the name of the style applied to the text. That way you can redefine the style to something more desirable in InDesign. However, sometimes the word styles have been completely botched and you might want to just strip them all out. For example, let’s say your author/editor has created a Word document with all sorts of bizarre paragraph styles that you don’t want to import. But if they used bold or italic formatting for emphasis, you probably would not want to lose that styling. If you select Preserve Local Overrides, InDesign keeps the formatting applied to the text while throwing out all the actual paragraph and character styles (Figure 5). You can then use InDesign’s Find/Change function to convert that formatting (italic, bold, etc.) into the character styles you define in InDesign. 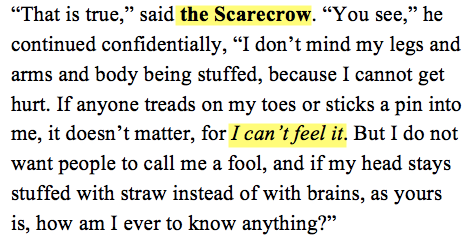

Figure 5: The local formatting in Word (above) is maintained in InDesign (below) when Preserve Local Overrides is checked for imported text.
Removing styles from tables
While it’s admirable that authors/editors want to make their tables pretty using the automatic table styles in Word and Excel, the results are a nightmare for designers who have to strip out all that crud. That’s when the option to remove styles in text and tables becomes a lifesaver. The option for how to convert tables (Figure 6) lets you convert the formatted table into tabbed text or a plain table (Figure 7). From there, you can apply more tasteful designs to the information. And for those who are wondering, yes, there is a similar option for importing Excel files.

Figure 6: The two choices as to how styled tables will be converted when styles are removed from text and tables.

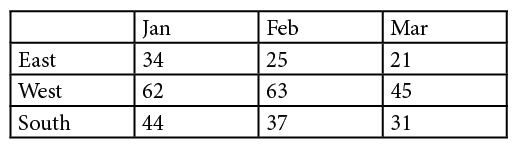
Figure 7: The formatting in the Word table (top) is converted into InDesign’s basic table style (bottom).
Preserving Styles and Formatting
The next radio button turns on the Preserve Styles and Formatting from Text and Tables option (Figure 8). This is most likely the option you will want to use. Even if you’re placing Word files that have no styles, the rest of the options are too important not to control.

Figure 8: The controls for Preserve Styles and Formatting from Text and Tables
Handling break characters
Word authors/editors often want to indicate that the text should start on a new page or column. They can do this by inserting a page break or section break character. Designers most often use a Keep Options setting in the paragraph style. Therefore, you need to choose an option from the Manual Page Breaks menu (Figure 9).

Figure 9: The menu for how manual page breaks in Word are handled
- Preserve Page Breaks maintains the breaks for both pages and columns. However, InDesign doesn’t honor all of Word’s break commands. Here are the Word characters and the replacement characters InDesign creates:
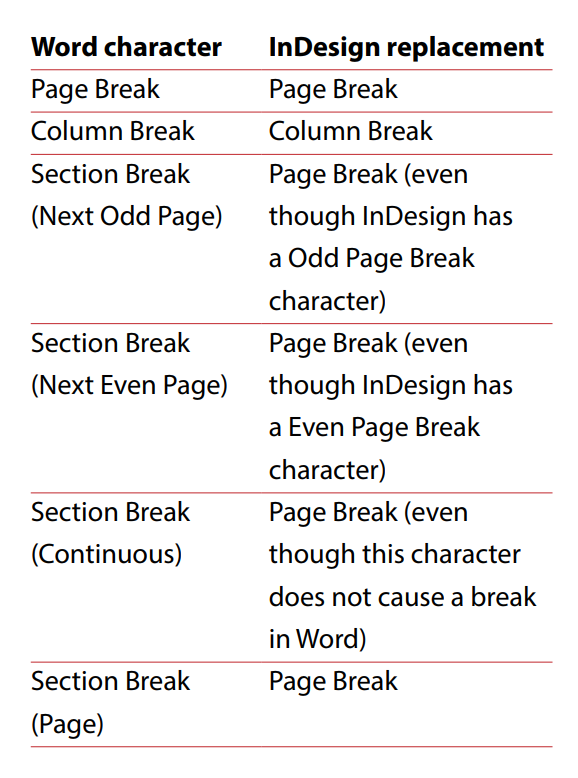
Figure 10: This chart shows which characters InDesign uses to replace Word’s break commands.
- Convert to Column Breaks changes all of Word’s page, column, and section break characters into column breaks.
- No Breaks discards any page or section break characters. This option should be used when InDesign files are laid out with new page or column settings.
Importing Inline Graphics
Many writers and editors assume that all photos and graphics should simply be inserted into their Word documents as inline graphics. However, to get professional results, you probably will want to replace graphics with something better or at a higher resolution. Images placed into Word files come into InDesign as embedded RGB graphics with generic names (Figure 11). PSD and TIFF files are converted to PNG files; AI and PDF files are converted to EPS files. While they may print correctly, the graphics may change in the conversion. 

Figure 11: An inline graphic from Word (above) is imported into InDesign (below) as an embedded PNG image.
Track Changes
As a designer, you really should be getting final-approved text. All the changes tracked in Word should have been approved and cleaned up in your imported text. That said, it is possible to import text with Word’s tracked changes still in the text (Figure 12).
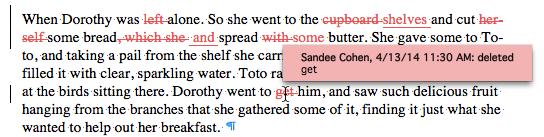
Figure 12: The changes tracked in the Word document are identified by the user.

Figure 13: The same changes imported into the InDesign document are indicated by a black line and are not identified by the user.
Import Unused Styles
You’d be amazed at how many styles are hanging around inside a Word document without being applied to any text. Obviously, choosing to import those unused styles can greatly increase the number of styles in your document. If you need to keep those styles, select the Import Unused Styles option. But most likely you won’t want to clutter up your Paragraph and Character Styles panels with all those extra styles.
Convert Bullets & Numbers
Word does an excellent job of applying automatic bullets and numbers to text. Authors and editors have three choices: plain bullets, numbered lists, or outlines. When these items are imported into InDesign, they come in almost exactly as they were in the Word document. The bullets and numbers are electronically created and the numbers are automatically updated as elements are added or deleted. They even honor the same numbering formats, such as Roman numerals or alphabetical entries. You may, however, find some bullets come in as unidentified characters. This is because Word uses bullets that don’t get translated correctly in the InDesign document. Fortunately, it is simple to redefine the style for the numbers as long as the text has been formatted with paragraph styles.
Import Styles Automatically
When you decide to preserve the styles and formatting from the Word document, you need to decide how styles with the same names are handled when they reach InDesign. This is the most complex part of placing Word documents into InDesign. It’s also the place where you can gain the most control over how the text is formatted in InDesign.
Style name conflicts
If the author/editor has applied styles, you should have coordinated the workflow so that the names of the styles they use in Word are the same as the names of the styles you have defined in InDesign. For example, they may have styles named a_head, b_head, body, body_first, and so on. You should have the same names for the styles in your InDesign template. But here’s the part that most Word author/editors don’t know: The styles in the Word document do NOT have to have the same style definition as the ones in the InDesign document. This is vital information, as some authors and editors want to work in very large point sizes, with double or triple line spacing, and typewriter fonts such as Courier. Let them have those style definitions—all you need to do is make sure they “tag” their text with the correct style names. When you import a Word document that shares the same style names as the InDesign styles, a yellow alert indicates that styles in the Word document have the same name as the styles in the InDesign file. You need to resolve those style name conflicts (Figure 14).

Figure 14: The yellow alert signals that the styles in the InDesign document have the same name as the styles in the placed Word document.
Control the style definitions
You have several options for resolving style name conflicts. Use the Paragraph Style Conflicts and Character Style Conflicts menus to choose one of the following (Figure 15):

Figure 15: Select choices from the Style Conflict menus to determine which actual style definitions will affect the incoming text.
- Use InDesign Style Definition applies the definition of the InDesign style instead of the definition in the original Word document. 99.99% of the time, you will want to apply this option.
- Redefine InDesign Style changes the definition of the InDesign style to match the definition of the incoming Word document. Unless your Word author/editors have perfect design sensibilities, you really don’t want to use this option.
- Auto Rename imports the text with the Word styles with a suffix so that you know that the style came from the Word document (Figure 16). There’s also a little disk icon that indicates the style came from an outside source.
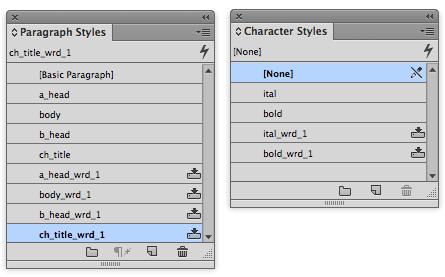
Figure 16: The suffix appended to the paragraph and character styles indicates that the style definition came from the original Word document.
Customize Style Import
So let’s say you and your Word author/editors haven’t coordinated your style names. Perhaps they used H1 and H2 for the styles that you call a_head and b_head. Maybe they used uppercase for the style names such as Body instead of body. Perhaps they used spaces between words such as a head and b head instead of a_head and b_head. All of these differences mean you have to map the Word styles to their equivalents in InDesign. You do this by clicking the Customize Style Import radio button. Then click the Style Mapping button (Figure 17). This opens the Style Mapping dialog box (Figure 18).

Figure 17: The Customize Style Import radio button allows you to map the Word to InDesign styles.
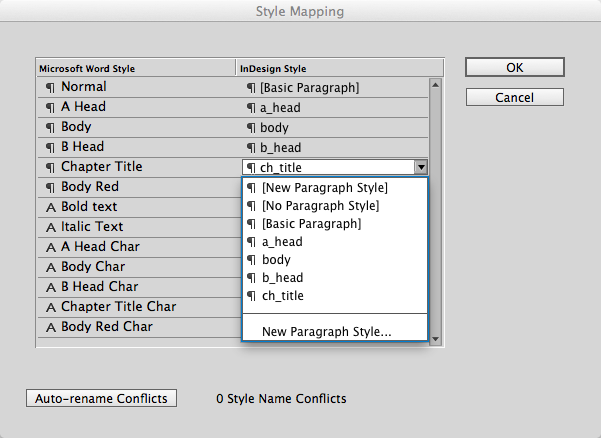
Figure 18: The menu under the InDesign Style column allows you to map each Word style to an InDesign style that has a different name.
Setting Presets
As I mentioned at the beginning of this article, the Word Import Options are sticky. Once set, they are applied to future Word imports until you disable them. However, the settings for custom style mapping aren’t sticky. Once you place the text, the custom mapping option is inactive. If you need to import the same type of Word styles into several InDesign documents, you can save the custom style mapping in a preset. Click the Save Preset button in the Word Import Options dialog box. This opens the Style Mapping Custom dialog box (Figure 19). Give the preset a name, and click OK. The preset will be available for all InDesign documents.

Figure 19: This little dialog box lets you save your custom settings as a preset, to speed the process of later repetitive imports.
Coordinate!
As you can tell, the most important part of setting the Word Import Options is coordinating the styles and elements between Word and InDesign. If you can, take the authors/editors who create your Word files out for lunch. Discuss their use of styles. Send them an RTF file that contains the names of the styles they should use. Meet with them to show how they should apply paragraph and character styles to their text. Coordinating will make it much easier for you to import and style Microsoft Word files.
Commenting is easier and faster when you're logged in!

Recommended for you

How to Inset a Stroke Partially Inside a Frame
Strokes don't always have to sit right along the edge of a frame. You can get so...

Heavy Metal Madness: Making the Best of a Dysfunctional Work Team
Last column I laid out how, through a fluke in timing and an addiction to eBay,...

Kodak Announces Intent to Acquire Design2Launch
Kodak announced its intent to acquire Design2Launch (D2L), developer of a collab...