
Scanning 101: Sharpening Your Images
As You Like It
The best way to become familiar with the unsharp masking options is to use them, but here’s a quick explanation of each parameter offered by Photoshop’s Unsharp Mask filter. Unsharp masking filters in other image-editing programs provide similar but not identical settings. For example, Ulead’s PhotoImpact offers two parameters for its unsharp mask filter — Sharpen Factor and Aperture Radius; these are similar to Photoshop’s Amount and Radius settings, respectively.
- Radius This setting is the most crucial of the three because it determines how many pixels on either side of an edge will be affected by the filter. These pixels will form the border that separates tonal areas through increased contrast. More than any other parameter, the radius setting is influenced by the resolution of the scanned image. High-resolution images (which contain very small dots) can tolerate higher radius settings. For example, a border four pixels wide in a 200-ppi image measures a mere .02 inches across and generates a sharp, thin border. The same radius setting in a low-resolution, 100-ppi image (which contains much larger dots) would produce a noticeable outline measuring .04 inches wide — the equivalent of a 3-point rule. The best way to determine the correct radius for any image is to try out different values. Your goal is to set a radius large enough to create distinct borders, but not so large as to create a noticeable outline around objects.
- Amount After setting the radius, you should turn your attention to the amount parameter. Basically, small amount settings introduce fairly low levels of contrast to adjacent pixels; high amount settings introduce high contrast levels into a picture. Once you’ve pushed adjacent pixels all the way to black and white, however, increasing the strength of the filter has no further effect on an image.
- Threshold The threshold parameter determines the point at which the sharpening filter will kick in, by allowing you to specify the minimum difference in pixel values that should indicate an edge. For example, if you set the threshold at 4, neighboring pixels with gray values of 124 and 126 will not be sharpened because the difference between them (2) is below the threshold. However, neighboring pixels with values of 124 and 129 will be sharpened, because the difference of 5 is above the threshold. You want a threshold level that keeps areas of smooth tonal transition out of the sharpening loop. Setting the threshold too high, however, can exclude too many pixels from the sharpening process.
How Much is Too Much?
It’s easy to get excited about the improvements associated with unsharp masking. When pushed too far, however, unsharp masking (or sharpening of any kind) makes a picture look surreal. The edges of objects are emphasized to the point that dark or light halos are formed. The images below demonstrate this phenomenon. Compare the first image, which was sharpened optimally, to the second, over-sharpened picture. Notice that a bright line now surrounds the two figures in the over-sharpened version.
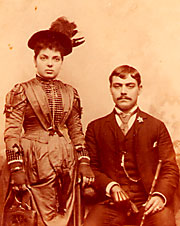

But the troubles don’t stop there. If you take the time to carefully inspect these two pictures, you’ll find other instances where the sharpening process has introduced artifacts. For example, the background behind the two seated figures contains some stray noise and dirt that has been made even more apparent in the second version.
Over sharpening is an especially big problem where faces are concerned. It can actually distort a person’s features by emphasizing the wrong details.
Less Is More
If you have a picture that requires a great deal of sharpening, experiment with amount and radius values to see how much you can sharpen without introducing visual artifacts. Keep in mind that there is a very tight relationship — a trade off, really — between the radius and amount settings. In general, as you increase the amount value, you should decrease the radius.
In the three versions of the portrait below, the first image is provided as a reference and was not sharpened. In the next two, a different value has been used for the radius and amount parameters within Photoshop’s Unsharp Mask filter. Though there are subtle differences between the final two images, both versions are acceptable, in that they exhibit more contrast and details than the original image and are free of noticeable artifacts or distortions.


In this example, the low resolution of the scans put a definite limit on the radius setting we could use with good results. If you are working with images for print, the higher-resolution images will give you even more flexibility in the radius and amount values you can use without introducing artifacts.
You can also use an unsharp masking filter with lower values to correct the image globally, and then use a sharpening tool to touch up selected areas of the picture. You’d be amazed how much better a portrait looks, for example, if you sharpen only the person’s eyes and mouth. Just remember to choose a brush with a soft anti-aliased edge, so that your sharpening corrections blend in with the rest of the picture.
In the final analysis there are no perfect settings for unsharp masking filters. Appropriate settings will vary depending on the resolution and content of the image. But used judiciously the filter can help your photos pop off the page or the screen.
This article was last modified on January 6, 2023
This article was first published on October 25, 2000
Commenting is easier and faster when you're logged in!

Recommended for you

Creating Instant Charts With Chartwell
You can create charts and graphs on the fly from live text with the ingenious fo...

Disappearing Paragraph Rules: A Mystery
Sometimes we learn things when something goes wrong. I had two fascinating InDes...

Making Hidden Characters More Subtle
How to change the color and tint of hidden characters in InDesign and Illustrato...