
Saving Selections with Channels in Photoshop
Increase your speed and creative options by using channels to save your precious selections.


This article appears in Issue 36 of CreativePro Magazine.
Photoshop is bristling with tools and features for making selections—but that doesn’t mean you should spend a lot of time using them. And you definitely don’t want to keep making the same selection over and over. That’s where the Channels panel comes in. In this article, I will explain step by step how to improve your workflow in Photoshop by saving your selections and organizing them in the Channels panel.
Being Selective
Before we dive into channels, let’s spell out a few fundamental facts about selections.
In Photoshop, the point of making a selection is to isolate part of an image layer for the purpose of manipulating it. When you do so, you can edit pixels and apply effects or filters to portions of your image while leaving the unselected areas untouched.
When you make a selection, it is displayed on the canvas with the familiar “marching ants.” But they tell only part of the story. Selecting a pixel isn’t an all-or-nothing thing. You can partially select pixels, which gives you even more control for applying adjustments, creating effects, and compositing images. And viewing a selection as a channel gives you a much clearer picture of just how much of each pixel is selected.
Photoshop provides separate sets of tools to make selections of raster and vector content. For example, to select pixels, you can use the marquee tools or the lasso tools. You can use commands in the Select menu to select all pixels, deselect, reselect, or select the inverse of your current selection. And there are specialized selection tools, such as the Object Selection tool, which can recognize people, plants, animals, and buildings, and then quickly select them for you (Figure 1).
src=”https://creativepro.com/wp-content/uploads/2024/09/Figure-1_625-fs8.png” alt=”Figure 1. Photoshop offers you plenty of tools to choose from when you need to select raster (pixel) content.” width=”625″ height=”297″ /> Figure 1. Photoshop offers you plenty of tools to choose from when you need to select raster (pixel) content.
You can also use the pen or shape tools to produce precise vector outlines (paths) that can be converted to selections or vice versa.
No matter which selection tool you use, the goal is always the same: to get the most precise selection possible for the purpose you have in mind. To accomplish that, sometimes you need more than one selection tool for the job. You can start with one selection tool and use others to complete the selection.
In general, when someone asks me which selection tool they should use, my answer is, “The one you’re most comfortable with.” Before reaching for any tool, however, take a moment to study your image. If you see a shape that looks like a rectangle, use the Rectangular Marquee tool. If you see an object that will be recognized by the Object Selection tool, grab that one. Experiment with all of the selection tools, and practice so you can increase your comfort level with them and quickly recognize which one will be right for a particular job.
Understanding Channels
For many Photoshop users (even experienced ones), the term channels is a bit obscure. And some folks get it confused with layers. Let’s make it easier to understand by distinguishing the two and defining a few terms.
Layers are used to isolate, composite, and manipulate various parts of an image, via the Layers panel and Layer menu. There are several types of layers: pixel layers, type layers, adjustment layers, shape layers, and Smart Objects. A layer can contain data from any or all image channels in the document.
Channels are grayscale images that store different types of raster image data. There are three types of channels you can have in a Photoshop document:
- Color information channels or image channels: These are created automatically when you open a new image, and combined they create the full color information for each pixel. The image’s color mode determines the number of color channels it contains. For example, an RGB image has a channel for each primary color (red, green, and blue), plus a composite channel used for viewing and editing the overall image. CMYK images have four color channels (cyan, magenta, yellow, and black). Lab Color images have three color channels (Lightness, a, and b). Grayscale images have just one image channel. And multichannel images can have anywhere from 1 to 56 channels (the maximum number a Photoshop file can contain).
- Alpha channels: These channels can store masks and selections as grayscale images.
- Spot color channels: These channels hold grayscale data and are used to specify additional plates for printing with spot color inks.
Here are a few things to know about channels:
- All new channels have the same dimensions and number of pixels as the overall image.
- The amount a channel adds to the file size of your document depends on the pixel information in the channel. Certain formats, including TIFF and native Photoshop files (PSDs), compress channel information to save space. The size of an uncompressed file, including alpha channels and layers, appears as the right most value in the status bar at the bottom of the window when you choose Document Sizes from the pop?up menu.
- You can use the Channels panel to view any combination of channels in the document window. For example, you can view an alpha channel and the composite channel together to see how changes made in the alpha channel relate to the entire image (Figure 2).
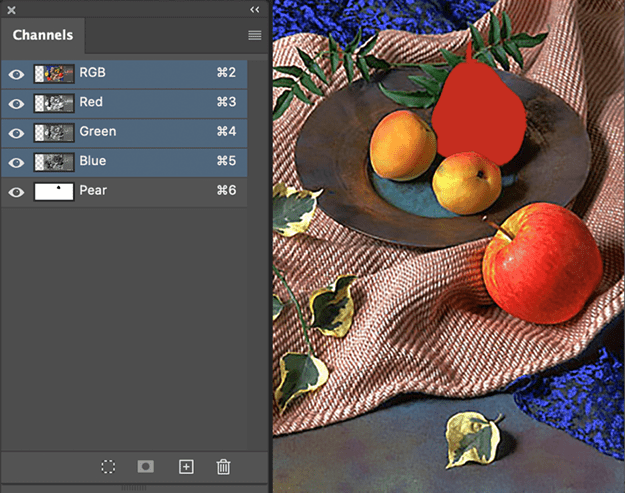
Figure 2. The Pear channel appears as a red overlay above the composite channel.
- By default, individual channels are displayed in grayscale in the Channels panel. There is an option in Interface preferences to view channels in color. But unless you have a reason for doing so, it’s best to keep them in grayscale, where it’s much easier see the detail in each channel.
- When a channel is visible in the composite image, a Visibility (eye) icon appears next to it in the panel.
- If you want a clearer look at channels in the Channels panel, go to the panel menu and choose Panel Options, where you can select a larger thumbnail size.
Flipping Through the Channels
You can view each individual channel and the composite one with keyboard shortcuts. Command/Ctrl+2 displays the composite channel (CMYK, RGB, LAB), Command/Ctrl+3, 4, 5, and so on display the individual color channels or alpha channels. Remember that Command/Ctrl+1 is for viewing an image at 100%. 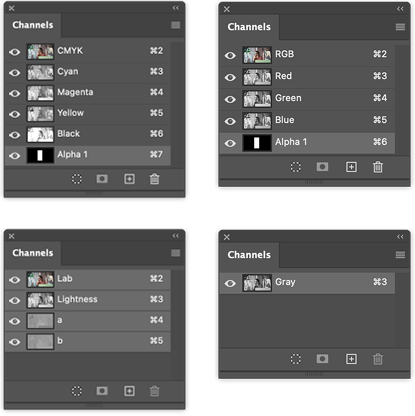
Saving Selections
Figure 3 shows an example of saving a selection with an alpha channel. After making your selection (in this case, the pear), go to Select > Save Selection. In the dialog box, you can choose a destination (any open document or a new one), and add a name.
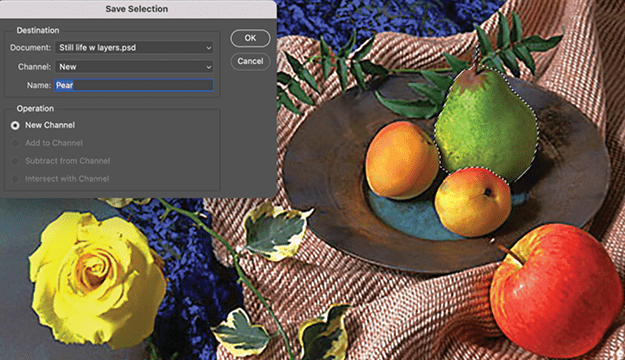
Figure 3. Saving a selection as a new channel in the current document
You can think of the Channels panel as your de facto Selection panel. You can go there to load (reactivate) a saved selection in your image—or any other image you desire.
Note: By default, there is no keyboard shortcut assigned to the Save Selection command. But there’s nothing stopping you from assigning one if you get in the habit of using this command! Choose Edit > Keyboard Shortcuts. In the dialog box, choose Shortcuts For: Application Menus, and scroll down until you see the Select menu and the Save Selection command. Click in the Shortcut column, type your new shortcut, and click OK.
Using the Channels Panel
After you have saved your selection, you can do several things with it in the Channels panel:
- Click the channel in the panel to view it on the canvas (instead of the composite image content). When you’re viewing a channel this way, you can edit it just as you would any grayscale image. Use the selection tools, apply transformations, copy and paste, paint on it, and so on (Figure 4).
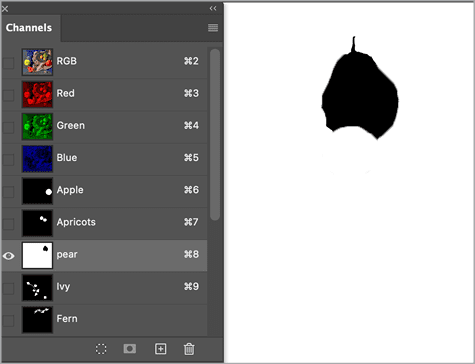
Figure 4. Anything you can do to a grayscale image you can also do to a channel.
- Double-click the channel to open the Channel Options dialog box, where you can select the color to indicate the masked or selected area, and its opacity (Figure 5). This mask appears as an overlay when you view the alpha channel with other channels. Viewing the channel and the mask tells you how much you have been selecting and gives you an idea of how to continue.
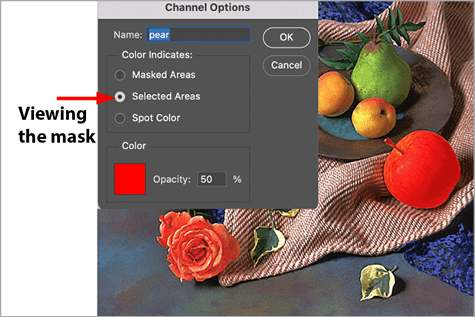
Figure 5. You can customize the color and opacity of the overlay when an alpha channel is viewed on top of the composite.
- Command/Ctrl-click the alpha channel to load (reactivate) it as a selection. Or choose Select > Load Selection to accomplish the same thing.
Tip: You can also load a channel as a selection without taking your hands off the keyboard. Press Command+Option/Ctrl+Alt plus the channel number. For example, pressing Command+Option+7/Ctrl+Alt+7 loads the first alpha channel in a CMYK document.
Adding and Subtracting from Selections with Channels
Let’s look at how to use channel operations to combine selections or to subtract one selection from another.
In my example, I isolated parts of the image, which enables me to target effects with other features (such as fill layers and adjustment layers) to those areas. I can also combine two channels to target areas from both. For example, after I save both the apple and pear selections as individual channels, I can create another channel that will include both the apple and the pear selections.
First, I target the composite channel by clicking it (you could also press Command/Ctrl+2). I choose Load Selection and load the Apple alpha channel. Then, I again choose Load Selection and select the Pear alpha channel. This time I activate the Add To Selection button and click OK. Now, with both items selected, I can save a new alpha channel and name it Apple_Pear (Figure 6).
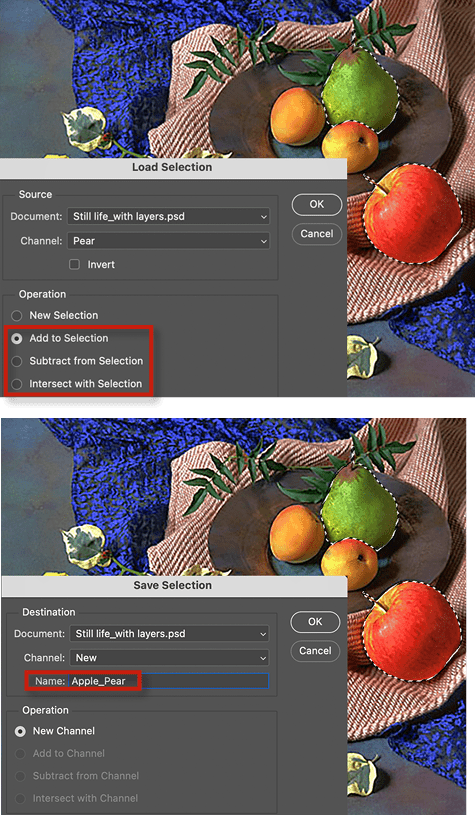
Figure 6. You can add, subtract, or intersect selections to create new ones.
Want to combine saved selections even faster? Command/Ctrl-click the first one, and then Shift-click the other one. With the combined selection active, choose Select > Save Selection (or, use that custom keyboard shortcut mentioned earlier).
Subtracting one selection from another is just as easy. Suppose I want a selection of the plate so I can make adjustments to it. I start by selecting the plate with the Ellipse tool. Now I need to subtract all the things on or in front of the plate. Because I already selected the apricots, the pear, and the apple, I can use those channels to subtract from the ellipse and create a perfect selection of just the plate.
While the elliptical selection active, I load the selection, select the Apple alpha channel, and click the Subtract From Selection button (Figure 7). I then repeat the process with the Apricot and the Pear selections. The result is a perfect selection of the plate. Of course, because it took a little work to create this selection, I should preserve it by saving the selection and naming it Plate.
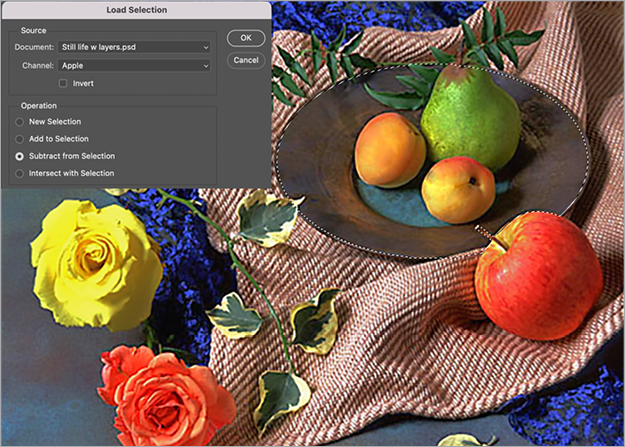
Figure 7. Subtracting the apple channel from the plate selection
Loading Channels as Selections with Keyboard Shortcuts
Using keyboard shortcuts will make life easier because you can quickly target the channel, layer, or mask that you want to load as a selection.
Use these shortcuts to load selections:
- Hold Control/Command and click the thumbnail of the layer, channel, or mask to load a selection.
- Hold Command/Control+Shift and click another thumbnail to add it to the selection.
- Hold Command+Option/Control+Alt and click a thumbnail to subtract it from the selection.
- Hold Command+Shift+Option/Ctrl+ Shift+Alt and click another thumbnail to intersect it with the selection.
Once a selection is active, you can check it, tweak it, and output it in various forms, including as a new layer, using the Select and Mask command, found on the Options bar (Figure 8).
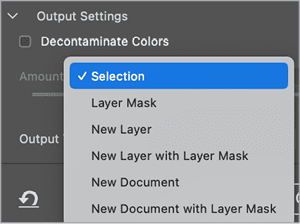
Figure 8. Select and Mask allows you to output selections as masks and/or layers.
Dynamic Layer Transparency vs. Static Alpha Channels
Every pixel, type, and shape layer you add to a document contains a dynamic, built-in alpha channel. You don’t see it in the interface, but this is what Photoshop uses to determine the opacity of that layer (in addition to any masks that you add later on). You can load that built-in alpha channel as a selection by Command/Ctrl-clicking the layer thumbnail, and in the dialog box, choosing the layer’s transparency in the Channel menu.
No matter what you do to transform the pixels in a layer, its transparency is connected to the built-in alpha channel. So, for example, if you move pixels with the Move tool, and then load the selection, it will correspond to the new location of the layer content.
On the other hand, the alpha channels you create and save manually are static. So, every time you load them as a selection, it will be in the same place (Figure 9).
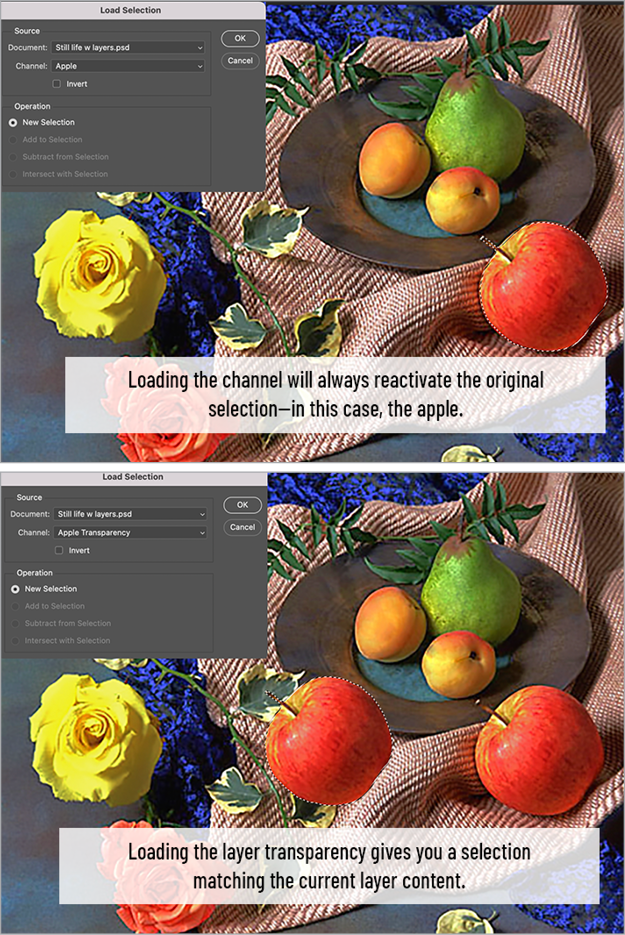
Figure 9. Remember that the alpha channels you save do not automatically update when the content of the image changes.
Keep this difference in mind when creating effects or compositing images with the help of saved selections.
Channeling Your Inner Artist
Now it is time to have some fun! With saved selections in the Channels panel, you can start manipulating elements in the image to fashion all kinds of looks for a project.
By mastering the skill of saving selections and managing them in the Channels panel, you’ll significantly enhance your Photoshop workflow, making complex edits more manageable and efficient. With a little practice you’ll soon be able to leverage this powerful feature to its (and your) fullest creative potential.
Commenting is easier and faster when you're logged in!

Recommended for you

How to Use AI Features for Quicker Photo Editing
Learn the to take advantage of machine learning (AI) when editing photos in Phot...

Merging Separations into Composite CMYK plus Spot
Need to recombine pages that have been separated into individual color channels?...
Basic and Not-so-Basic Text Selection Shortcuts
Most people understand the basics of selecting text like double and triple click...