
As a prepress operator, one of my responsibilities is to check artwork supplied by clients. An issue that I encounter regularly is PDF artwork that is supplied with no bleed, even though it is clear that elements of the artwork will need to bleed off of the trim edge. The following example uses a supplied business card that once trimmed will be 90 x 55 mm.

In the above image, the culprit is a PDF setting in InDesign that did not include the bleed.

Realizing the PDF had no bleed, I asked the customer to export the PDF again, but this time with 3 mm of bleed in the Export Adobe PDF dialog box. Note that when the Bleed setting is changed, the word (modified) is added to the end of the PDF Preset name.

Once the PDF is generated, you can see by the larger dimensions (96 mm x 61 mm) it has 3 mm of bleed all around.

One thing to notice is the presence of red and blue borders – they indicate where the relevant trim boxes are and they can be turned on in Acrobat’s Page Display Preferences or in the Output Preview dialog box (Tools > Print Production > Output Preview).

Let’s look at another instance of a PDF with no bleed:
Unlike the previous PDFs, this one contains crop marks, which isn’t a problem… but the lack of bleed on the image is! Assuming that the client hasn’t left their bleeds at zero in the Bleed and Slug portion of the Export Adobe PDF dialog box, what happened?
One cause: incorrect page elements
If I receive a PDF that looks like this, there is a possibility that the original InDesign page elements were not positioned to bleed. If this is the case, the elements of the artwork that are to be trimmed off must be extended past the trim area in InDesign, and a new PDF exported.

Another cause: Document Setup bleed settings
In this instance, the InDesign file has the artwork past the trim edges, so what is going on? The answer is the setting in the PDF Export dialog box.

This can happen if the client is using a customized PDF setting where the Bleed and Slug settings are taken from the Document Setup, as the default options do not do this. In this instance, that is exactly what is happening because the checkbox Use Document Bleed Settings in the Export Adobe PDF Dialog box has been checked. If we change the Document Setup so that the bleeds are 3 mm, this will resolve the issue.

Or alternatively, you could deselect Use Document Bleed Settings and manually enter the Bleed values as 3 mm all around in the export dialog box. Either method will produce following result:

That’s much better.
Beware of the default settings
Remember how I mentioned earlier that the name of an Adobe PDF preset will change when you modify the settings in the dialog box? That is because the default PDF export options (these appear inside square brackets in the dropdown list from the Export dialog box) do not contain bleed settings, so unless you’re using a customized PDF export option containing the necessary bleed, you will need to change the bleed settings each time you choose a default setting for PDF export.

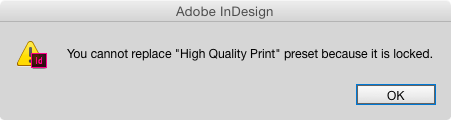
So why not change the default Adobe PDF Presets so they contain bleed? Because the defaults cannot be changed. Note that in the Adobe PDF Presets window, the selected preset cannot be edited (the Edit button is grayed out). And if you try to overwrite a default with a new preset having the same name, InDesign refuses.
So how do you determine how much bleed to use? Ask your printer. Some printers publish the details of their PDF requirements on their website. Or better still, see if your printer has a joboptions file that you can download and add to your PDF presets. If your printer does not have PDF specifications available online, feel free to ask them directly.
This article was last modified on August 8, 2019
This article was first published on March 5, 2015
Commenting is easier and faster when you're logged in!

Recommended for you

Ink Manager: Never Forget This Step Before Exporting a PDF
Talk to any printer and they’ll tell you: Designers are forever sending them PDF...

Photoshop How-To: Adding Bleeds and Crop Marks
One question that I receive on a fairly regular basis, is how to add bleed to an...
Mind your InDesign Metadata: It Might Show Up in a Web Browser!
If you create PDF files from InDesign, you should know that some browsers displa...