Review: Silver Efex Pro

Film Types and Styles
It’s a little strange, but even though most digital cameras yield images with more dynamic range, better detail, more resolution, and less grain than 35mm film, it’s hard to resist the look of a textured, chunky image. To that end, many companies have created plug-ins that mimic the look and feel of traditional film stocks. While many of these yield nice results, most simulate grain in the same way: by creating a specific noise pattern and then blending that with the image.
Silver Efex is more sophisticated in its grain emulation. It models your image as chunks of silver halide crystals, resulting in a grain that really looks like grain, both in terms of the appearance of the actual grain, and in the way that the grain distribution varies from one tone to another.
Silver Efex comes loaded with a nice list of predefined film types, which you can easily select from a menu (Figure 11). You can customize these types or build your own using the Film Type controls, which consist of three simple sliders: Grain, Sensitivity, and Tone Curve. Grain lets you change the amount of grain, Sensitivity lets you adjust the gain of individual primary color channels, and Tone Curve lets you build a custom tone response.
Figure 11. Silver Efex ships with a lengthy selection of pre-defined film types.

These simple controls yield a lot of power, and while you might not need to ever go beyond the included film stocks, having such straightforward customization is very welcome.
Figure 12. An upclose (100%) example of Silver Efex’s film stock emulation (in this case, Agfa APX 400).

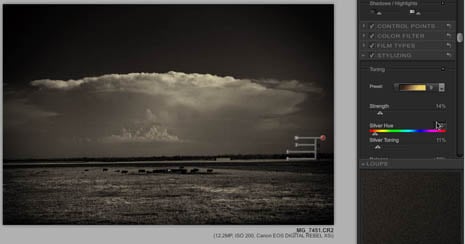
With the Stylizing controls, you can create several important darkroom effects. Toning lets you apply a color tone to your image, which can be used to create everything from old-style sepia tones to more stylized color tonings.
Vignette lets you create a corner altering effect. With it you can darken or lighten the corners in your image. Burn Edges lets you overexpose the edges of your image to create darker edges. Silver Efex lets you apply separate amounts of burning to each individual edge, using a very streamlined interface. Both edge burning and vignetting provide a nice way to bring more focus to the subject of an image, and allow you to create a very authentic looking “darkroom print” feel (Figure 13).
Figure 13. A little vignetting, edge burning, and toning, and the image is done. Click the image to see a larger version.

Applying
Once you’ve adjusted your conversion to your liking, you can hit the Okay button to apply the edit to your image. In Photoshop, you also have the option of clicking the Brush button, which applies the effect to a copy of the selected layer and automatically constructs a Layer Mask. This allows you to paint the adjusted layer on however you want, giving you an even greater degree of localized control.
Silver Efex doesn’t offer this type of non-destructive operation in Aperture, but that’s because Aperture doesn’t provide any mechanism for non-destructive plug-ins.
Worth the Price
In case you hadn’t guessed, I’m a big fan of Silver Efex Pro. It’s powerful, fun, and delivers great results. If you’re serious about black and white photography, the $200 price tag is very reasonable, especially if you sell your imagery and can quickly recoup the cost.
Also, Silver Efex works with Photoshop Elements, which can be had for under $100 and offers all the image editing power many photographers need.
If you’re an Aperture user who likes to work in black and white, Silver Efex is a must-have, as Aperture’s built in monochrome facilities are very weak.
You can download a free 15-day trial of Silver Efex (as well as Viveza). If you’ve never worked with Nik’s Control Point technology, it’s well worth taking advantage of the free demo.
This article was last modified on December 14, 2022
This article was first published on September 15, 2008
Commenting is easier and faster when you're logged in!
Recommended for you

Photojojo University
Photojojo, the site that brought you such goodies as the camera lens coffee mug...

Heavy Metal Madness: A Focus on Hocus Pocus
My favorite type of graphic discovery is one that comes out of nowhere, supplyin...

CreativePro Tip of the Week: Photoshop Blend Mode Shortcuts
This CreativePro Tip of the Week for Photoshop blend mode shortcuts was sent to...


