


Aperture Philosophy
Apple has touted Aperture’s “non-destructive editing” capabilities and trumpeted the fact that Aperture never makes changes to original raw files. Users of other raw converters have bristled at Apple’s implication that Aperture is unique in its hands-off approach to raw files because most raw converters make no changes to the original file.
However, Apple isn’t completely out of line in heralding Aperture’s non-destructive capabilities. While Photoshop provides non-destructive editing for some of its tools through Adjustment Layers, and for raw conversion through the use of Smart Objects, all of Aperture’s editing and adjustment tools are non-destructive.
When you make any type of edit in Aperture — from cropping to rotating to Levels and Exposure adjustments — the program simply adds the specifics of that edit to a list of edits to be applied to the image. It doesn’t alter any pixels. Any time the program needs to display an image, whether on the screen or for any type of output, it reads in the list of edits and applies them to the original image data in real-time. What’s more, this non-destructive approach is true for all supported image formats, not just raw.
This approach has a few advantages. First, it means that you’re never viewing proxy data or low-res previews. Second, you can adjust and remove editing operations at any time, and in any order. And finally, you can easily create different versions of a document, without consuming significantly more disk space.
In Aperture, if you want to create a new version of an image to try out different edits or to render a different look for a different intended output, you just choose the New Version command. This creates a new instance of your original master file, which has its own list of edits. Edits are stored as XML files inside the main library, and edit lists are very small — roughly 30K — so creating multiple versions requires very little in the way of system resources.
When you finally have a version to your liking, you can export it, which causes Aperture to render a final image that includes all of your edits.
Metadata and Keywords
Aperture has a full assortment of metadata editing tools. Opening the Info pane reveals the metadata editor, and it’s got pretty much all of the fields you’d expect. IPTC tags and read-only EXIF tags are all there. Many users have complained about the program’s inability to edit EXIF tags, but most catalogers treat EXIF data as read-only, which makes sense. EXIF tags are encoded by the camera at the time of shooting, and there’s little reason to edit them.
Aperture’s keywording tools are very good. Understanding that keywording is something photographers know they should do but don’t want to bother with, Apple has made keywording very simple. A keyword toolbar at the bottom of the main window provides buttons that allow you to apply a keyword with a single click. Each button has a keyboard shortcut that makes keyword application even simpler. Configuring the buttons is a breeze, and you can easily create sets of buttons that can be swapped in and out with a menu choice or keyboard command. It only takes a minute to learn how to use these features, and once you have them, keywording is a no-brainer.
Keywords in Aperture are hierarchical. For example, you can create separate keywords for mother, father, son, and daughter, and all of these can be descendants of a single keyword called family. Therefore, a search for family turns up the images tagged with son and daughter, as well.
Finally, as does Adobe Bridge, Aperture provides a simple star mechanism for rating. You can tag images with a rating of zero to five stars, or with a Reject rating. Numerous keyboard shortcuts make it easy to apply a rating, and special relative adjustment commands let you increase or decrease the rating of single or multiple images.
The Filter HUD makes short work of filtering the current images to view only images with a particular rating or keyword tag, as well as images shot within a particular date range (Figure 7).

Figure 7. The Filter HUD gives you a quick way to filter your images by rating, keyword, or exposure time.
Editing
Aperture was designed to perform most of the operations that a working photographer needs to use every day. Because it’s the rare photo that doesn’t need some edits, Aperture provides a basic set of image-editing tools in the form of filters you apply and control using the Adjustments HUD (Figure 8). By default, the Adjustment HUD always includes Exposure, Levels and White Balance filters, though these aren’t activated until you choose to use them.
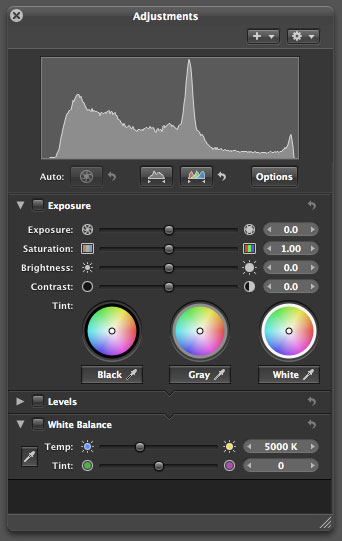
Figure 8. The Adjustments HUD is the single repository for all of Aperture’s editing controls and provides a simple way to see what edits have been applied to the currently selected image.
The Exposure filter is where you’ll perform the bulk of your edits and, like the Adjust filter in iPhoto, it works on either raw or JPEG images, though obviously it’s capable of different degrees of editing depending on the image data.
Like Adobe Camera Raw, the Exposure filter provides sliders for Exposure, Saturation, Brightness, and Contrast. It lacks a Shadows slider, which can be a drag if you need to change the black point of an image, because you’ll need to apply a separate Levels filter.
Also like Camera Raw, the Exposure slider lets you perform highlight recovery, rebuilding clipped channels from surviving channels in overexposed highlights, and Aperture seems to be as capable in this regard as Camera Raw.
Overall, Aperture’s sliders operate as you’d expect: the Exposure slider works like a white point control, while the Brightness slider functions as a mid-point adjustment. Saturation simply increases or decreases saturation, while Contrast applies an S-curve contrast adjustment. The Adjustment sliders may not appear to offer as much range as the equivalent sliders in Photoshop — Exposure doesn’t seem to provide as broad an exposure range, and White balance only seems to go from 2500° to 10000° — but this is because Apple hid the full range of the sliders. The visible sliders represent the “sweet spot” of each control: the area Apple thinks we’ll use the most. If you hold your mouse over the numeric readout for each slider, though, it changes into a special cursor that, when you drag it back and forth, moves the control over its true, full range. It’s a strange idea to hide functionality in this way, and I’d prefer sliders that actually show the full range of each control by default.
The Exposure filter also provides tint controls that work a lot like Final Cut’s three-way color corrector. You use three color wheels to apply a tint to the black, white, and middle gray tones of the image. It’s an interesting way to apply global tone and temperature changes, but you’ll probably find it more useful for JPEG images than for raws.
The Temperature filter provides a simple eyedropper tool for setting the white point of an image, but I didn’t find it to be very effective. When I clicked on known neutral patches in images, I often found that it selected an incorrect color temperature. The inaccuracy was inconsistent — sometimes it was too warm, sometimes too cool. Apple has acknowledged this trouble and will address it in an update.
The Levels filter controls are fairly standard. The filter is unique in that it provides an option for quarter-tone control points, which lets you effectively create an S-curve adjustment. The Levels control has no eyedropper tools for setting white, black and mid-points, but I didn’t really miss these.
What I did miss from Aperture’s editing suite was a Curves tool. Though the quarter-tone feature in the Levels control is nice, it’s no substitute for a real Curves control. Aperture lacks any kind of masking or selection tools, making it impossible to selectively apply an edit to an image. This is a serious limitation in the program’s editing capabilities, and one that makes a Curve tool even more valuable. With a good Curves control, it would be possible to apply some localized tonal corrections.
Also missing are any color sampling tools. It’s simply impossible to get a readout of any color values in your image. Though the program does have a highlight clipping display, the absence of RGB readout is annoying.
The rest of Aperture’s editing controls are mostly straightforward. There’s a good red-eye filter (does Apple really think that professional photographers spend more time using red-eye tools than they do using Curves?), a Monochrome Mixer for creating custom grayscale conversions, a Color Monochrome filter for creating monotones, and a Sepia Toner. A Highlights and Shadows filter works just like Photoshop’s Shadow/Highlights command and does a very good job of controlling difficult shadows and highlights. Noise Reduction and Sharpen filters are also included, but they’re underpowered by today’s standards. The Sharpen filter is nothing more than a normal Unsharp Mask filter but without the Threshold slider, while the Noise Reduction filter has only two controls: Radius and Edge Detail. There are no separate controls for handling luminance and chrominance noise. In general, both Sharpening and Noise Reduction are too weak for a professional program.
Aperture’s Spot and Patch tool gives you a way to take out sensor dust or other small aberrations and is similar to Photoshop’s Patch tool. It’s no substitute for a Clone tool, but it’s a welcome addition to the editing suite.
The Straighten tool deals with crooked images. Rather than simply drawing a line across your desired horizon line, you click and drag with the Straighten tool to interactively rotate your image into a straightened position. While rotating, Aperture automatically zooms the image to create a clean crop. This is a clever mechanism, but far twitchier and slower to use than Camera Raw’s Straighten tool.
One of the most maddening characteristics of Aperture’s editing facility is the lack of keyboard control. You can’t tab from one editing field to the next, meaning you’ll be doing a lot of mousing for ordinary edits. It’s a strange omission given that Aperture has thorough keyboard support otherwise.
Pressing T at any time enables a very nice metadata display. With it enabled, hovering your mouse over any image superimposes a customizable metadata HUD. This is a smart way of quickly reviewing metadata without having to open the metadata pane and rearrange your screen.
Note that Aperture doesn’t support Photoshop-compatible plug-ins, so if you rely on third-party plug-ins, you’ll have to use them those in Photoshop, and deal with the resulting workflow issues that that Photoshop trip creates. Given Aperture’s real-time architecture, it’s understandable that supporting Photoshop plug-ins is an issue (Photoshop plug-ins aren’t coded for video card support) but it would be nice if there was some mechanism for using those plug-ins within Aperture, even if it wasn’t real-time. Plug-in support would also provide an answer to Aperture’s weak sharpening and noise reduction tools.
My overall take on editing in Aperture: It’s okay. The lack of selections and curves is a fairly serious liability. If your images are generally well-exposed and need little editing, then Aperture’s tools will suffice, but if you have even a few images that require some form of localized editing, you’ll be forced to alter your Aperture workflow to include an external editor. I’ll have more to say about this later.
For quality sharpening and noise reduction, you’ll want to look elsewhere.
Moving Edits
Adobe Camera Raw stores its raw conversion parameters as separate XML files, letting you alter them at any time. Using Adobe Bridge, you can easily copy your conversion parameters from document to document and synchronize documents so you can adjust multiple images simultaneously.
Aperture is much weaker when it comes to copying parameters from one document to another: You’re limited to its Lift and Stamp tools. The Lift tool sucks up all of the editing parameters from any image you click on, then turns into the Stamp tool. Click with the Stamp tool on another image and it receives the parameters from the image you lifted.
This is the only way to copy edits from one document to another and, though it works, it can make for a lot of clicking. Unfortunately, it can also make for a lot of waiting. Lifting and Stamping involves little more than copying some data from one XML file to another, yet using the tools often leaves you staring at a rainbow cursor for a while, unable to do anything else in Aperture.
You can also use Lift and Stamp for copying other metadata from one image to another, but there’s no facility for copying the crop from one image to another. Because the program recognizes that photographers usually deal with images in batches, I was surprised that Aperture doesn’t have better tools for batch editing.
Organization and Output
Aperture’s Album and Smart Album capabilities are like iPhoto’s. You can drop images into albums to create subsets of pictures within a project, or use Smart Albums to automatically create albums based on the ratings or keywords of images.
You can also drop images into a Light Table, a workspace in which you can freely drag images around, resize them, and overlap them (Figure 9). A Light Table gives you the same type of layout freedom that you get in a page-layout program, and you can experiment with how images might fit together. Something of a specialized tool, you’ll probably use Light Tables a lot or not at all.

Figure 9. A light table in Aperture provides a free-form layout space where you can spread images out, resize them, and experiment with how they fit together and flow. Click on the image above for a larger view.
Aperture projects can contain Web pages into which you drop images. Apple includes a handful of templates that automatically create thumbnail pages you can click through to larger index pages. Smart Web Pages can automatically generate a Web page based on an image’s rating or keywords.
Aperture’s Web page creation is good (Figure 10). The templates are classy, and you can resize the images on both the thumbnail and details page. You can also specify exactly what metadata should display with the images.
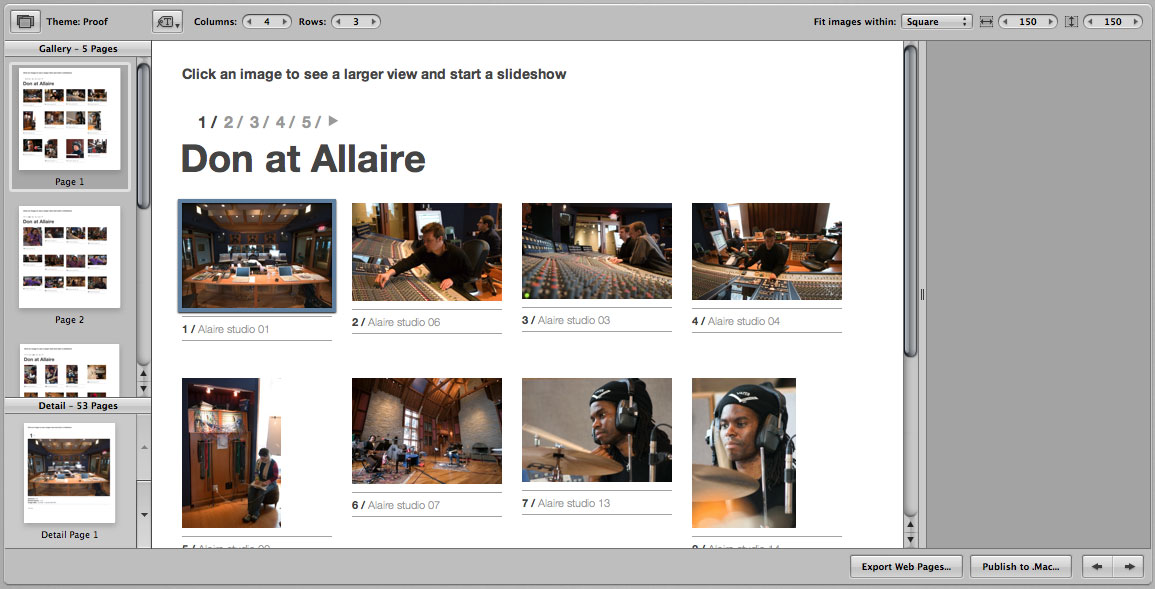
Figure 10. Aperture’s Web Gallery builder provides understated, sophisticated themes and good customization controls. Click on the image above for a larger view.
Unfortunately, there’s no way to create your own templates, which means you can’t use Aperture to automatically generate image galleries that fit into an existing Web site or presentation. I’d really like to see Apple add something akin to iView MediaPro’s custom templating mechanism.
One Web gallery can’t link to another, which can be a bit of a hassle if you want to present a few different galleries of the same project to a client.
Aperture can automatically publish its Web galleries to a .mac account, or output a site for uploading to your own server.
Aperture’s Web Journals are a form of photo blog that can include pictures and text. Web Journals provide the same customization tools as Web galleries, but with additional controls for adding blocks of text. This is a welcome feature when you’re on the road and want to post images of your journey, but again, it can’t be integrated into a larger site, and it’s difficult to understand how this fits into Apple’s view of the needs of a “professional” photographer.
Both Web Galleries and Web Journals provide good controls for watermarking images.
For client review, Aperture includes a good slideshow tool with control of transitions and background music. The program’s most impressive review feature, though, is its dual monitor support. Simple menu commands let you configure Aperture to display the current selection in full-screen mode on one monitor, while you navigate and work on the other. When used in conjunction with a pair of large Cinema Displays, the results are stunning. It’s kind of like reviewing the day’s shoot in an IMAX theater.
Aperture’s printing support is excellent. In addition to a fully color-managed workflow, Aperture can automatically create proof sheets, and it can intelligently arrange multiple images on a single page. For anyone who’s ever hassled with putting multiple images into a single document in Photoshop — or fed the same page through a printer multiple times to place different images on one page — Aperture’s printing features will be a huge relief.
As with iPhoto, you can order prints and books using Aperture. While the printing service remains largely unchanged, Aperture’s book output features are greatly improved over iPhoto’s. In addition to a different set of themes, Aperture’s book facility gives you complete control over the layout of every page (Figure 11). You can create custom picture and text boxes of any size, and you can also create full-page spreads and overlapping images. Most importantly, though, books from Aperture are printed at twice the resolution as iPhoto’s books, making for a marked improvement in quality. In addition to the higher resolution, which makes for much better detail and clarity, Aperture-printed books lack many of the weird artifacts that iPhoto books suffer from. Aperture’s books provide quality that’s akin to the images in a nice full-color magazine – a far cry from the marginal quality provided by iPhoto’s book printing.
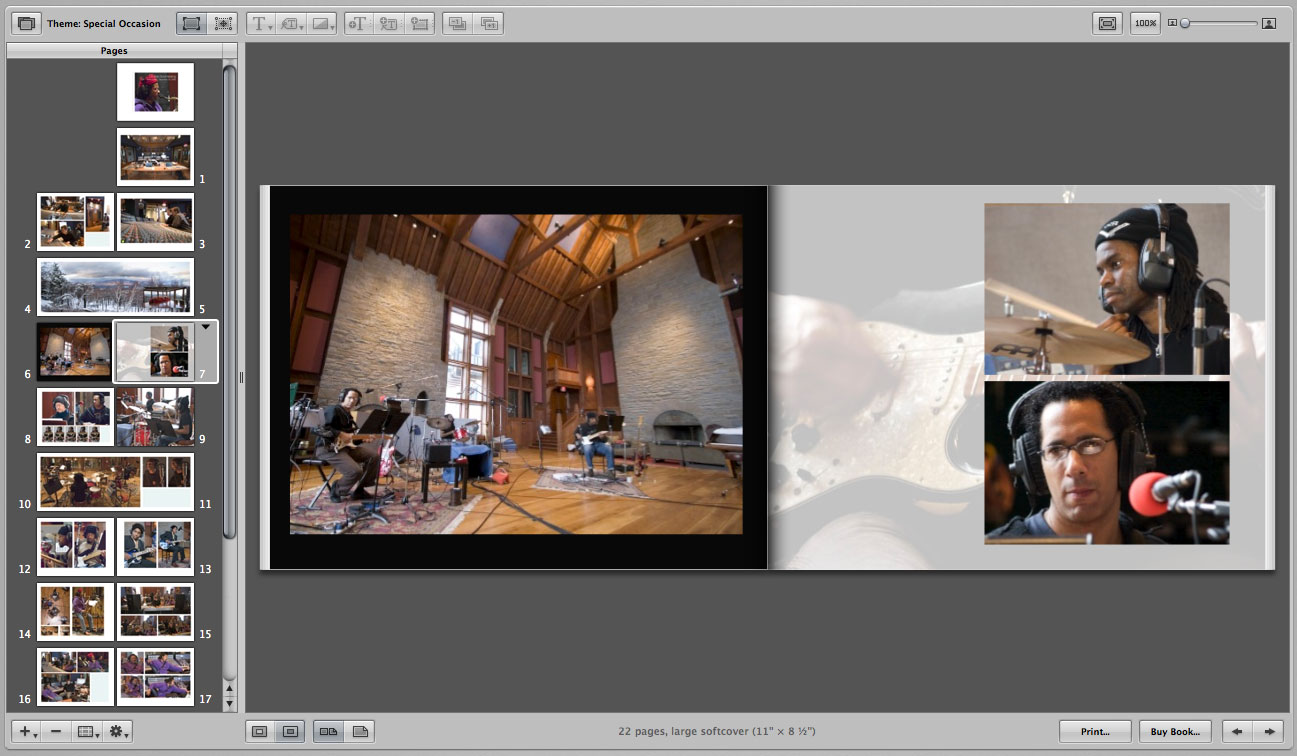
Figure 11. You can customize each page of an Aperture-generated book. Click on the image above for a larger view.
Aperture can also output your final book layout as a standard PDF, meaning you can print it yourself, or use a book printing service of your choice.
For a version 1.0 product, Aperture has an astounding array of output options that are well-designed and well-implemented.
Workflow
One of the most impressive things about Aperture’s design is its lack of modality. While Aperture tries to encourage a particular workflow — import, compare and pick, add keywords and metadata, edit, output — at no time are you locked into a particular mode or operation. For example, the program’s editing tools work all the time. If you’re working on a book layout and decide an image needs a little adjustment, you can click on that image in your book layout and bring up the editing HUD. Images remain live everywhere in the program, and this flexibility makes your work much easier and a lot more fun.
While it’s great to be able to edit an image as it sits in a book layout, if you’ve made the image very small on the page, you may not have the best view for your edits. In Aperture, you can hit F at any time to go into full-screen mode. The Aperture interface fades out and you’re presented with your image on a black background. You can then bring up whatever editing HUDs you need. When you’re finished, press the F key again to return to the previous view. This seamless switching from one process into editing, and back, makes for extremely speedy workflow within the program.
But if you need to include Aperture in a workflow with other programs, things get a little trickier. Because Aperture’s editing facilities are fairly weak, you’ll most likely need to perform many edits using an external editor, such as Photoshop. Aperture lets you specify your choice of external editors, and a single command opens the currently selected image in the assigned editor. You can edit to your heart’s content there; when you save, the resulting file appears as a new version within Aperture.
If you tend to make a lot of edits using Photoshop layers, though, your life will be a little more complicated. Aperture can handle layered Photoshop files, but it doesn’t let you access individual layers. So if you add layers to your image in Photoshop, when you return to Aperture, you’ll see a final, flattened version. Your layers are still there — you can return to Photoshop and edit them — but Aperture displays a flattened version.
If you import an already-layered Photoshop document into Aperture, then tell Aperture to open that layered document in Photoshop, the document you see in Photoshop will be flattened. The original layered version is still in your Aperture library — it’s considered a master image and so remains untouched, and you can export it as a master at any time — but Aperture creates a flattened version for passing on to Photoshop. So, for imported, layered Photoshop documents, there’s no way to perform an automatic round-trip to Photoshop. This can make for a complicated workflow.
Also problematic: Aperture strips all of the EXIF information out of your document when it exports to Photoshop, meaning that information will be lost in any subsequent versions of the edited file that you create. This is a hassle for which there is no workaround. Apple is aware of this problem and will address it in a future update.
Even if you don’t work with layered files, trying to get Aperture to work well with other applications can create any number of problems. Because Aperture keeps all images inside its library, you must output them as a TIFF, Photoshop, or JPEG file before you can use them in any other applications. One you’ve done this, you have another version of your document that’s not included in your Aperture library. If you start editing it or changing it somewhere else and then want to include it in your Aperture library, you’ll need to re-import it, which of course will create a copy of it inside the Aperture library. In addition to being an inefficient use of disk space, you now have a version control headache.
If you’re exporting images for use in a video editing/compositing program, or a 3D program, you’ll probably find that keeping your images in Aperture creates far too complicated a workflow.
Taking raw files into another program creates a similar headache. Aperture can export your original master raw file, but then you’re using twice as much disk space for that one image.
Aperture’s library scheme will be a deal-breaker for many professional photographers for several reasons:
- A library can’t span multiple volumes. Once your library is full, you can’t add any more pictures. You can create a different library on another volume and change to that library with a Preference change and Aperture restart, but then you can’t look at any images from your first library.
- You can’t catalog off-line volumes. Aperture provides an excellent built-in backup facility for backing up the images in your current library to CD or another hard drive. But as your drive storage wanes and you want to archive your images — to CD or DVD for example — you must remove them from your library and resort to a cataloging program such as iView MediaPro or Extensis Portfolio to track them. So now, in addition to Aperture and Photoshop, you need an image cataloger.
- As described above, workflow gets complicated if you do anything outside of Aperture. Even if you can manage all of your edits within Aperture, there are many other reasons to take images into an external editor. For example, Aperture has no image-sizing controls, so if you need to resize your image for a particular purpose, you’ll need to export and take the resulting file into Photoshop. You then must decide whether to import the resulting resized version back into Aperture, or just have a separate set of files outside your Aperture library.
Apple claims that they went with the internal library scheme to prevent the hassle of broken links, but iView MediaPro manages to solve the links problem without resorting to an internal library. Even Apple’s own iTunes keeps a purely reference-based library without burdening the user with too much hassle.
The Finder, along with Spotlight, is a really good tool for managing, sorting, and finding documents. I’m baffled that Apple thinks I need another program to manage my image files. Aperture desperately needs an iTunes-like option for choosing not to use the internal library, to allow photographers to manage their own files and work with the program in the way that suits them best.
Quality and Performance
Despite its very good interface and excellent comparison tools, Aperture suffers from two major issues. First, its raw conversion quality is not state-of-the-art.
While conversions are generally good, and the program includes very good highlight-recovery, Aperture-converted raw files can suffer from noise, demosaicing artifacts, and undersaturated color (Figure 12). Low-light photos are especially noisy when compared to the same file converted with Adobe Camera Raw.

Figure 12. On top, a zoomed crop of Aperture’s conversionof this high-ISO image. On the bottom, Adobe Camera Raw’s conversion. Aperture yields much noisier results.
Even well-exposed daylight images can be plagued by annoying artifacts (Figure 13).
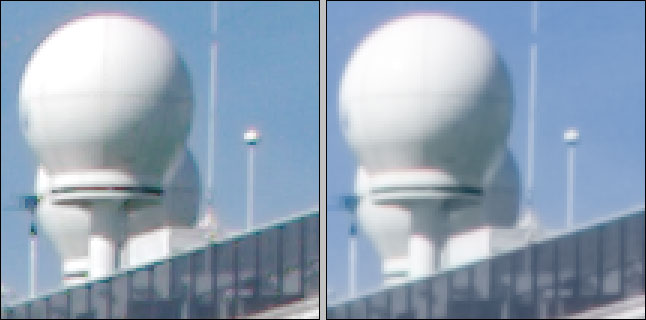
Figure 13. Aperture sometimes produces strange artifacts in its conversions. On the left, a zoomed crop of an Aperture conversion; on the right, the same area converted by Photoshop. I used default conversion parameters used for both images and didn’t apply sharpening. Click on the image above for a larger view.
Aperture’s quality problems are a big issue. Even though the program’s raw conversion quality is generally acceptable, you need to encounter only a few problem images to have your confidence in its output shaken. Certainly, all raw converters can trip up from time to time, but in my experience, Aperture images are more often hobbled by noise and artifacts than are images from Adobe Camera Raw.
Depending on your hardware, though, you may not use the program long enough to be annoyed by its output, because the odds are that Aperture will be frustratingly slow on your computer. I tested the software on a range of machines, from a 1.5 GHz PowerBook with 1.5 GB of RAM, up to a 2.5 GHz Quad G5 with 4 GB of RAM. The program suffered from slowdowns on all machines. Obviously, things were generally faster on the G5s than on the Powerbook, but even on those machines, I saw way too many rainbow cursors and waited far too long for edits to appear. Professional photographers can’t afford this kind of downtime.
In some cases, interface elements were unusable or maddening. Auto-stacking is useless on the Powerbook, what with the long wait times, and even some editing controls, such as the straighten tool, were difficult or impossible to use on the G5, simply because they were too slow and twitchy. Even on the G5, editing was a process of move a slider, wait, adjust the slider, wait, move the next slider, wait, adjust it, wait, and so on. Moving sliders can be difficult because you must wait for the screen to update before the slider thumb snaps into position, so you’re never quite sure what setting you’ve made. And as you apply more edits to an image, things get progressively slower.
Because of the poor Powerbook performance, the program is not suitable for fieldwork, especially if you’re on-location with a client, where the sudden appearance of a rainbow cursor can be embarrassing.
Swapping out video cards made more of a performance improvement than did swapping out CPUs, so if you have a slower 2GHz dual G5, you might want to consider upgrading your video card.
Perhaps the program was designed with faster Intel machines in mind. Right now, it’s too slow.
The Final Say
You’ll most likely develop a love/hate relationship with Aperture. The fact is, it’s really fun to use. Or at least, it is unless an image doesn’t convert well. And it’s not so fun when too many edits bring your Mac to its knees. Nevertheless, for a version 1.0 product, the program has a stunning array of features, a very well-designed interface, and some breakthrough comparing and sorting tools. I recommend that you wait until the next version and see whether Apple addresses Aperture’s major shortcomings. But if you relish being on the bleeding edge and buy it anyway, you’ll find a program that’s useful, though you’ll probably need to adjust your workflow practices and buy more storage and a faster video card to get the most out of it.
This article was last modified on January 18, 2023
This article was first published on December 20, 2005
Commenting is easier and faster when you're logged in!

Recommended for you
Using Lightroom Profiles
The latest updates to Lightroom CC (1.3), Lightroom Classic CC (7.3), and Adobe...

Creative Cloud Storage: Where Does It Go?
When you create using Adobe Creative Cloud applications, where is your work save...

Survey Finds Over Four in Five Creative Pros Spend Time Weekly Finding Lost Assets
LinkrUI Automatically Syncs Assets and Enables Automatic Version Control, Solvin...