

Does this sound familiar? You used a high-quality, 10-megapixel SLR to shoot a series of products for an 8-1/2″ x 11″ catalog. Months later, the client calls and wants to make a 6′ trade show graphic from one of the images.
Here’s another scenario: The brochure you’ve been hired to design is coming along smoothly. You’ve laid out the spreads, chosen the typefaces, and placed the client’s FPO images. At the final approval stage, you request the high-resolution images. The client’s reply: “That’s all we have.”
What now? Your original product shots just don’t have enough information for a 6′ poster. As for the brochure, you could redesign it without the low-res images, hire a photographer to reshoot, or upsample the images in Photoshop and pray the resulting jaggies aren’t too bad. All of these options have their downsides.
Get a Little Help from a Friend
The best solution is to upsample the image, but not with Photoshop alone.
There have been upsampling plug-ins for years. Now the fun and friendly Alien Skin Blow Up ($199) has joined the likes of onOne Software’s Genuine Fractals and pxl SmartScale. This cross-platform plug-in works with Photoshop CS and CS2 or Photoshop Elements 3 or above. Once you install into your plug-ins folder and open an image, you access Blow Up via File>Automate (Figure 1).

Figure 1. You reach Blow Up through the File>Automate menu command.
Blow Up supports RGB, grayscale, CMYK, LAB, and duotone modes, as well as 8-, 16-, and 32-bit images. This broad support gives it an advantage over the competition. (However, Blow Up doesn’t support GIF. You’ll have to convert GIF files to another format in Photoshop first.)
The real joy comes when you resample a layered Photoshop image and don’t lose any layer information. Try doing that with other image resizers and you’ll be disappointed!
Intuitive Interface
The interface is a smooth, two-windowed affair that’s very easy to learn (Figure 2). If you’ve used the Image Size dialog in Photoshop, you’ll feel right at home.
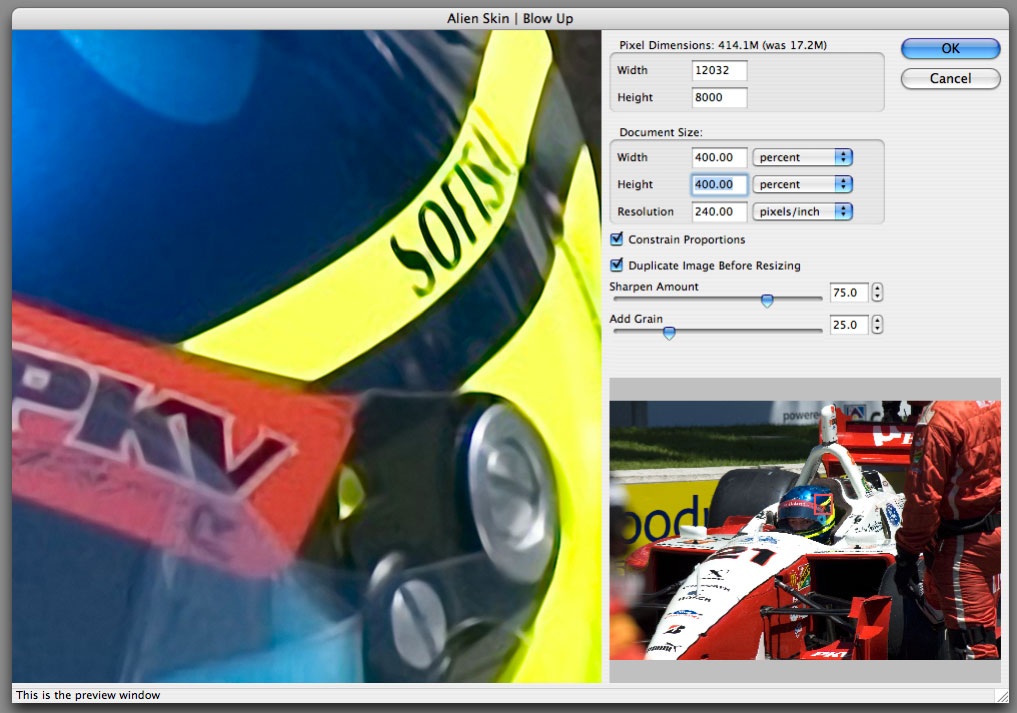
Figure 2. The Blow Up interface. Click on the image for a larger version.
The interface displays the current image size in pixels, then the document size. When I produce images for print and know my final output size and desired resolution, I prefer to make the change here and can use inches or point measurements. Just as in Photoshop, Blow Up shows the new image size in megapixels as you make adjustments. It’s good to realize that a 300 dpi 24″ x 36″ CMYK file will weigh in at a whopping 296.6 MB, and a 36″ x 48″ file will set you back 593.3 MB. Blow Up has no problems with files that size, but just make sure you have enough storage and scratch disk space. The rule of thumb is three to four times the images size in available scratch space.
Check Blow Up’s Constrain Proportions box to maintain the relationship of the height to the width as you try different settings. Check the Duplicate Image Before Resizing box if you want to maintain the original image as it was before the upsampling. (I highly recommend this, as it’s a non-destructive workflow.)
The last two interface options are where Blow Up really differentiates itself from Photoshop’s Image Size command (Figure 3). The Sharpen Amount slider lets you dial in edge sharpening by percentages. It’s similar to using Photoshop’s Unsharp Mask command, yet Blow Up doesn’t create ugly halos at the higher settings, as can often happen in Photoshop. The Add Grain slider comes in handy when your enlargement is more than 400 percent. At these percentages, upsampling algorithms often make your image appear plastic. The Add Grain slider creates more realistic, plausible images.
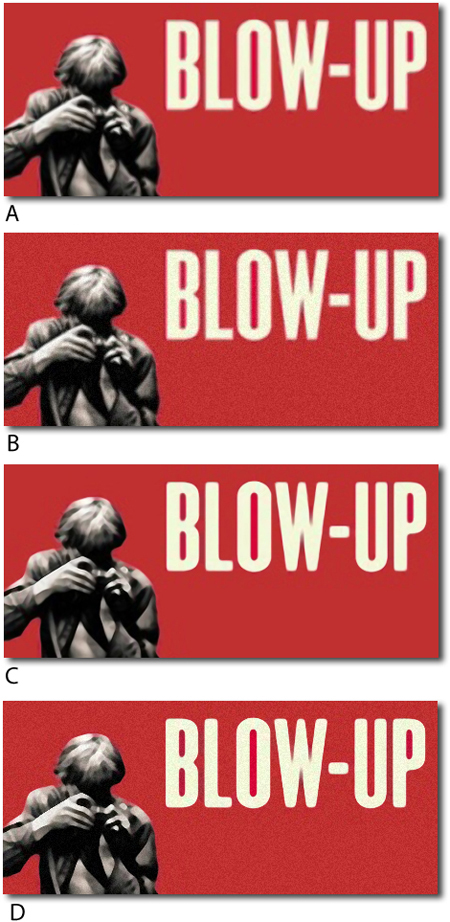
Figure 3. The Sharpen Amount and Add Grain sliders in action:
A. 0% sharpening, 0% grain
B. 0% sharpening, 100% grain
C. 100% sharpening, 0% grain
D. 100% sharpening, 100% grain
The Results
Of course, upsampling is never as good as the original image in the correct resolution because upsampling involves creating those extra pixels out of nothing. Blow Up uses a sort of “facet” approach to creating the missing pixels. You can see the difference this makes in patterned areas (Figure 4).

Figure 4. Both of these images were resized from 72dpi to 300dpi. The top image was done in Blow Up, while the bottom image uses Bicubic interpolation in Photoshop. I think the Photoshop artifacts actually make some areas, such as the hair, more pleasing, but you choose. Click on the image for a larger version.
The up-side of Blow Up’s approach is that when you’re dealing with a very graphic image of defined color, such as the race car in Figure 5, the plug-in does a wonderful job of maintaining clean edges.

Figure 5. I upsampled both of these images 400% from the original. I used Blow Up to resize the image on the left and Photoshop’s Bicubic Interpolation to resize the image on the right. You can see that the solid color and defined lines of the image fare well with Blow Up but start to show jagged stair-stepping with Photoshop. Click on the image for a larger version.
The Bottom Line
Image-resizing software isn’t a must for everyone. If you only output letter-sized inkjet prints, most digital cameras can capture enough data for a decent 8″ x 10″ print.
On the other hand, if the situations I mentioned in the beginning could have come from your life, I suggest that you consider an image resizer beyond Photoshop. If you already own Genuine Fractals or pxl SmartScale and have a flattened workflow, Blow Up’s main differentiator — control over image grain — may not be worth the cost of switching. But if you prefer to work with layered Photoshop files, often enlarge images 400% and beyond, or simply want an easy-to-use application, Blow Up should be at the top of your list.
Want to see it for yourself? Download the fully functional demo from Alien Skin and try it free for 30 days. Just don’t blow up at me when your demo expires and you can’t live without Blow Up.
This article was last modified on January 4, 2023
This article was first published on January 8, 2007
Commenting is easier and faster when you're logged in!

Recommended for you
Meet the Neo SmartPen: A New Way to Draw
As an artist who specializes in combining traditional and digital tools, I’m alw...

Using the Select Subject Feature in Photoshop
Any experienced Photoshop artist knows that most of the grunt work involved in c...

Reducing the total ink limit in CMYK images using Photoshop
Having too much total ink in your CMYK document is a pretty common problem. Sure...