
To jump to specific sections in this review, click any of the following links:
1. Multiple Page Sizes; Span, Split, and Balance Columns
2. Simplified Transformations and Selections
3. The Gap Tool; Gridified Frames and Super Step-and-Repeat; Layers Rebuilt
4. Metadata Captions; Mini Bridge
5. Interactive Documents
6. Workflow and Collaboration; (Not Quite) All The Little Things
7. Buying Advice
Simplified Transformations and Selections
Adobe added a number of new features that are all geared toward simplifying how you work on page items, eliminating a lot of tool switching and multiple object selecting.
Content Indicator. Switching between the selection tool to modify a frame, and the direct selection tool to work with the content in that frame, is a common repetitive task. CS5’s new content indicator ring — a semi-transparent “donut” that appears in the center of graphic frames when you hover over them — eliminates that tool switch. Just click and hold on the content indicator and start dragging the image around in the frame. Release, and immediately resume working with the frame. There’s no need to practice “patient user mode,” either. Live previews of objects and images as you move them are now instantaneous.
Live Corner Effects. Rectangular frames also sport another new element: a small yellow square on their upper right edge. Click that, and each corner of the frame becomes a yellow diamond. Drag any diamond inward to round all corners, or shift-drag to round only the selected corner (Figure 4). More precise settings are available from the Control panel and the Corner Options dialog, which now includes separate settings for each corner.
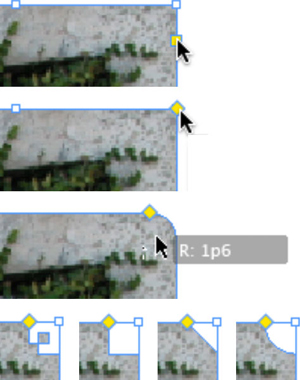
Figure 4. You create simplified corner effects by clicking the yellow square on any rectangular frame (top), then dragging the yellow diamond (second from top) to apply the default rounded corner effect (third from top). Opt/Alt-clicking the yellow diamond cycles through the other corner types (bottom row).
Dynamic Rotation Cursor. Speaking of tool switching, you can forever eliminate trips to the Tools panel to choose the Rotate tool. Hover just beyond any object’s corner with the Selection tool, and the cursor switches to a rotate icon. If you’ve selected multiple objects, they all rotate together without the need to group them.
Modify Multiple Frames. Re-sizing multiple objects simultaneously no longer requires grouping, either. Select the objects to be re-sized, then click and drag a handle on the selection to re-size them all at once. Hold down the Shift key to make that transformation proportional, or click Shift-Cmd/Ctrl to proportionally re-size the objects and their content (text or graphics).
Auto-Fit. The new frame-level Auto-Fit feature enables semi-intelligent scaling based on the position of the image in the frame without the scale tool or modifier keys. Depending on whether the image is cropped within the frame, and which handle of the frame you select to re-size it (top/bottom, left/right or any corner), Auto-fit fixes on the current position of the image within the frame and works to maintain that position as you re-size the frame (Figure 5). Auto-Fit adapts as you extend the frame drastically in one direction or another, switching the points (top and bottom left or top left and right) from which it re-sizes.

Figure 5. Click to open a YouTube video demonstrating how the Auto-Fit feature in InDesign CS5 works.
Simpler selection. Accessing and then moving an object that’s behind one or more overlapping objects has always been a frustrating exercise. A key combination would get you to the object, but the additional click needed to move it instead deselected it and selected an object above it. Not anymore. If an object is selected and your mouse is over it, InDesign CS5 assumes that’s what you want to work with and favors that object over any in front of it.
Double-click Into Groups. One of my absolute favorite improvements is how easily you can now access objects in — and easily navigate back out of — groups. Prior to CS5, the only way to get to a single object in a group without un-grouping everything first was to use the puzzling Select Container or Select Content buttons in the Control panel. Now, just double-click on an object that’s in a group to select it. Once you’re in the group, you can click to select any other single object within it, or double-click to select an object’s content (image or text). The Escape key backs you out the way you came, one step at a time.
Live Distribute. Once objects are on a page, adjusting the spacing between them use to involve drawing a lot of guides, repeatedly selecting and moving individual objects, using the Align panel, and any number of other tedious steps. The new Live Distribute feature in CS5 lets you simultaneously — and evenly — adjust the spacing between multiple objects. Simply select one or more objects that are in a row, click a handle on the left or right side of the selection (or the top and bottom sides for vertical spacing changes), press and hold the space bar, and start dragging away from the selection to increase the space between objects or toward the selection to decrease it. Performing the same action from the bottom right corner of the selection redistributes the objects diagonally and can transform a horizontal row of objects into a vertical row, and vice-versa.
One transformation has, regrettably, been made more difficult in CS5. When rotating the “old-fashioned” way with the rotate tool, you could set the rotation point crosshair with a click before rotating. That no longer works. Instead, you must first find the little crosshair (not always easy to do), then drag it to establish a rotation point. It’s either that, or mouse up to the Control panel and click one of the 9 points on the proxy icon. I hope this changes gets reversed in a mid-cycle update.
This article was last modified on January 18, 2023
This article was first published on May 6, 2010
Commenting is easier and faster when you're logged in!

Recommended for you

Track Down Obscure Glyphs in InDesign
There are many characters that don’t appear on standard keyboards. Here’s how to...

Check, Please: A Typographic Checklist
In the best of all possible worlds, we’d have type-savvy proofreaders or copy ed...

Type of All Eras & Nations at the Typographic Hub
Press Release UKType has been working with the Birmingham Institute of Art &...