
Review: Adobe Illustrator CS2

Increased speed, dependability, and ease of use, and a handful of truly useful new features make Illustrator CS2 one of the most exciting updates released by Adobe in recent years.
As Illustrator, Photoshop, InDesign, and GoLive continue to play better together, the recently released Illustrator CS2 is redefining itself as a vector-art creation tool by incorporating an improved working environment; new drawing, painting, and tracing tools; and by seamlessly integrating live Photoshop effects with Illustrator’s unmatched Appearance Palette. The question is not “Should I upgrade to Adobe Illustrator CS2?” but rather, “How soon can I get my hands on it?” And that’s coming from someone who’s used many a previous version and the CS2 beta constantly in many projects for The Chopping Block, a design studio in New York City.
The stand-alone version of Illustrator CS2 costs $499, with upgrades from Illustrator CS and 10 at $169. It’s also available as part of the Creative Suite 2 Standard package for $899 and the Creative Suite 2 Premium for $1,199.
Getting Things Done
Previous versions of Adobe Illustrator left its users feeling a bit cramped for working space. I, along with many other designers and illustrators, was more than accustomed to working with palettes two rows deep, and at the same time, hesitant to close or move any floating palettes from within reach.
Adobe heard our cries of frustration and delivered. Illustrator CS2’s first new addition is the Control Palette, sitting (by default!) at the top of a document. What would you say if I told you that 80 percent of the controls you need the most are all in this one place? While the Control Palette looks similar to the Options Palette in Photoshop, it performs in an entirely different way. Within Illustrator CS2, the Control Palette is context-sensitive, which means it changes based on what objects — and what type of object — you have selected. It offers stroke, fill, type, alignment, and a handful of other options. You can even customize your Control Palette options using the fly-out menu on the right. While it may take seasoned users a little while to get comfy using the Control Palette exclusively, I can help you along by pointing out that many of the additional full palette options are linked to off the Control Palette itself.
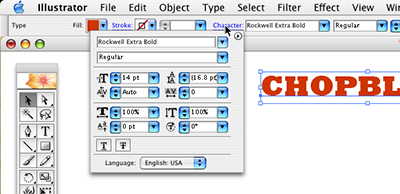
The Control Palette frees you from palette clutter.
Now that I’ve teased you with the ideas of less palette clutter and customizing your working environment, it’s time to pull out the big guns and acquaint you with Custom Workspaces, a feature I’ve wanted for a while now. The ability to save your palette layout — or several different palette layouts — in what Adobe calls “workspaces” has made its way from other CS apps into Illustrator. It’s right where you’d expect it to be, at the top of the Window menu, and it allows you to save, share, and access saved palette layouts for specific tasks.
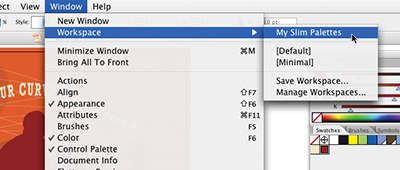
The new Workspaces feature may not look like much, but it opens up a whole new world of more efficient, customized palette layouts.
Although you’ll want to build you own, Illustrator also comes with two workspaces. The first one, appropriately titled “default,” is the safety. It returns all palettes to the default Illustrator CS locations. The other workspace, called “minimal,” shifts the Control Palette to the bottom of the screen and frees up the rest of the working environment. Regardless of how you use them, the Control Palette and Custom Workspaces will have a dramatic effect on day-to-day tasks, allowing users of all kinds to work more efficiently.
Live Paint
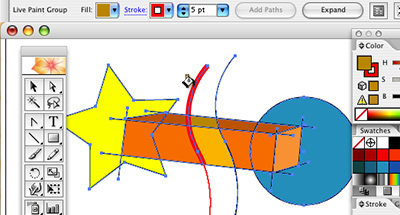
Traditionally, you build compositions in Illustrator using a fairly simple stackable object model; in fact, that’s where most designers and illustrators first learned the concept of “send to back” and “bring to front.” Beyond this, many of us have become accustomed to using groups or the pathfinder tools to nest or combine basic objects into more complex shapes. Live Paint introduces a better, faster way in an entirely new kind of drawing object: a live paint object. You can convert any traditional Illustrator object to a Live Paint object by clicking on a selected group of objects with the new Live Paint Bucket or Live Paint Selection tool. Once converted, the new tools can then easily fill any region in one click, automatically detecting and correcting for gaps, and solving one of the more frustrating side effects of traditionally structured compositions by opening up entirely new possibilities for drawing and design techniques.

The Live Paint Bucket in action.
If you hold the shift key down while using the Live Paint Bucket, you can fill any edge of a Live Paint object, and the Live Paint Selection tool not only lets you shift-click and modify many regions or edges at once, but also select and delete any unwanted or stray regions or strokes. This not only makes it much easier to quickly and precisely edit drawings in Illustrator, but it brings one of the speed advantages of drawing in Flash into Illustrator CS2.
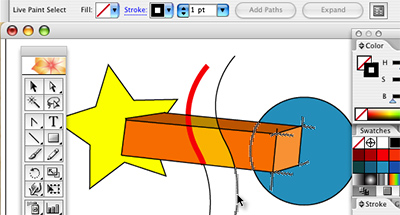
Hold down the Shift key to fill the edge of a Live Paint object (top). Shift-click to get rid of unwanted regions and strokes (bottom).
Live Trace
Illustrator CS2’s high-profile new feature is so insanely integrated and so long-needed that simply knowing its there, or seeing it work once, will make you reach for the software box. Live Trace is not your father’s tracing tool — more importantly, it’s not Adobe’s Streamline application. Live Trace is new, and it’s better.
Here’s how it works: Placed bitmaps within Illustrator CS2 are treated as a linked file object.

This is a photo placed inside Illustrator CS2.
From the Control Palette, all you need to do is click the Live Trace button, and the bitmap image is converted to editable and scalable vector paths.
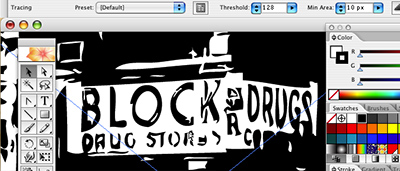
The photo after using Live Trace’s default setting.
By default, Illustrator CS2 traces the image in black and white, but the drop-down menu next to the Live Trace button gives you direct access to thirteen built-in tracing presets. If you place a full-color image, select “Color 6” to see the results.
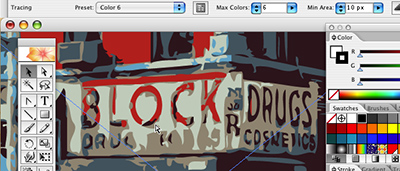
The Color 6 option yields a better result.
You’re now dealing with a Live Trace Object, and the Control Palette makes it extremely easy to tweak the trace results and see them live. Modifying the “Max Colors” or “Min Area” adjusts how Live Trace interprets the original image. Beyond this, the Control Palette also holds a button to launch the full Tracing Options dialog box, which gives you full control over the aforementioned tracing options and a handful more.
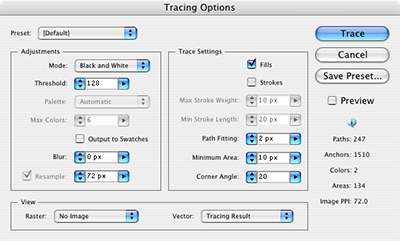
The Tracing Options dialog box.
My favorite slider is the blur control, where you can soften a placed image and smooth the lines of a trace.
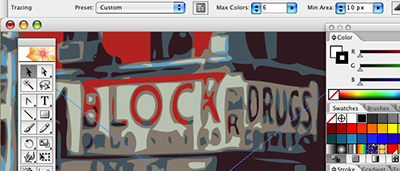
The traced photo after using the blur control in the Tracing Options dialog box.
Perhaps most important is the “Live” part of Live Trace — it indicates that you can still edit your original placed bitmap and all of the effects, trace and all, will update accordingly.
Putting Live Trace and Live Paint Together
While new and previous users will find many ways of incorporating these new tools into their projects, the real power of Illustrator CS2 is in how well these new features work together. Many ideas start as a sketch on paper, maybe even a napkin. Unfortunately, the traditional design workflow has always left us struggling to redraw these ideas using beziers or a brush. Now all we have to do is scan our images, place them in Illustrator CS2, and apply our Live Trace.
Words can’t describe how easy it is… It’s a cliché, but it’s true, so here’s a step-by-step example I created for this review. In the images below, you can see how I used the full tracing options and the blur slider to smooth out the pencil marks from my scanned sketch.
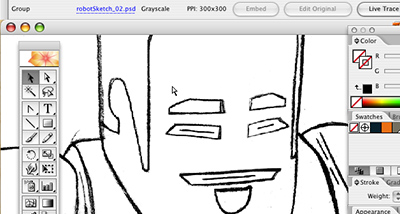
The sketch before blurring (top) and after (bottom).
Now the real fun began. I used the Control Palette (I could have used Live Paint Bucket as well) to convert my Live Trace object to a Live Paint object and quickly color the regions of my sketch. Long-time Illustrator fans will love the fact that at any time, you can use the direct selection or pen tools to modify the points and beziers of any Live Trace Object. You can even fill regions with null color and allow the artwork behind a Live Trace object to show through, as I did below.

That robot was a pencil sketch a few minutes ago!
It’s All Coming Together
Years ago, Adobe introduced the Appearance Palette into Illustrator, and for the past several updates, the logic of the Appearance Palette has continued to solidify. What is always shocking to me as a designer and illustrator is how many Illustrator users haven’t embraced (or even explored) the Appearance Palette. “But why is this important to this review?” you may ask. It’s quite simple.
Every object, group, and layer in your Illustrator file has an associated appearance stack. Each appearance stack can hold an unlimited amount of strokes, fills, and effects. In addition, each stroke and fill can hold its own effects. And every effect is LIVE, meaning you can double-click on it and modify it, as many times as you want, forever. Users of all types understand how important it is to have endless edit capabilities, and there is no other tool like it.

The Appearance palette is your friend. No, really!
With this release, Illustrator CS2 continues to strengthen the Appearance Palette. Not only has it completely integrated Live Paint and Live TraceAppearance Palette, but all of Photoshop’s effects (including the effects gallery) are now available directly inside Illustrator, and yes, they are live, a little trick that Photoshop itself can’t even do!
So Much More
There are a handful of really solid additional features and tweaks I haven’t yet mentioned. Given Illustrator’s exceptionally wide range of users, I’m willing to bet that some of these might be even more valuable to certain people than the major features described above. Here are a few I absolutely must mention:
- Double clicking on any group of objects or a Live Paint object triggers an isolation mode in which you can modify, move, and edit internal objects without digging through the Layers Palette.
- Expanded Stroke Options let you control the position of a stroke on a path by choosing centered, inside, or outside.
- You can assign a spot color to a linked, embedded, or opened grayscale image, and apply a spot color to a drop shadow and be confident that artwork will separate properly when printing.
- Swatch and color integration with the rest of the CS2 Suite Applications is seamless (this is huge!).
- Full support for the latest Wacom tablets and brush support for the new Wacom 6D Art Pen.
- Support for Photoshop Layer Comps.
- Enhanced page tiling controls lets you more easily create large tile-based printed mock-ups or multi-page PDFs.
- Dramatically improved artwork export and preview options for mobile devices in any SVG format, including SVG-tiny.
- Enhanced PDF/X support.
Is It Perfect Yet?
With all of these great additions and improvements, it’s difficult to find things to dislike. But as with many applications, even when it’s great, it can always be better. I would like to see the document default center point moved to the upper left hand corner, and there are unfortunately still more tool options and often-overlooked features scattered throughout the application. Many users still bring up the lack of multi-page layout support. (However, the suite approach is working well for us at The Chopping Block, and we have been using Illustrator CS2 in conjunction with InDesign CS2 for our multi-page needs.) The program would benefit from more live painting tools and stronger isolation mode options — all the things I didn’t even know I wanted until I started using Illustrator CS2.
Do You Really Need to Buy It?
Adobe has really listened to its users. With this release, Illustrator has gone from “pretty good” to “downright excellent!” If you’ve been holding on to an older version of Illustrator or wondering what was going to become of Freehand, this is the time to get your hands on Illustrator CS2. Add the increased speed and stability to all the new features, and the result is a fantastic product update.
All types of users — from designers and illustrators to architects and page-layout professionals — will not only drastically boost their productivity with CS2, they might even have a little more fun along the way. This is not one of those updates you buy just to keep current. Illustrator CS2 is an application that will change the way you work — for the better.
Matthew Richmond is a designer and principal partner at The Chopping Block. His projects include work for the Museum of Modern Art, LEGO, XM Radio, They Might be Giants, Phish, Adobe, and Sony Pictures Classics. When not in the studio, Matthew can be found teaching Digital Illustration and advanced Flash to the MFA students at the School of Visual Arts.
This article was last modified on July 20, 2021
This article was first published on May 6, 2005
Commenting is easier and faster when you're logged in!

Recommended for you
Sticky notes in InCopy
If you’re a seasoned InCopy user, this headline probably grabbed your atte...

Tab Leaders (Part 3): Fill-In Blanks in Paragraph Text
In parts 1 and 2 of this series we discussed inserting and formatting tab leader...
Tip of the Week: Using the Book Panel to Preflight Multiple Documents
There are three new Links panel icons in InDesign CC that you'll see when workin...