

If you’ve ever had to write paragraphs to a specific range of word counts or character counts (or check for them) in InDesign, you may know that the Info panel will show you these numbers for selected text, along with the number of lines and paragraphs.  That’s fine for a few paragraphs, but what if you had to check dozens of them? If you just put your cursor in a paragraph the Info panel shows you stats for the entire story.
  So, to see the counts for each paragraph you’d have to select them one by one and keep checking the Info panel, which would get pretty boring pretty fast. But with the help of nested styles you can see at a glance which paragraphs fall within the desired length. Here’s how. Create new character styles to mark text that falls below, above, and within the desired word or character counts. To avoid reflowing the text, just change the Character Color setting in each.
  Edit the paragraph style and in the Paragraph Style Options dialog box, click Drop Caps and Nested Styles. Click New Nested Style. From the pop-up menu, choose your “too short” character style and apply it through a number one lower than your minimum. So, if the minimum is 10 words, apply the character style through 9 words to mark that as the “too short” zone. In the dialog box, click just below the character style name (and make sure the Preview checkbox is ticked) to preview the effect.
height=”316″ border=”0″ /> To mark the acceptable range, click New Nested Style. Either apply None to keep the regular look of the text, or apply an “OK” character style if you made one. Set it to be applied through a number that adds up to the maximum when you include the “too short” value. For example, if your minimum is 10 and maximum is 20, the “OK” value is 11, because 9+11=20. Again, click below the character style name to preview and confirm its working as intended.  To mark the “too long” text, click New Nested Style again. This time, choose your “too long” character style and apply it through a character that you know will never appear, so it always gets applied through the end of the paragraph. The End Nested Style Character is usually a safe choice.
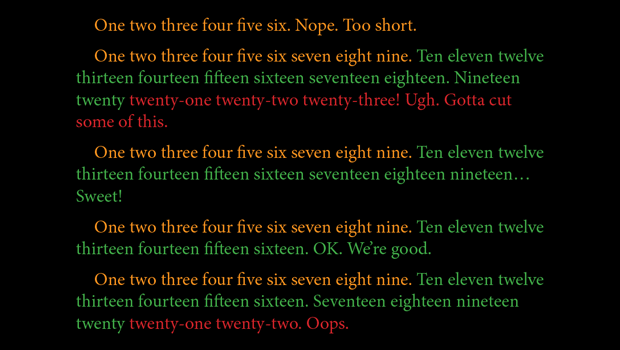
  Now you can edit the text and know exactly when a paragraph falls within the right range. You can apply this same concept to character counts. Just change Words to Characters in the Nested Styles area and use the appropriate numbers for each.
  When you’re done editing the text, you can delete the nested styles. Or, if you think you might need them later on, just disable them by choosing the None character style for each.
Commenting is easier and faster when you're logged in!

Recommended for you

Controlling Line Breaks with Nested Styles
A customer came to me recently with an interesting InDesign problem. I only had...

Significant Limitation in Nested Styles, Variables, and Section Markers
Sadly, trying to apply a nested style to a section marker (or other variable tex...

Holiday Text FX, part 3: Fun With Nested Styles
Learn how to use nested styles to make this cheery greeting in InDesign.