
Rekindle Your Love of Typesetting with Nested Styles
Renée Dustman walks you through using nested styles for automating repetitive typesetting tasks.


This article appears in Issue 40 of InDesign Magazine.
I can’t stand repetition. That’s why I’m always looking for the most efficient way to do things—including formatting text in Adobe InDesign. I love the many types of styles InDesign CS5 provides us for that very reason. Consider, for example, nested styles. They eliminate monotonous tasks, such as manually applying the same character attributes to text in many different paragraphs. A bulleted list like the one shown in Figure 1 is a perfect example of when nested styles are a designer’s best friend.

Figure 1: Format a list with a bold lead-in of one or more words using a single nested style.
Create a Bold lead-in for Bulleted lists
Create a new Character Style
Click the Type tool in your formatted list to pick up the character attributes. Then, on the Character Styles panel (Type > Character Styles),
Option-/Alt-click the Create New Style button to open the New Character Style dialog box. Name the style “Bold Lead-in“ and, on the Basic Character Formats pane, select Bold from the Font Style pop-up menu. Click OK.
Define a bulleted list in a paragraph style
Open the Paragraph Styles panel (Type > Paragraph Styles) and Option-/Alt-click the Create New Style button at the bottom of the panel to define a new style. (To modify an existing style, right-click on the style and choose Edit from the context menu.) Go to the Bullets and Numbering pane, and select Bullets from the List Type pop-up menu. Set the remaining attributes as you like, and then click OK. Apply the paragraph style to the intended text, if it isn’t already.
Activate Nested Styles
On the Paragraph Styles panel (Type > Paragraph Styles), double-click on the paragraph style applied to your list to open the Paragraph Style Options dialog box. On the Drop Caps and Nested Style pane, click the New Nested Style button to activate the Nested Styles options. Then, select the Bold Lead-in character style from the first pop-up menu.
Set parameters for the character style nested in the paragraph style
The default settings apply the character style through the first word of each paragraph. To bold all the words up to the first parenthesis in each paragraph, click on “through,“ and then select “up to“ from the resulting pop-up menu. Skip to the last field and click on “Words.“ If you scroll through the pop-up menu that appears, you’ll see a number of options, but not the one you need. No problem. Simply type an opening parenthesis character in the field, as shown in Figure 2. If you have the Preview checkbox selected (in the lower-left corner of the Paragraph Style Options dialog box), you can see that InDesign has automatically formatted your list just the way you want it, with zero repetition on your part.

Figure 2: Set parameters that tell InDesign where to start and stop the nested character style.
Loop Multiple Nested Styles to Automate More Complex Formatting
What if your styling needs aren’t that simple? Your bulleted list may, for example, need a range of text within each paragraph uniquely formatted—such as the italicized Latin names for flowers in our list (Figure 3). Here, too, you can use the Nested Styles feature to accomplish this formatting task. Just to make things tricky, though, notice that the parentheses surrounding the Latin names aren’t italicized.

Figure 3: Use nested styles to for mat a specific range of text in each paragraph, such as the italicized Latin names of the flowers in this example.
Tell InDesign to restore regular paragraph formatting to the first parenthesis
Click the New Nested Style button on the Drop Caps and Nested Style pane of the Paragraph Style Options dialog box. For this second nested style, select [None] from the pop-up menu in the first column—in other words, you don’t want any character style applied here. Leave the default settings for the next two fields and choose Characters from the last pop-up menu in the row, as shown in Figure 4.

Figure 4: A second nested style tells InDesign to restore paragraph style formats through the first parenthesis.
Create a nested style that italicizes just the Latin text between the parentheses
Click the New Nested Style button and select Create New Character Style from the first pop-up menu. This opens the New Character Style dialog box. From here, name the style “Italic,“ and select Italic from the Font Style pop-up menu on the Basic Character Formats pane. Click OK to save the style in the Character Styles panel and return to the Paragraph Style Options dialog box. Now, back in the Nested Styles area of the Drop Caps and Nested Styles pane, click on “through“ and select “up to“ from the resulting pop-up menu in the second column. Then, leaving a default setting of “1,“ click on “Words“ in the last column and type a closing parenthesis, as shown in Figure 5. Click OK to save your changes to this style. InDesign now knows to apply the Italic character style to text in between parentheses formatted with this paragraph style.
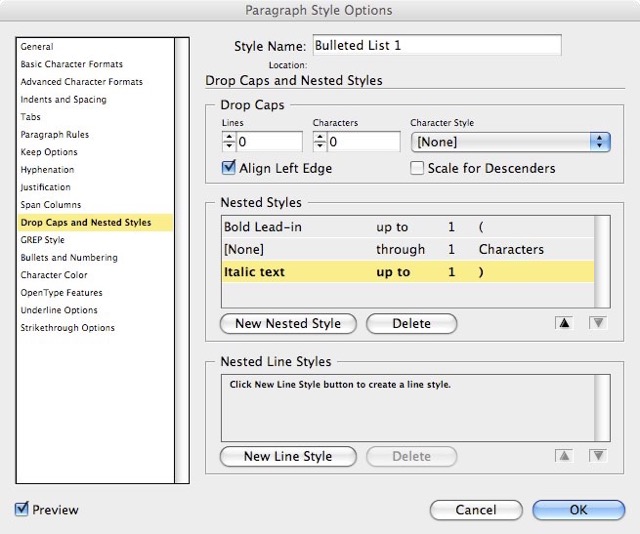
Figure 5: A third nested style tells InDesign to format text preceding a closing parenthesis with the Italic character style.
Nesting Line Styles
Nested styles let you format nearly any range of text in a paragraph. However, they have one limitation: They don’t recognize lines of text. Nested Line Styles resolve this predicament. The Nested Line Styles feature enables you to apply a character style to one or more lines, either consecutively or in a repeated fashion. The nested line style shown in Figure 6, which formats the first line of the paragraph, is just one example of what you can do with nested line styles.

Figure 6: You also can tell InDesign to uniquely format a specific number of lines in a paragraph.
Create a nested line style
Double-click the paragraph style (“Instructions Lead-in,“ if working with my example) applied to the intended body of text to open the Paragraph Styles Option dialog box. On the Drop Caps and Nested Styles pane, click the New Line Style button. Select the Italic text character style (or create and select your own) from the pop-up menu in the first column. The only other parameter you can change is the number of lines to which you want to apply the character style. The default setting of “1“ is appropriate in this case (Figure 7), so click OK to save your settings.

Figure 7: Use the Nested Line Styles feature to format specified lines of text in a paragraph.
Commenting is easier and faster when you're logged in!

Recommended for you

Converting Nested Styles into Local Character Styles
Need to convert nested style formatting into "real" character style formatting?...

Making a Checkerboard Pattern With Nested Styles
I love coming up with new and unusual ways to make patterns in InDesign. Awhile...
Controlling Line Breaks with Nested Styles
A customer came to me recently with an interesting InDesign problem. I only had...