Put Lines to Left and Right of a Heading
Two ways to make a centered heading with a line on either side in InDesign

Ann wrote:
I’ve hunted and hunted for a way to make … a centered heading with a line on either side.
There are two ways to create this effect: the traditional, easy way (which works in limited situations); and a slightly more difficult method (which works in almost all situations).
The Easy Way to Put Lines on Both Sides of a Heading
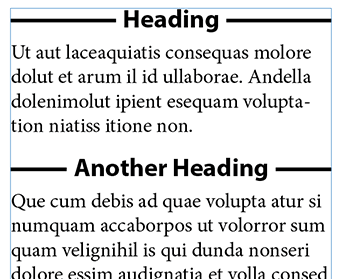
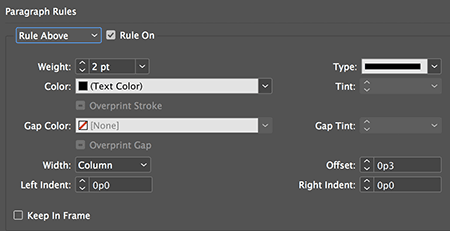
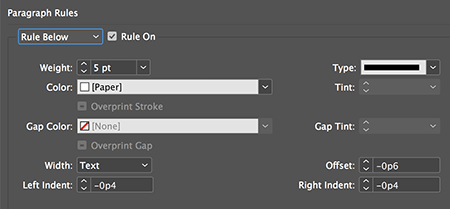
The easy, traditional method is to apply two paragraph rules to the text (typically as part of the paragraph style):
- a thin rule above with a slight offset to center it vertically on the line
- a thicker rule below set to the background color (normally Paper white), that “knocks out” part of the line above. To do this, you need a negative offset, a negative left and right indent, and the width set to Text
See the examples below:
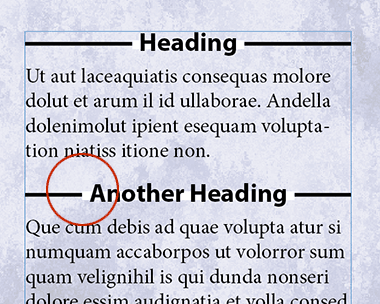
This method is fast and easy, but it has one negative result: it only works over a solid background the same color as the “knock out” rule… when it’s over another color, or an image, the knock-out just leaves a white or colored gap:
The Harder but More Flexible Way to Put Lines on Both Sides of a Heading
Fortunately, there’s another way. This time, we’re going to set up the paragraph style to be flush left, rather than centered:

Now, to center the heading, and add a little space between it and the line, we’ll add some text. In this case, I’ll use the Find/Change dialog box (GREP tab) to find everything in the heading paragraph style, and replace it with the same text, but with a tab and en space before it, and an en space and a right-align tab after it.
The code for “everything” is .+ and the code for the replacement is ~>$0~>~y so it looks like this:
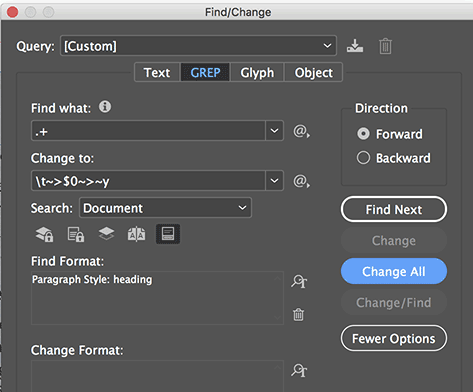
Notice that in the image above, I have used Find Format to limit the scope to just my heading paragraph styles.
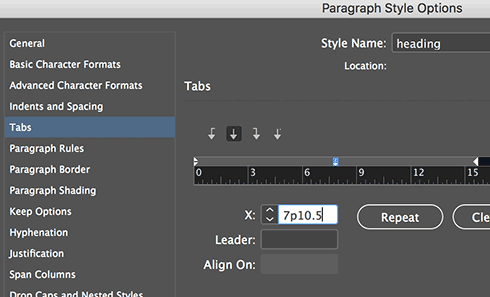
Next, I need to change my heading paragraph style by adding a center-aligned tab stop in the middle of the column width:
And I add a Nested Style that applies a “strikethrough” character style to the tab characters:
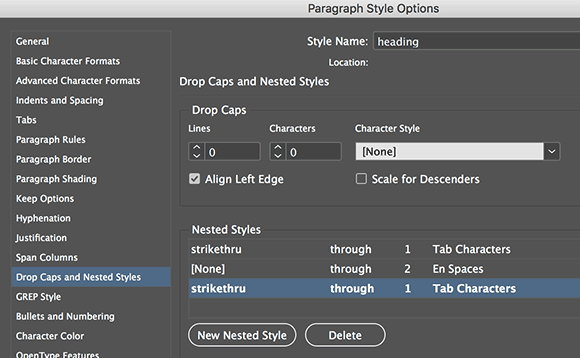
I could have used a GREP Style instead of Nested Styles, but my general philosophy is that if you can do it with nested styles, try that first.
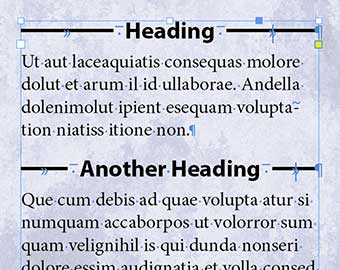
The result is a tab with a thick strike-through, followed by a blank en space, then the heading, then another en space, then another struck-out tab to the end of the line:
There are, of course, many other solutions to this problem: You could anchor lines into the text; you could use underscores instead of strikethrough; you could use scripting; you could add custom strokes with a huge gap and convert each heading into a table cell… but I think these two options are the simplest options. But let me know below if you can think of others!
This article was last modified on July 25, 2019
This article was first published on April 4, 2018
Commenting is easier and faster when you're logged in!
Recommended for you

Illustrator How-To: Breathe New Life into Stock Clip Art
Many designers find the idea of using clip art in their work to be somewhat gauc...

New SWOP Certified Proofing Systems Announced
IDEAlliance today announced the posting of new SWOP and GRACoL Proofing Systems...
Using a Graphic Standards File
Since the early days of typesetting, when we used to chisel out often-used file...


