
Power Up With Object Styles
Take charge of your layouts with one of the most powerful—and underused—features in InDesign

This article appears in Issue 133 of InDesign Magazine.
If I could create “styles” for all the repetitive tasks in my daily life, I’d welcome the tiny bit of extra work up front that would end up saving me an enormous amount of time in the long run. Who wouldn’t love to click a single button to have dinner on the table, the office cleaned up, or a newsletter written and formatted? Object styles are one of the most powerful features in all of InDesign, allowing us to save a complex set of formatting attributes and apply it to page objects with a single click.
An object style can include such things as the stroke and fill of a frame, text frame options, frame size, position, and a plethora of other attributes that you can apply to frames, lines, or groups. Importantly, object styles can even apply paragraph styles to the text within a frame.
The reason to use object styles is, at minimum, two-fold. First, they help you to apply attributes to text or objects quickly and consistently. Second, when an attribute needs to be altered, you simply edit the style, and all of your objects that use that style will immediately update to the new look. I use object styles in all of my InDesign documents, big and small, and they have saved me a lot of time and frustration.
So, are you ready to learn all about object styles? I’ll show you how to set them up, apply them, edit them, and most importantly, find new and useful ways to put them to work in your documents!
Creating an Object Style
For our first example, let’s say you need to place a bunch of photos into 3″ × 2″ graphic frames. The design spec for these frames dictates that they
all have a 1 pt black stroke, 18 pt rounded corners, and a 40% black drop shadow. It would take you quite a bit of time to apply these attributes to every individual frame, and you could miss one or accidentally apply incorrect values. Furthermore, when you show the results to your client, they might want you to tweak the stroke, the corner radius, the shadow, or all three. Without an object style, you’d have to change each attribute by hand for each frame (Figure 1).

FIGURE 1. There’s nothing complicated or difficult about the formatting of this photo frame, but would you want to set it up (or edit it) manually 10 times? How about 100?
Instead, let’s do the smart thing and make an object style.
- Select the frame that will serve as your prototype, and apply all the formatting you want to it (stroke, drop shadow, and so on).
- While that frame is selected, open the Object Styles panel (Window > Styles > Object Styles).
- From the panel menu, choose New Object Style and name the style Photo Frame.
On the left side of the dialog box, notice the long list of all the attributes that you can apply to an object. InDesign automatically turns on the attributes you manually applied to the selected photo frame for the new object style.
- Be sure to turn on the Apply Style to Selection option, which appears at the bottom of the dialog box when you choose General from the Basic Attributes list (Figure 2). If you forget to turn this on, the original object will not be formatted with the object style when you close the dialog box!

FIGURE 2. Apply Style to Selection is a sticky setting. Once you turn it on, it remains active across multiple documents and even after you quit and relaunch InDesign.
- Click OK.
- Here’s where the magic happens: Place another photo into a new frame, and in the Object Styles panel, click your new object style. InDesign will apply all those attributes to the new photo. Continue to apply the object style to more photos.
Using Find/Change to Copy Object Styles to Other Documents
File this under Strange But True: You can actually use InDesign’s Find/Change feature to copy an object style from one document to another—without ever using Copy/Paste or the Object Styles panel.
Here’s how: In one document, apply an object style to some frames via the Object tab of the Find/Change dialog box. Next, open a different document, and use Find/Change again without changing the Change To options. When InDesign applies the object style in the new document, it also adds the style to the Object Styles panel. That means the Find/Change dialog box retains not just the name of the object style, but its details as well.
You may never have to use this trick, but it’s pretty cool to know it can be done.
Editing an Object Style
Of course, after you format all the photos in your document, your client or boss will tell you to change it, right? No problem: If you find that after applying the object style to all your photo frames, you’d like to make the stroke thinner or make the shadow more subtle, you can simply edit the style, which, in turn, will affect all objects formatted with that style. Give it a try.
- Right-click the name of the style in the Object Styles panel, and choose Edit “Photo Frame” (Figure 3).
- Click the word Stroke in the list of Basic Attributes, and then reduce the stroke weight.
- Click the words Drop Shadow in the bottom section under Effects For, and reduce the opacity as well as X and Y Offset values.
- Click OK, and you’ll see that all the objects with the object style applied have been updated with the new settings. (If you have Preview on, you can check your edits before okaying them.)
Or, you can also edit an object style without opening that bulky dialog box: Make a change to one of the formatted objects, and then choose Redefine Style from the Object Styles panel menu.

FIGURE 3. Right-click the name of an object style, then choose Edit “Style Name” to open the Object Style Options dialog box and, more importantly, avoid inadvertently applying the style to an object that you have selected.
Adding Object Styles to Your Documents
There are several ways to get object styles into your documents besides creating them from scratch. If you need to use an existing object style in a different document, you can simply copy and paste a frame with that style applied to it. When you paste the object into your new document, it comes along with all the text styles and swatches that the object style uses.
If you would like to add several object styles from a different document, go to the Object Styles panel menu and choose Load Object Styles. Use the dialog box to open the document and select the styles you’d like to add. As with the copy-and-paste method, InDesign adds all the necessary swatches and text styles as well.
If you want certain object styles to be in every new document you create, use the Load Object Styles command while no document is open.
You can’t save an object style directly in a CC library like you can a paragraph and character style. However, if you add an item with an object style into a CC library as a graphic, the object style will be included. Then, when you place that item into another document, InDesign will add the object style (along with the necessary text styles and swatches) to your document.
Applying Paragraph Styles with Object Styles
Object styles are great for a lot more than just photos or graphic frames. You can create an object style that formats both a frame and the text within it with a paragraph style. To demonstrate, we’ll create callout boxes with maximum efficiency.
- Create a text frame and type in two paragraphs, a heading, and some body text. Format the text, and create paragraph styles for the callout box headings and body text. Because you know that body text will always immediately follow the heading, wouldn’t it be great if you could apply them both with one click? You can! Edit the heading paragraph style, and in the Next Style menu, choose your body text style (Figure 4).
- Format the text frame for the callout box. Choose settings for Fill Color, Inset Spacing, Auto Size, Vertical Justification, and so on.
- With the text frame selected, create a new object style and name it Callout. Turn on Paragraph Styles in the list on the left, and select the heading paragraph style to apply to the first paragraph in the callout frames. Then turn on Apply Next Style (Figure 5). Make sure to turn on Apply Style to Selection at the bottom of the General area, and click OK.
Now, when you apply the Callout object style to a text frame with two or more paragraphs, the frame formatting attributes will apply and the paragraph styles for the heading and the body text will automatically apply to the text in the right order. You can even string multiple Next Styles together to create a complex text frame in one click!

FIGURE 4. Specify which paragraph style (Body) for InDesign to apply following the selected style (Heading).

FIGURE 5. InDesign does not apply paragraph styles as a default within a new object style. Turn on the checkmark, choose the style to format the first paragraph, and then select
Apply Next Style.
Making Placeholder Frames for Photos
If you regularly use a template where you need to place large photos into frames, it can be really helpful to create an object style to fit the photos to those frames properly. Otherwise, the photos initially show up much larger than the frame, and you need to manually resize each image to fit the frame. Instead, let’s make an object style that simply scales the photo proportionally when it’s placed into the frame. As a bonus, you can also add a stroke, shadow, or other attributes.
- Open your template, and select an empty graphic frame.
- Create a new object style. Name it Fill Frame or the like.
- In the list on the left under Basic Attributes, notice that Frame Fitting Options (you might have to scroll down) has a dash. This means that the object style will not change any frame fitting settings when you apply it. Let’s change that by clicking the dash to make it a checkmark. Then, from the Fitting menu, choose Fill Frame Proportionally (Figure 6). Save the object style.
- Apply this object style to all empty photo frames in the template.

FIGURE 6. There are three states for the attributes in the list. A checkmark indicates that the attribute will be applied, a dash indicates the attribute will be ignored, and an empty box indicates that the attribute will be removed. Note that Frame Fitting Options displays a dash as a default and is ignored in a new object style.
Now, when you place photos into frames within your template, the photos will automatically size to fit (Figure 7).

FIGURE 7. Photos placed into an empty frame will display at 100%. Create an object style with Frame Fitting Options set to Fill Frame Proportionally to quickly scale photos to fit the frame.
Applying Object Styles as You Place Photos
It’s been 15 years since Adobe added object styles to InDesign CS2, but somehow we still lack the ability to apply an object style as we’re placing images. Actually, it’s a bug that has never been fixed. You can choose any object style as your default for creating new objects (select the object style with no other objects selected), but InDesign refuses to recognize and apply the style during a Place operation. Fortunately, there are two workarounds that are almost as old as the bug itself.
Place Gun Frame. Create a new object style called Place Gun Frame. Type it exactly like that, with initial caps, spaces, and no period at the end. Apply your desired settings, and save the style. Now, every time you place an image, InDesign will apply the Place Gun Frame object style to the frame. Note that the style does not have to be selected in the Object Styles panel; as long as it exists it will be applied. After you’ve placed all your images you can, of course, edit the style to change the name.
Use a script. TomaxxiPLACE is a free script that allows you to pick any object style in your document and apply it while you’re placing images. While the script is running it creates a small dialog box where you can choose an object style to apply to the image you’re currently placing. If you’re placing multiple images, you can switch to a different object style at any time—even while you have the loaded place cursor. You can also create new object styles while the script is running and refresh the list. To stop the script, simply close the dialog box.
Positioning Objects with Object Styles
Master pages are fantastic: You can use them to set up page designs and display repeating objects, such as logos, page numbers, and running headers. Occasionally, however, you can run into trouble when you have to release a master page object on a document page, and then make changes to that element on multiple pages. This is when object styles for something like a master page header can really save your bacon.
- To create an object style for a master page header text frame, start by double-clicking the master page in the Pages panel to edit it.
- Create a text frame, and type in the word Header. Format the word as desired, and use that formatting to create a paragraph style called Header. In the Paragraph Styles options, choose Indents and Spacing from the list on the left and from Alignment, choose Away from Spine. This way, you can use the same paragraph style for headings on the right or left pages and they will always align to the outside of the page.
- Position the header at the top of the page; make the frame as wide as the margins.
- Select the frame, and choose Object > Text Frame Options. In the dialog box, choose Centered Vertical Alignment. Then adjust the height of the frame to center the text in the margin area nicely.
- Create an object style for this frame, and name it Header Frame. Make sure to turn on the Paragraph Styles option and choose your Header paragraph style.
- In Size and Position Options, choose Adjust: Height & Width and make sure the width is as wide as your margins. For Position, set Adjust to X & Y, X Offset to .5 in, and From to Page Edge. Currently you can’t specify the X or Y position to offset from the outside or inside of the page; it will only offset from the top and left of the page (Figure 8).
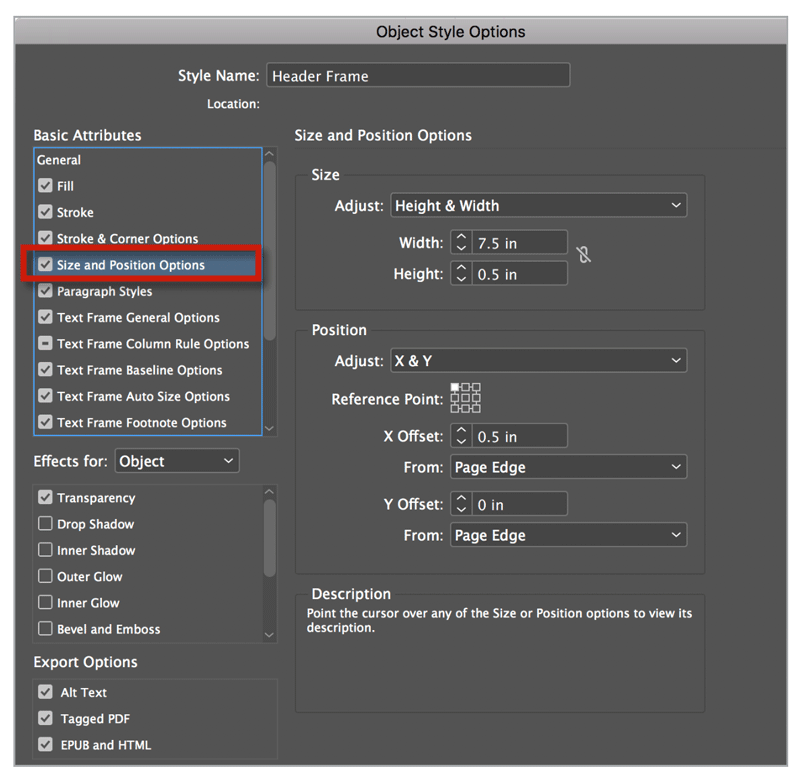
FIGURE 8. Size and Position Options are not applied as a default when you make a new object style. When you turn on the checkmark, the current values of the selected object will be used.
This is cool because if the frame is on a right page when you apply the object style, the frame will snap to the top of the right page, lining up to the right and left margins, but if it’s on the left page, it will snap to the top of the left page. Your paragraph style is telling the text to align away from the spine. Really slick!
Because we placed these frames on a master page, they will appear on every document page based on that master. To release them from the master page—to type in custom text, for example—Command+Shift-click (macOS) or Ctrl+Shift-click (Windows) on the frame on a document page. If the font, size, or color of the text needs to change, modify the Header paragraph style. If the position, fill color, vertical justification, or any other frame settings need to change, just modify the Header Frame object style. If the header frame is moved, and needs to be reset back to the original location, choose Clear Overrides from the Object Style panel menu.
We’re still using our master page to get the header on each document page, but we’re using our object style to set the location, size, fill, and other attributes. Changes will update on all frames based on the styles we’ve created and not rely on whether the frames are still attached to the master.
You can also use this trick to precisely place an indicia (the location of the postage stamp or barcode), to position an address label frame, or to add any other item that you need to position or size precisely.
Object Style Template Essentials
Editor’s Note: As a Premium member, you get access to a huge collection of InDesign templates and starter assets that we call Template Essentials. Don’t miss these Template Essentials containing useful object styles.
Image and Art Object Styles includes almost 50 object styles for various uses, including text wraps and keylines, shadows and transparency effects, charts and graphs, lines and arrows, and more.
Text Frame Object Styles includes object styles that control the number and width of columns, apply insets, and add corner options. There are also styles to help you work with footers, folios, captions, anchored items, and drop caps. Examples show how to incorporate several text frame attributes to create an overall effect, like this ticket.

Applying Object Styles to Groups
Consider this interesting scenario: Say you want to anchor a photo with a caption text frame into a story. The photo and the caption frames each have a different object style applied to them, the two frames are grouped, then the group is anchored into the text. Now, here’s the tricky problem. You need apply another object style to the group to control the anchored position and the text wrap—but any attributes set by the object styles applied to the photo and caption will be overridden by the style applied to the group. So things can quickly become quite a mess. The key to avoiding trouble is to pay close attention to which settings are turned on and which are ignored in each object style.
First, we’ll create two object styles, one for the photo and another for the caption.
- Place a photo, and immediately create an object style called Photo. In the Object Style Options dialog box make the following choices: Stroke: Black 1 pt, Frame Fitting Options: Fill Frame Proportionally, Size and Position, Size section: Adjust Height & Width, Width 1.2 in, Height .9 in
- Click OK
- For the caption, create a text frame, type a caption, and format the text.
- Create a paragraph style called Caption Text.
- Select the frame containing the caption. Create a new object style named Caption Frame.
- In the Object Style Options dialog box make the following choices: Fill: White, Stroke: None, Paragraph Styles: Caption, Text Frame General Options: Inset Spacing: .125 in, Vertical Justification: Center
- Click OK.
- Position the caption on top of the photo, and group the photo and the caption.
- Select the group, and anchor it into the text by dragging the little blue square into the beginning of a paragraph.
- Position the anchored object; for precise positioning, you can choose Object > Anchored Object > Options. (For all the details of working with anchored objects, see my article in Issue 117.)
- Choose Window > Text Wrap to apply a text wrap and a text offset.
- Select the group and create a new object style. Name it Anchor. Notice how almost all of the checkmarks are turned on in Basic Attributes. These settings will override those in your Photo and Caption Frame object styles. To combat this, you have to make a list of the attributes that you’ve saved in your Photo and Caption Frame object styles that may conflict with the Anchor object style. For Photo, we applied a stroke, frame fitting, and size. For Caption Frame, we applied a white fill, none stroke, text frame options, and paragraph style.
- In the Anchor object style, you’ll need to click the checkboxes to make them a dash for Stroke, Fill, Text Frame General Options, Paragraph Styles, Frame Fitting Options, and Size and Position Options. Basically, you’re telling the Anchor object style to apply the text wrap and anchor position only and to ignore all other attributes (Figure 9).

FIGURE 9. Our Caption Frame object style specified no stroke on the frame. The Photo object style specified a black stroke. To make the Anchor object style leave our stroke alone, make sure a dash displays in the checkbox next to Stroke.
One more issue you might run into is that the caption text might disappear due to the text wrap applied to the group. To fix this, edit the Caption Frame object style and in the Text Frame Options General, turn on Ignore Text Wrap.
Automated Artistry
For a great example of the power of object styles to maximize your efficiency and creativity at the same time, check out David Blatner’s article “Building a Photo Book with Object Styles” in Issue 126.
Making Organizational Charts with Object Styles
Organizational charts are a part of the corporate world, and they are always changing. Let’s see how you can design an organizational chart with paragraph and object styles to make your job easier.
Unfortunately, InDesign can’t connect the boxes in a chart like Visio or other programs made specifically for this purpose. With guides, and features for aligning and distributing objects, however, InDesign can help you create a great looking org chart that’s no trouble to update. Let’s practice.
- Create a text frame, and type a name, title, and location. Make sure to make each line a separate paragraph.
- Format each line of text differently. Create three paragraph styles. Name them Name, Title, and Location.
- Edit the paragraph style called Name, and choose Title as the Next Style.
- Edit the Title paragraph style, and choose Location for Next Style.
- Create another text frame, and type another name, title, and location.
- To apply our three styles to the text that is already in a frame, select all three paragraphs, then in the Paragraph Styles panel, right-click the Name paragraph style and choose “Apply Name, then Next Style.” InDesign will apply all three styles to the selected paragraphs in order.
- Now, format the text frame. Set the Fill, Stroke, and Vertical Justification. Make the frame 2″ × 1″.
- Create a new object style. Select Paragraph Styles in the list of Basic Attributes. Choose Name as the style to apply to the first paragraph of text. Then make sure to turn on Apply Next Style. This will apply all three paragraph styles, one after another.
- Turn on Size and Position Options. Choose Adjust: Height & Width, and make sure the measurements match the desired size of the frame. Any frame you apply this object style to will resize to these dimensions.
- Apply the object style to a frame with three paragraphs, and you have an easy to create and modify organizational chart (Figure 10).

FIGURE 10. You can create different object styles for different levels of your organizational chart to apply different colors, sizes, and paragraph styles. You can even save an object style for the connecting line.
You can use the Pen or Line tool to make lines that connect the boxes, and don’t forget to format the lines with an object style, too, to make them all consistent and easy to modify. Unfortunately, there isn’t an automatic way to connect these boxes and have the lines move as you move the boxes. But you can use the Align panel to line up your frames and center the arrows on the boxes. (See this InDesign Secrets video tutorial for help.)
Getting the Right Text Formatting When You Paste
If you want to paste text into a frame and have the text be formatted with the paragraph style specified by the object style, choose Edit > Paste Without Formatting.
Have character-level formatting, such as bold or italics, that you need to preserve? Use the regular Paste command, then select the frame with the Selection tool and click the button in the Object Styles panel to clear overrides.
Efficiency Is Always in Style
The more I use object styles in InDesign, the more I realize how powerful they are and how flexible they make my documents. I’m free to change my mind and experiment with the design because adjustments are so easily to make. Object styles automate much of the tedious formatting and, more importantly, make updating designs faster and more consistent. For longer documents with repeating styling I find that taking a little more time up front to plan and create object styles saves me an enormous amount of time in the long run.
Object Style Omnibus
Check out these articles for more great tips for using object styles:
Five Great Uses for Object Styles in InDesign
Applying Object Styles to All the Frames in a Text Thread
Using More Than One Object Style to Format an Object
Adding Alt Text to Images with Object Styles
Setting Exact Gap and Dash Values in Strokes with Object Styles
A Workaround to Make Objects Bleed for Print Jobs with Object Styles
Commenting is easier and faster when you're logged in!

Recommended for you

InDesigner: Raphaël Freeman
Addison Lalier shows how one designer has mastered the complex layouts and types...
Designing with Rules, Borders, and Shading
Creative ways to highlight text content in InDesign
InDesign Magazine Issue 133: Object Styles
We’re happy to announce that InDesign Magazine Issue #133 (May 2020) is now avai...