
Photoshop Tips: Go Ahead, Be Shallow
This article courtesy ePaperPress.com
When shooting photographs, you can achieve shallow depth of field using a large f-stop (small f-stop number). Shallow depth of field lets you focus on the subject while the background appears blurred and plays a less important role.
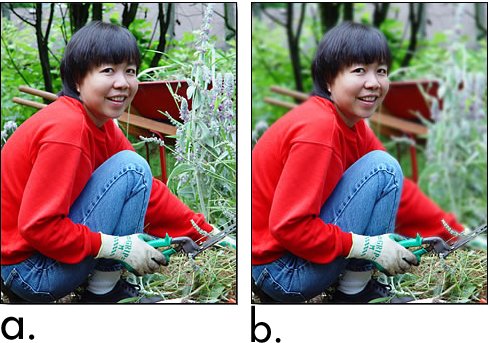
If you forgot to shoot with a large f-stop, you’re not out of luck. You can simulate a shallow depth of field in Photoshop (Figure 1).

Figure 1. 1a shows an original photograph with a distracting background; 1b shows a shallow depth of field, or selective focus, that I simulated in Photoshop.
There are four methods you can use to achieve this effect.
Method 1
Select the background and blur the selection (Filter > Blur > Gaussian Blur). If you make a mistake, then undo the blur, modify the selection, and redo the blur. You may find it easier to select the subject and invert the selection — or use the Quick Mask (Q) mode.
To minimize edge effects around the selection, modify the procedure as follows: After making the selection, right-click on the layer and choose Layer via Copy (Ctrl-J). Then Lock Transparent Pixels (the small button near the top of the Layers palette) prior to blurring to prevent blurred pixels in the background from altering the subject.
In a variation, try duplicating the background layer, then apply the blur to the duplicated layer. You may wish to over-blur since you can control the amount of blur later by reducing opacity of the duplicated layer.
This method uses a two-step process: Make a selection, then blur the selection. Wouldn’t it be nice if you could use a brush to apply a blur and view the image while painting? The remaining methods have this advantage.
Method 2
Duplicate the layer, then blur the duplicated layer (Filter > Blur > Gaussian Blur). You may wish to over-blur the layer since you can control the amount of blur later by reducing opacity of the layer. Then erase portions of the blurred image so that the original sharp image shows through. Figure 2 shows the Layers palette for the image; Figure 3 shows the image in progress.

Figure 2. The Layers palette.

Figure 3. Erasing the blurred layer to transparency allows the sharp layer to show through.
If you make a mistake and erase too much, you can undo (Edit > Undo) and try again. However, you must undo to the point of the error, and this may erase a substantial portion of your work. Also, if you save the file and rework it at a later date, the erased portions of the blurred image are lost. If you want erased sections restored you’ll have to start again from the beginning.
Method 3
Use the History palette to save snapshots of a sharp and blurred image, then use the History Brush and paint sharp or blurred areas (Figure 4).

Figure 4. Depending on your image, choose either the sharp or blurred brush in the History palette.
Click on the camera icon at the bottom of the History palette to take a snapshot of the image. Then blur the image and take another snapshot. Enable the sharp or blurred brush, as shown, and edit the image. With this method you can arbitrarily change any portion of the image at any time. There’s no need to undo — just repaint with the correct brush.
After applying the History Brush a few times the snapshots scroll out of sight. This means that you must scroll to the beginning to access the correct brush. Note that snapshots are lost when you save a file. If you decide to rework the image later, the sharp/blurred base images will be gone.
Method 4
Use a Layer Mask to control the blurred effect. Duplicate the layer and blur the duplicated layer (Filter > Blur > Gaussian Blur). You may wish to over-blur the layer since you can control the amount of blur later by reducing opacity of the layer. Then click the Layer Mask icon at the bottom of the Layers palette (Figure 5).

Figure 5. Use a Layer Mask to control the blur.
Press “d” for default black and white colors, and press “x” to swap colors. Select a soft brush and use shortcut keys “[” and “]” to control brush size. Left-click on the Mask and start painting. Paint with black or white to respectively hide or reveal the blurred image (Figure 6). You can Alt-click on the mask to view the black and white mask by itself. Alt-click again to restore the image.

Figure 6. Use a Layer Mask to control the blur.
You can redo any portion of the image at any time. Just choose a color (black or white) and repaint the mask. All layers and masks are saved when you save the image as a Photoshop file, which facilitates edits at a later date. This method incorporates immediate feedback as you paint and the ability to re-edit the image at a later date.
This article was last modified on January 4, 2023
This article was first published on December 1, 2006
Commenting is easier and faster when you're logged in!

Recommended for you
A Photoshop Script to Delete Empty Layers
As a Photoshop user, one of the kindest things you can do for anyone who has to...

Editing Highlights and Shadows in Adobe Lightroom and Camera Raw
Adobe Photoshop Lightroom and Adobe Camera Raw have two sets of controls for mak...

Build a Tilt-Shift Camera Lens for Peanuts
Tutorial compliments of “Make:” magazine. One of the fancier lenses...