
Helping Photoshop and InDesign Play Nice
Chad Chelius and David Blatner offer advice on how to make these two software siblings get along great.


This article appears in Issue 107 of InDesign Magazine.
You know that InDesign and Photoshop are brother and sister in the big Adobe family (along with their older sibling Illustrator), but—like all families—they don’t always get along as well as you might expect. And if you’re a typical InDesign user, you probably also use Photoshop a lot, so it’s essential that you find ways of getting them to work together well!
InDesign simply cannot do the kinds of things Photoshop can. For example, Photoshop is the best tool for changing the tone or color of an image. The Adobe Creative Cloud functions like an ecosystem of applications, each designed to perform a certain set of tasks within your creative workflow.
In this article, we’re going to focus on the many ways in which Photoshop integrates with InDesign and the great accomplishments you can achieve when you use these programs together.
Preparing Your Images
Before you even think about placing Photoshop images in your InDesign layouts, you need to consider how best to prepare them—and that means thinking about size, resolution, and file formats. Remember that Photoshop images need to be handled somewhat carefully because they are pixel-based (raster) and inherently have a resolution associated with them. Resolution, as you know, is the density of pixels contained in that image file. So when preparing images for use in an InDesign layout, we need to take into account the size in which we want to use the image, as well as the desired resolution of the final output.
For example, if you want to use an image in a print magazine layout as a full-page spread, you need to make sure that your image is roughly 17″ × 8 ½” and at a high enough resolution (pixel density) that it won’t look pixelated
or jaggy in print. Some people round up to 300 ppi (pixels per inch)—or 118 pixels per cm—though that’s probably higher than you really need. (Many experts say 225 ppi is all you really need unless you’re doing super high-quality output.)
When resolution is too low, the image gets pixelated; when it’s too high, the file size gets unnecessarily large, and image quality can actually suffer. So how do we make sure that the resolution of our images is just right for use in a project?
Resizing Images in Photoshop
One approach to proper image resolution is to optimize the image in Photoshop prior to placing it in InDesign. Generally you would use Photoshop’s Image > Image Size feature to adjust the dimensions and resolution of your image (Figure 1). Designers have great arguments over whether you should ever upsample your images (increasing the resolution). After all, if you take a low-res 72-ppi web graphic and try to upsample it to 200 ppi or higher, it will simply get blurry—Photoshop can’t magically add details and make it look great. That said, if you need to, you can probably increase your image resolution by 10 or 15% without damaging the image. And if you’re using Photoshop CC 2018, you might get even better results by using a new resampling option in the Image Size dialog box, called Preserve Details 2.0.

Figure 1. Photoshop gives you a lot of control over the dimensions and resolution of your images.
You can, of course, always downsample (reduce the resolution, and thereby lower the file size). While it is somewhat tedious to resize images in Photoshop before placing them in InDesign, you will get a better final result than if you place the original image (say, a high-res image from a digital camera) in InDesign and then resize it. Let’s look at why.
Resizing Images in InDesign
You can always select an image in InDesign and scale it on your page using any one of a variety of features, including the Free Transform tool, changing the scale in the Control panel, or holding down Command+Shift or Ctrl+Shift and dragging a corner handle. When you do this with a bitmapped image, InDesign always changes the image resolution—the density of the pixels. For example, if you scale a Photoshop image down to 50%, the resolution doubles—literally, twice the number of pixels have to fit into the same amount of space.
It’s important to remember that when you select a graphic frame in InDesign, the Control panel and Transform panel will almost always show 100%, but that’s not the scaling of the image itself. If you double-click the image with the Selection tool (or click once with the Direct Selection tool), you’ll select the image inside the frame, and the Control panel will display the proper scaling amount.
Although InDesign doesn’t give you the ability to define the interpolation method used to resize the image, it does calculate the current resolution of the file after scaling, referred to as the effective resolution. Effective resolution takes into account the redistribution of pixels as the image is resized. InDesign displays both the actual and effective resolutions in the Links panel, with the effective resolution value being the important metric, as it reveals the true resolution of the image at its current size on the page (Figure 2).
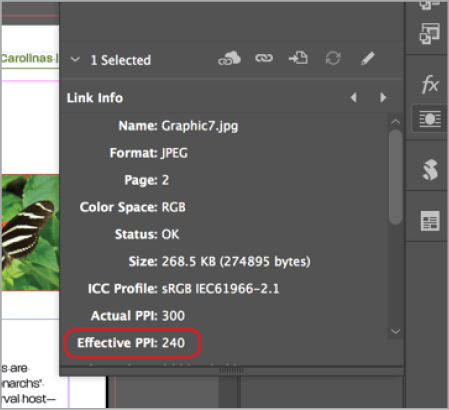
Figure 2. “Effective PPI” is the number to watch.
Here’s the problem with resizing in InDesign: sooner or later, InDesign will almost certainly need to resample the image—add or throw away pixels, just like Photoshop’s Image Size dialog box. For example, let’s say you place a 300-ppi image into InDesign, and then scale it down 50% (so the effective resolution becomes 600 ppi). When you export a PDF, InDesign will reduce that image resolution, based on the settings in whatever PDF preset you’re using (probably down to 300 ppi again).
And here’s the rub: InDesign’s resampling features are not nearly as good as Photoshop’s. Will the result be terrible? Probably not. But they won’t be as good as if you had done it in Photoshop. So often this is a matter of quality vs. efficiency, getting the best result you can versus getting the job done quickly. You need to decide which is important for each job.
Saving Your File
Of course, once you have your file just right in Photoshop, you need to save it in some file format that InDesign can read. There are lots of options, but usually the best one is to simply save it as a native Photoshop (PSD) file. Sometimes you may want to save as a PDF, which we’ll discuss later.
However, if you want to read about the pros and cons of different file formats, check out this post at InDesignSecrets, and the article “Fiddling Around with File Formats” in Issue #57.
Getting Photoshop Images into InDesign
The preferred method for getting Photoshop images into an InDesign document is using the Place command in InDesign (File > Place). Using the Place command, you navigate to the location of the file on a hard drive or server, and then place the document in the InDesign layout. When you use this technique, InDesign embeds a low-resolution “proxy” image into your document, and then keeps track of the location and information of the high-resolution image on disk, and maintains a link to that image throughout the life of the document.
Of course, this method requires that whenever you print or export, InDesign has access to the up-to-date file. If the linked file is ever edited (and saved), InDesign will notify you that the link has been modified, requiring an update, and if InDesign can no longer locate the file, it will notify you that the file is missing, requiring you to specify the new location of the file.
While linking takes some planning and organization on your part, there are several important benefits to this system, including these:
- Linking keeps your InDesign file size small and nimble. It’s easier to work with and transfer a file that is a few megabytes rather than gigabytes!
- A team of people can work concurrently on editing images and laying out the document.
- You can quickly and easily edit an image even after it has been placed.
Embedding Images
While the Place feature, by default, links to the image file on disk, you can override it and embed the entire Photoshop file into your InDesign document. Embedding an image will make the document self-contained and won’t require access to the original location of the image. But it also makes your file size much larger—for example, if you embed ten 30-MB images, your document file size will get 300 MB larger.
There are two ways to embed an image into InDesign. First, you can use copy and paste… but please don’t! Copying and pasting an image from Photoshop embeds the image into the InDesign document, but it’s very hard to unembed that image in the future, making editing that image difficult at best. Pasting an image into InDesign adds every byte of information to the overall size of the InDesign document. Plus, you can’t take advantage of important features such as transparency, vector type, the Links panel, and color management (the process of keeping color consistent).
So, instead, if you want to embed an image, choose Embed Link from the Links panel menu. (Images embedded this way do make your file larger, but they act like any other image, and do work with color management, layered transparency, and other image features.) If you need to make an edit to the image later, you can select it and choose Unembed from the Links panel menu.
Embedding an image can be helpful when building a template that you’re giving someone else, or for company logos (which are likely small and seldom change), or if you need to build a snippet or IDML file to send to another person. In most cases, though, placing (linking) is the way to go.
Options When Placing Photoshop Files in InDesign
Yet another reason to place Photoshop images into InDesign is the ability to control other aspects of the appearance of the placed image. Using these techniques is efficient and can save you valuable time.
Isolating Objects Using a Clipping Path
Clipping paths are a helpful tool in Photoshop that can be used in several ways, but one common use is to isolate a subject from a background in an image to remove the background (sometimes called a silhouette). While it’s often easier to create this effect in Photoshop by adding a mask or erasing to transparency, some people still prefer the old method of “cutting a path,” where you use the Pen tool in Photoshop to draw a path around an object. InDesign can then apply that path to a placed image.
Clipping paths are best used to isolate hard-edged objects (such as a car, phone, coffee cup, etc.) and are rarely useful for soft- or fine detail-edged objects like clouds, trees, and people or animals with long hair.
InDesign also provides the ability to choose which path to apply to an image in a situation where more than one path exists. For example, Chad used to work on a jewelry catalog where the photographer would shoot several pieces of jewelry in a single photograph. Instead of cropping each piece of jewelry into its own image file, he would draw a path in Photoshop around each piece of jewelry and then choose which path to apply when placing the image.
To apply a clipping path to an image, you first need to have a path saved in Photoshop. By default, a freshly drawn path will be called Work Path, and it cannot be accessed by InDesign. So after you draw the path, you need to give it an appropriate name by double-clicking on the path in the Paths panel in Photoshop (Figure 3).

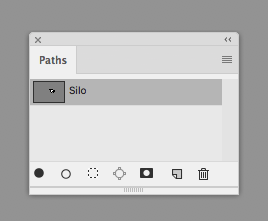
Figure 3. A newly drawn path in Photoshop (top) cannot be accessed by InDesign, but a saved path (bottom) can.
Once you have a path saved inside a Photoshop image and you’ve placed the image into InDesign, you can apply the path to the image by choosing Object > Clipping Path > Options, choosing Photoshop Path from the Type menu, and selecting the path that you want to apply to the image from the Path menu (Figure 4).
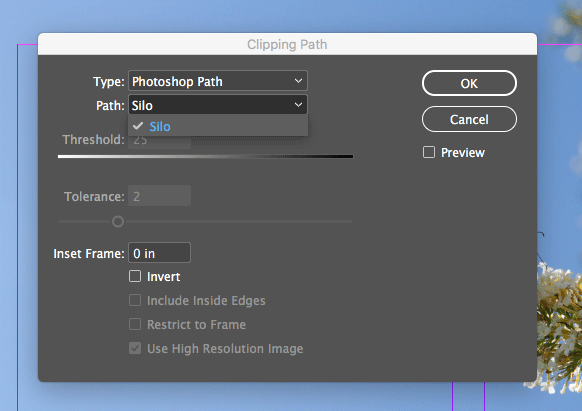

Figure 4. Choosing the path to apply to the image in the Clipping Path dialog box
Using a Photoshop Clipping Path
Adobe Photoshop allows you to define a path as a “clipping path,” which differs from other paths. To do this, select a path in the Paths panel, and choose Clipping Path from the panel menu. You can define only one clipping path per Photoshop file. When you define a clipping path in Photoshop, it is automatically applied when placing the image in InDesign. However, you can still override the clipping path (assuming you have more than one path saved in your file) by choosing Object > Clipping Path > Options.
Placing Images with Transparency
As we said earlier, instead of using a clipping path, it’s often easier to work with Photoshop images that contain transparent pixels. In cases like these, InDesign honors those transparent pixels and retains them when placing those images in an InDesign document. So if your project requires a pixel-based mask, as opposed to the crisp clipping-path-based mask, then you can use the transparency capabilities in Photoshop to create the result that you desire.
Blending Modes and Layer Styles
While Photoshop’s transparency effects are generally honored in InDesign, there are a few details you need to be aware of. First, blending modes (such as Screen or Multiply) applied to layers in Photoshop will be retained in images placed in InDesign, but they are honored only between layers within the Photoshop file itself, and may not interact the way you expect with elements in InDesign. For example, let’s say you set a layer to the Screen blending mode in Photoshop (which creates a “light” effect there), and then place it into InDesign. That layer will not lighten InDesign objects that are under the image.
On the other hand, layer styles generally are honored in both Photoshop and InDesign (Figure 5).

Figure 5. The orange and green boxes have blending modes applied to them within Photoshop, and interact with the butterfly graphic; however, those rectangles do not interact with the purple background that was created in the InDesign file, which may or may not work to your advantage. The layer styles show a different story; the orange box has a Drop Shadow applied and the green box has an Outer Glow applied, and you can see that those layer styles interact with the elements in the Photoshop file as well as with the purple background in the InDesign file.
These limitations can be overcome in many cases, however, by thinking ahead and, when possible, applying the blending modes to the objects in InDesign as opposed to in Photoshop. Many, though not all, of the blending modes that exist in Photoshop are available in InDesign. To apply a blending mode to an object in InDesign, simply select the object, and then choose the blending mode from the drop-down menu found in the Effects panel.
Working With Layered PSD Images
In the interest of working non-destructively in Photoshop, a large number of Photoshop images that you work with probably contain layers. That’s okay! You don’t need to flatten your images, because InDesign supports file formats containing layers—including PSD and TIFF. Even better, you can control the visibility of those layers within InDesign.
You can hide or show layers in two places in InDesign. First, when you’re placing your Photoshop image, you can enable the Show Import Options checkbox (in the Place dialog box), and then click Open (Figure 6). This tells InDesign to display the Image Import Options dialog box. Click the Layers tab at the top of the dialog box to see all of the layers in the Photoshop image being placed. You can enable or disable the visibility of any of the layers to achieve the desired result.


Figure 6. Image Import Options for a Photoshop file with layers
Beyond the ability to adjust the visibility of individual layers of a placed Photoshop image, the Image Import Options dialog box also provides access to any layer comps that were saved in the Photoshop image. You can think of a layer comp as a way to remember which layers were visible or hidden at a particular time. Layer comps have the added benefit of recording the layer style appearance (if applicable) as well as the position of the layer at the time that the layer comp was saved. So you could have several layer comps that, in addition to hiding or showing various layers, also move the layer to a different location in each layer comp. Then, when importing into InDesign, you can choose which version you want to use (Figure 7). Talk about flexibility!

Figure 7. Choose a layer comp when you’re importing an image from Photoshop.
At the bottom of the Image Import Options dialog box, you’ll see the Update Link Options area. These options allow you to choose what should happen to the placed image if layer visibility is adjusted in Photoshop after it has been placed in the InDesign document. Keep Layer Visibility Overrides tells InDesign to use the visibility defined in InDesign regardless of the visibility defined in Adobe Photoshop. The second option, Use Photoshop’s Layer Visibility, will change any manual visibility adjustments made in InDesign to match the current state of the Photoshop file.
If you create or delete layers in a Photoshop file that’s been imported to InDesign, here’s an issue to look out for. Creating or deleting layers causes a conflict between the state of the file and the settings in InDesign, which then causes a message to appear to tell you that your layer visibility will be reset to the state of the Photoshop file (Figure 8).
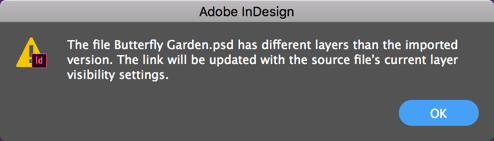
Figure 8. InDesign keeps track of the layers in an imported Photoshop file.
The second way to gain access to all these layer features is to select an already-placed image on your InDesign page, and then choose Object > Object Layer Options. By enabling the Preview checkbox, you’ll be able to see a preview of your changes as you adjust the layer options.
Working with Type
Whenever the topic of text comes up in a conversation that involves Photoshop, you’ll hear strong opinions as to whether or not it’s appropriate to set type in Photoshop at all. We believe there’s a time and a place for setting type in Photoshop, but whenever possible, we prefer to set type in InDesign. While Adobe has added a number of typography features to Photoshop over the years, InDesign’s type tools are still better. Plus, text in Photoshop will usually get rasterized, causing the type to look soft and not very crisp. As a general rule, however, you can get good results setting large type in Photoshop. Of course, sometimes the only way to achieve a particular effect might be to set the type in Photoshop (such as if you want to apply crazy Photoshop filters to it, or if you want to take advantage of SVG fonts).
If you are setting text in Photoshop, it may seem like the fonts are vector—with sharp resolution-independent edges that can scale up or down. But as we said, they are still going to get rasterized when placed in InDesign. Talk about a lesson in futility! This is simply one of the limitations of the formats that we use to save our files.
All of the standard formats that we like to use, including PSD and TIFF, support only raster-based content. However, there are two formats that actually retain the vector type and objects from the Photoshop file, and continue to retain them when placed into Adobe InDesign, giving you the best of both worlds from a raster/vector perspective. Those are PDF and EPS.
If it is important to you to keep your text sharp-edged, then simply save your Photoshop file like you normally do, except in the Format drop-down menu, choose Photoshop PDF. (Or EPS, but that’s a dying file format, so it’s best to avoid it when possible.)
Organizing Photoshop Assets using CC Libraries
Creative Cloud (CC) Libraries have opened up a new method by which we can access and place Photoshop files into InDesign and other Adobe applications. Heck, you can even access those assets from your mobile device! Using CC Libraries, you can organize the assets for a project in one convenient location, and then access them using the CC Libraries panel directly within InDesign.
Adding Photoshop Assets to a CC Library
If you’ve used traditional InDesign Libraries in the past, you may try to use CC Libraries in the same way—by dragging and dropping objects into the library from within InDesign. Although that might work OK for InDesign objects, adding a placed Photoshop file to a CC Library from within InDesign isn’t very beneficial, because the Photoshop image is still referenced on your local hard drive or server.
To take full advantage of CC Libraries, you should add the asset to the CC Library using the application that created the asset—in this case, Photoshop. In Photoshop, you have access to the same CC Libraries panel that you do in InDesign; however, the panel is simply called Libraries. To add content to the Library, select the layer(s) that you want to add, and drag and drop them onto the Libraries panel, or click the + sign at the bottom of the Libraries panel. Then select the properties you want to add, and click the Add button (Figure 9). It’s worth noting here that when you add items to the Libraries panel within Photoshop, you’re not adding the full PSD file, so features such as Layer Comps aren’t retained.
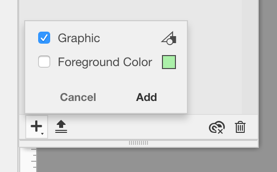
Figure 9. It’s easy to add content to a CC Library.
Once the graphic is added to the Libraries panel, you’ll see a new entry in that library that can be renamed to anything you wish, and the object will sync to your Creative Cloud account. Back in InDesign, you’ll see that asset in your CC Libraries panel, where you have a few options for using it. First, you can place the asset by dragging it from your CC Libraries panel onto an InDesign document, which creates a link to the asset in your Creative Cloud account. You’ll notice a small “cloud” icon in the upper left corner of the frame for the asset you just placed (Figure 10).
Another option is to use the drag-and-drop method described previously, but this time, hold down the Option/Alt key when doing so. This embeds a copy of the asset into the InDesign document instead of creating a link to it in the cloud. This gives you the option of leaving the asset embedded, or unembedding the asset locally to your hard drive in the event that you want to have a local copy of it.
It’s worth mentioning here that not only can items placed in InDesign be linked to your Creative Cloud Library, but also that Library can be shared with other users—so they can use them in collaboration with you, or for any other purpose. Or, if you run the Package command on an InDesign file, those cloud-based assets will be collected locally to the package folder for easy distribution to other users.
We love the control that InDesign gives us when working with Photoshop images. Not only does it save time, but it allows us to leverage the strengths of both programs so we can make design and layout decisions from one convenient location and with very little effort. And that’s the kind of cooperation we expect from siblings.
Commenting is easier and faster when you're logged in!

Recommended for you

How to Make Anyone into a Clown in Photoshop
If your boss has ever accused you of clowning around in Photoshop instead of doi...

100 Free InDesign Scripts
Free for the taking: a heaping helping of features that make InDesign better, fa...

CreativePro Week Conference Speaker Spotlight: Chris Converse, Designer and Coder
Welcome to our Speaker Spotlight series, designed to highlight some of our Creat...