
Photoshop How-To: Take a Filter Beyond the Basics

Rough in organic texture, yet romantic in feeling, this very easy Photoshop technique converts images into iconic, contemporary interpretations of Sumi-e ink paintings. (For more on Sumi-e, see the sidebar at the end of this article.) While it won’t fit every situation, the inventive, artistic approach worked well on photos I took at a wedding in an architecturally important church and a reception in Denver’s historic Brown Palace Hotel.
Step 1.
Prepare an 8-bit image for the updated Sumi-e process by first removing facial blemishes, eye bags, wrinkles, and undesirable background items, such as obtrusive signs. Images showing action or motion or that are simply a bit blurry are just as suitable as sharp, detailed portraits. Both natural and architectural landscapes make good subjects, too.

Figure 1. The original portrait in natural light. Click on the image for a larger version.
Step 2.
Duplicate the background image and select the Dodge tool (not the Brush), using the large soft pastel brush shape from the standard Photoshop brush library. Use this brush in normal mode and midtone range. The brush shape is roughly a vertical oval and paints like wide, flat-tipped bristles. I use a very fast track ball, but a tablet or mouse is also acceptable.
Paint quickly and irregularly in the background area of the image, following shapes and lines in the subject, with the Dodge tool set at about 25% to 30% opacity and about 700 to 1000 diameter for the first painting pass.
I paint a second and then third pass, with about 15% to 20% opacity and 5% to 10% opacity respectively and successively smaller diameter tool size to layer the effect.
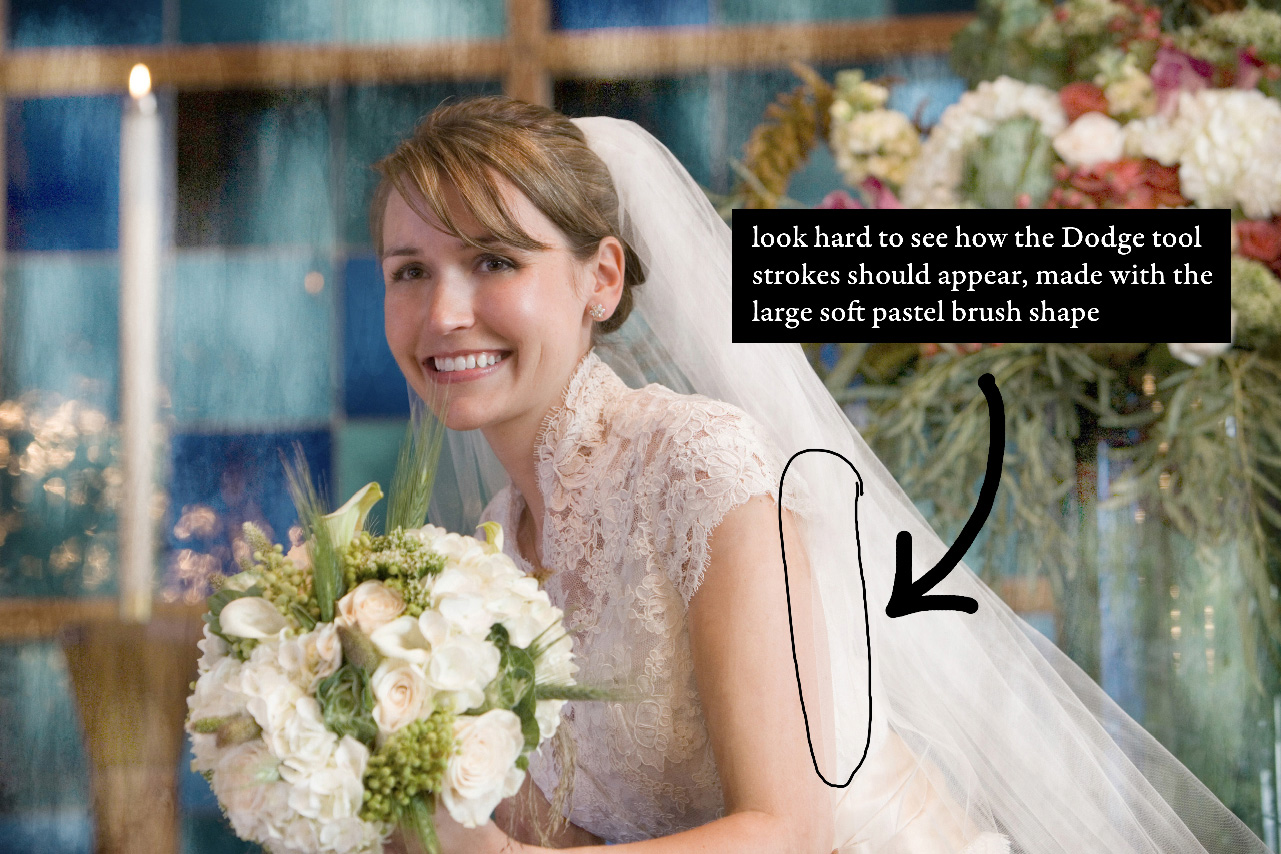
Figure 2. Step 2 has only moderate streaky impact visible on the original. Click on the image for a larger version.
At this stage, take care to brush over faces sparingly or not at all in order to preserve detail. Leave some background areas loosely painted and vary the heaviness by applying multiple strokes irregularly over each other.
Step 3.
Now go to Filter> Brush Stroke> Sumi-e. I allow the filter to run at default 10/2/16 settings, though you can experiment with stroke width, pressure and contrast. Without the underlayment you did in Step 2, this standard filter would be just that — an ordinary Photoshop device.
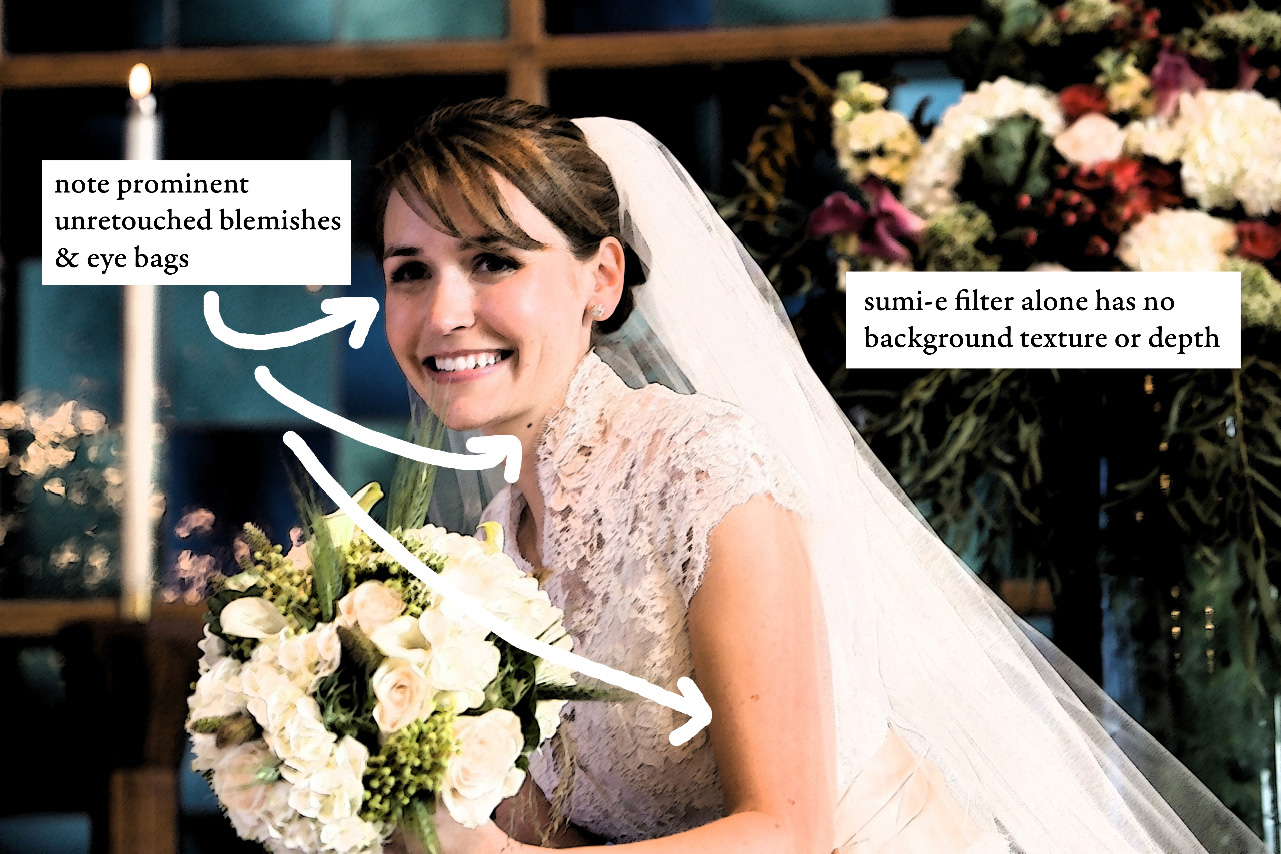
Figure 3. The Sumi-e filter alone looks Photoshop-y and heavy handed. Click on the image for a larger version.
If you didn’t remove all facial blemishes and background anomalies, they will show up now — dark, sharp, and unsightly. If the filter result is a bit dark, or has some areas that could use more of the flat brush stroke feel, go back to the Dodge tool add more strokes, all on the same duplicate layer.

Figure 4. Steps 2 and 3 combined begin to look like a real piece of art, but too contrasty. Click on the image for a larger version.
Step 4.
Now you can go in one of three ways. One, you can merge layers and leave the Sumi-e image just as it is.
However, the direct result is too dark and contrasty for my taste, so I choose to merge the layers, make the Background into a layer by double-clicking on it, and then add a new white-filled layer on the bottom. I create a French-looking pastel by decreasing the opacity of the image layer to 40% to 60% (Figure 5).

Figure 5. The pastel version is light, soft, and feminine. Click on the image for a larger version.
My favorite option is to darken and add moderate contrast to this pastel by adjusting the RGB Channel in Curves, pulling down the shadow end to taste (Figure 6). Hue and saturation can benefit from minor adjustments, as well.

Figure 6. My favorite version exudes snap with rebuilt contrast and tonal range. Click on the image for a larger version.
With about five minutes’ effort, this entire process is one of the quickest and simplest I’ve invented, while still creating a unique interpretation every time. You don’t recognize it as Photoshop manipulation. I particularly like how the charcoal wash doesn’t obscure the photographic heartbeat of the original.
Figure 7 and 8 are two other before-and-after examples:
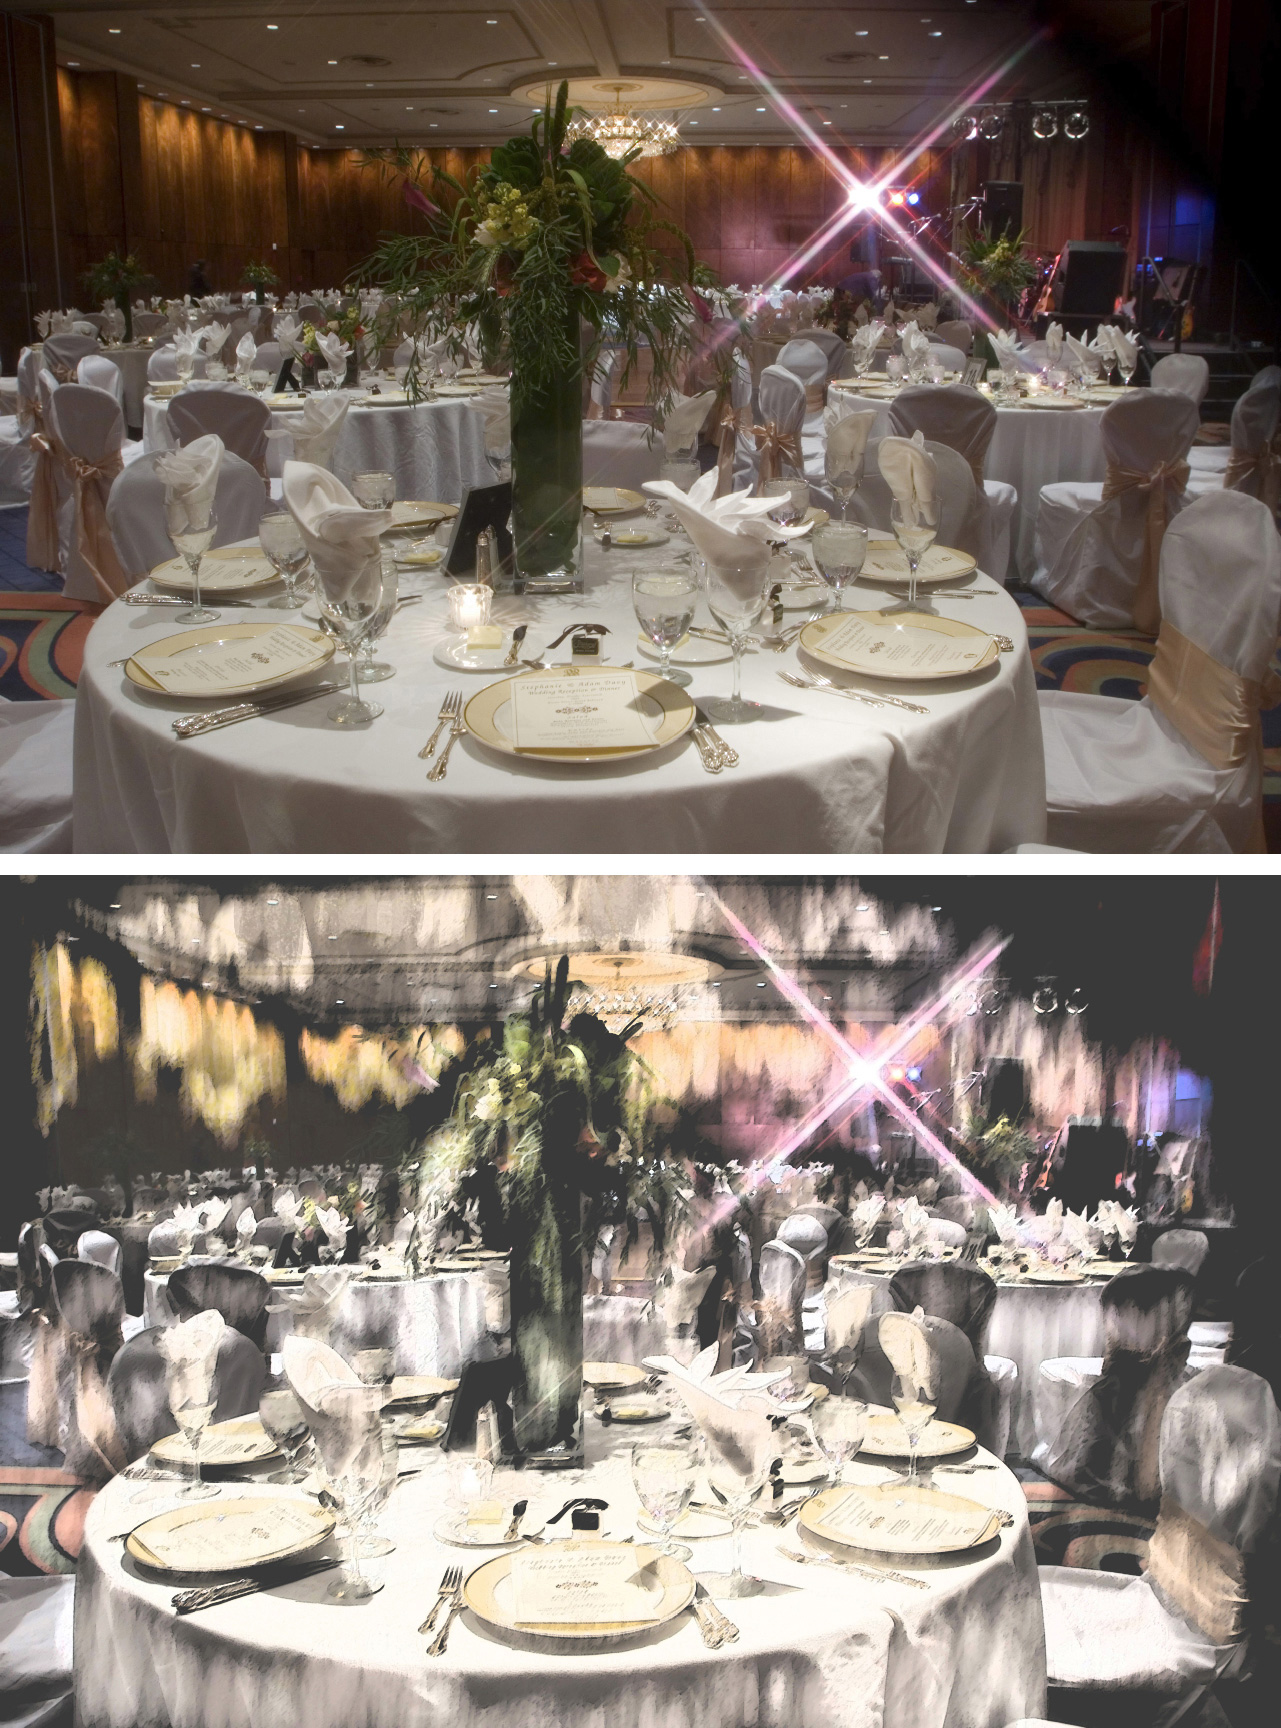
Figure 7. The top shot is the original image. Click on the image for a larger version.
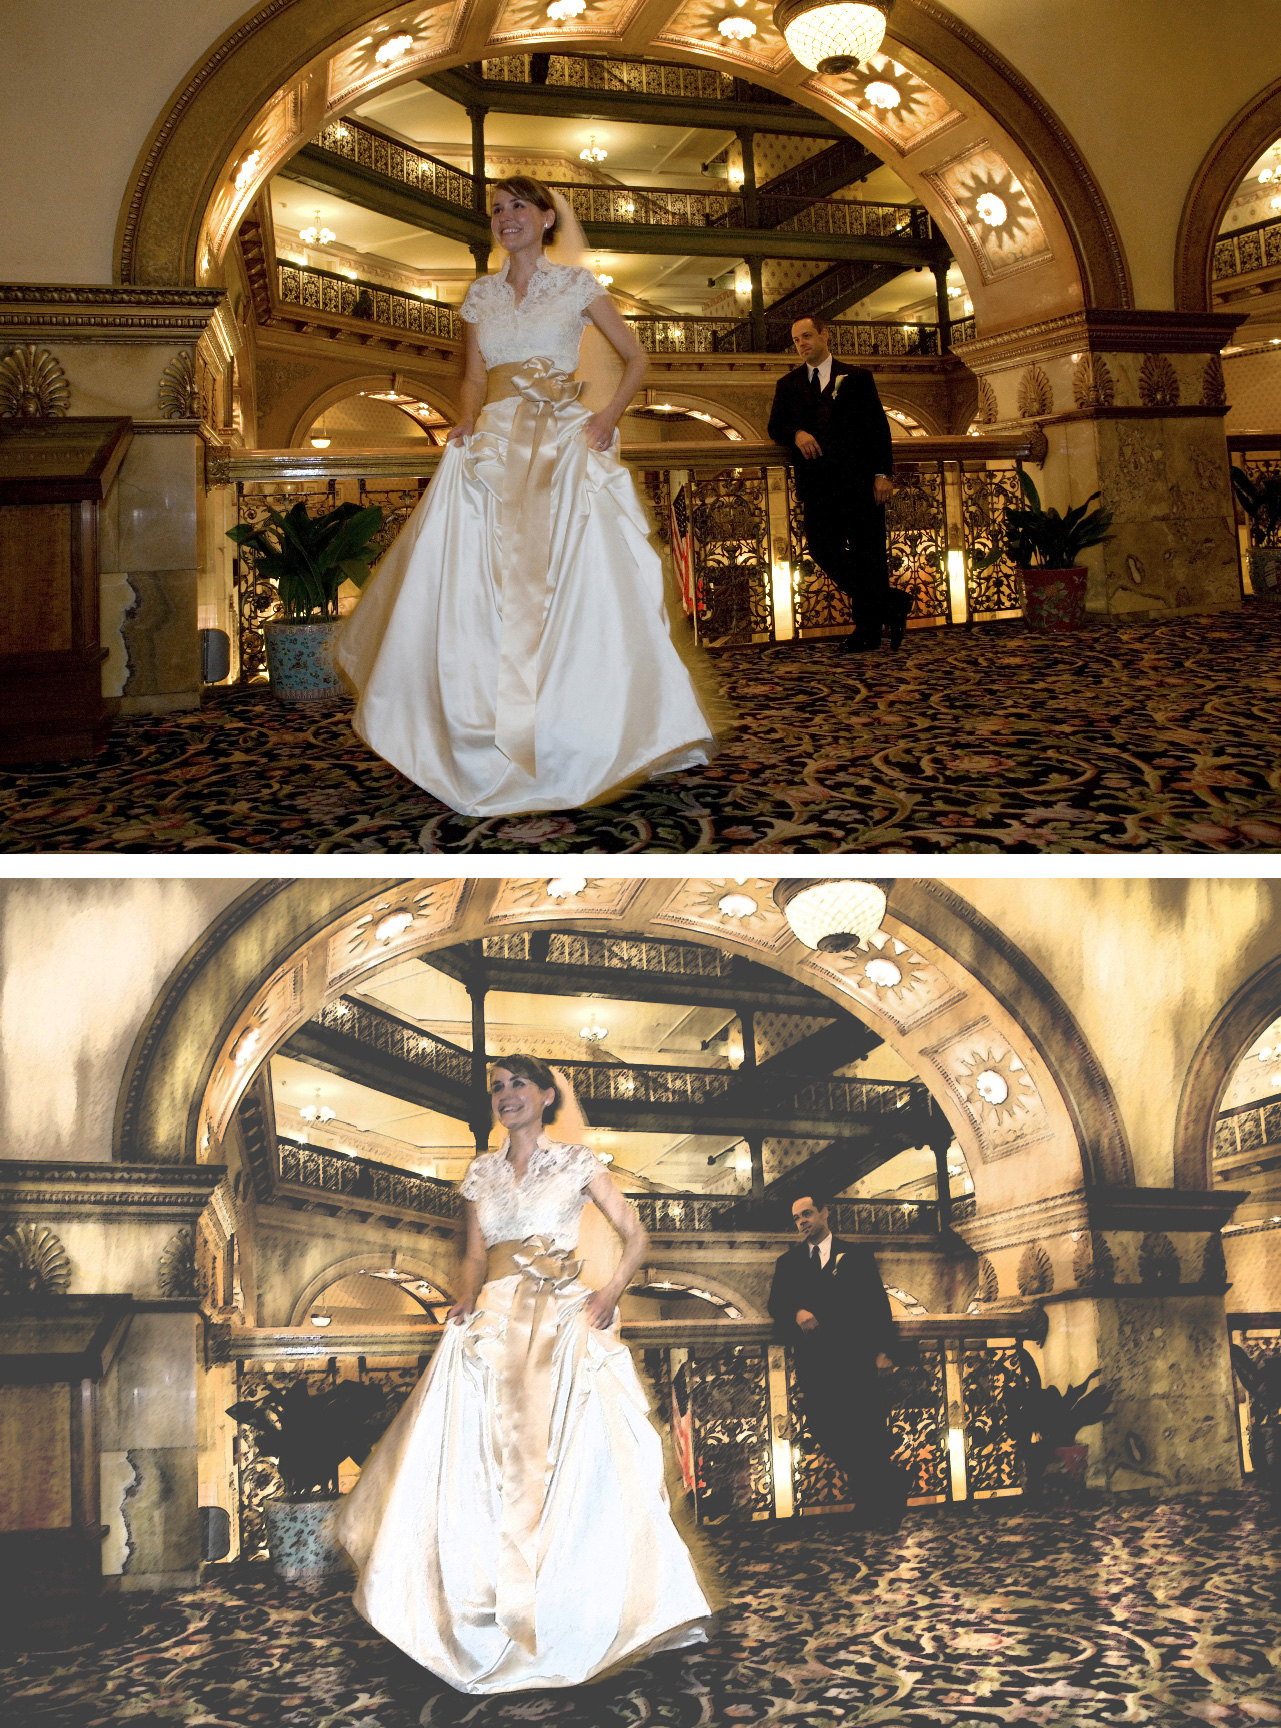
Figure 8. The top shot is unretouched. Click on the image for a larger version.
Sidebar: Sumi-e Primer
Black ink wash painting, or Sumi-e, developed in China during the Tang Dynasty and reached its popular heyday during the Song Dynasty. Migrating later to Japan, the technique was refined and perfected during the Muromachi Period, spanning longer than the 15th century, and roughly corresponding to the early European Renaissance.
Charcoal ash of bamboo or pine is compressed into hard sticks or cakes with a binder of fish bone glue. To make the ink, an artist grinds the charcoal stick on a special stone palette moistened with a few drops of water.
Sumi-e painting subject matter is most frequently organic and representative of the four seasons, which also symbolize the four virtues in Confucian philosophy.
My Photoshop Sumi-e filter does not reproduce the exact technique, but is named for the heavily detailed outlines and the charcoal roughness that are a contemporary update.
Sara Frances is an author of photographic books, a magazine contributor and adjunct professor of digital imaging at Red Rocks Community College. Her specialty is never-duplicated digital composite albums filled with her personal brand of “pixel surgery,” shown at her photographic atelier, Photo Mirage Imaging in Denver, Colorado. Contact her at st****@*********ge.com.
This technique was inspired by the innovative coffee table books from Apollo Photo Imagizing, which are printed by Kodak NexPress on deckle-edged leaves reminiscent of Oriental watercolor paper. The specific job was a set of iconic wedding images presented with dignified simplicity.
This article was last modified on January 4, 2023
This article was first published on May 14, 2007
Commenting is easier and faster when you're logged in!

Recommended for you

Top New Features in Photoshop
A little over a week ago, Adobe rolled out updates for Photoshop, Muse, and the...

Photoshop How-To: Distorting Text
This story is taken from “Photoshop Studio Skills: For Photoshop 7 and Pho...
Image-Editing Review: Adobe Photoshop Lightroom 4
Pros: Improved develop engine extracts surprising dynamic range out of single im...