

High-bit Support
While much of this upgrade is devoted to making the killer app for the 21st century photographer, there’s plenty for others to rejoice about too. The support for high-bit imaging has been radically extended to allow all the same things you can do with layers in 8-bit/channel files, including layer effects, layer masks, and nesting layer sets up to five deep. The Healing Brush tool sports the option to “use all layers,” so you can now perform cosmetic magic on a separate 16-bit/channel layer too. For those of us who have long been wishing for a lossless 16-bit/channel workflow that preserves all the original data, this is great news (to understand why some of us think this way, see my column Out of Gamut: The High-Bit Advantage). But in the “be careful what you wish for” department, it’s possible to create very large (i.e. gigabytes rather than megabytes) files in the process.
All the tools in the tool palette now work in high-bit mode as do selections made with the Magic Wand, Color Range, and QuickMask, and the Fill from History command. As a result, the CS upgrade has rendered moot all the crazed workarounds I’ve taught for years that tried to overcome the old high-bit limitations [for another stroll don’t memory lane, see Out of Gamut: You Can’t Do This to High-Bit Files in Photoshop (or Can You?)]. I won’t miss them, and I’m sure no one else will either. Extract and Liquify still don’t work in 16-bit/channel mode, nor do most of the “creative” filters, but we’ll be patient.
Filter Gallery
No new artistic filters have been added with this release, but a new Filter Gallery feature lets you stack multiple filters from the Artistic, Brush Strokes, Distort, Sketch, Stylize, and Texture sets. It’s best to start out with a small selection when you use this feature, because these filters tend to work pretty slow, but it’s useful to have the ability to experiment with the way the different filters interact, and see the effect of changing the order in which they’re applied.
Color Replacements
A new Color Replacement tool lets you apply the kinds of corrections you’d make with the Replace Color command, but you use a brush instead instead of a dialog box. A Tolerance setting lets you control the range of color that gets replaced, while the Limits options let you protect edges and details.
A more ambitious color-replacement feature, the Match Color command (another new item on the Adjustment menu), lets you apply one image’s color palette to another. Thus far, most of our attempts at using this feature have produced what might charitably be described as art, but while it seems rather a blunt instrument for making nuanced photorealistic color corrections, it does open up some interesting new creative possibilities.
New Palettes
A new Layer Comps palette works essentially like the Save Workspace feature, except that it records layer states rather than palette visibility and placement. You can record the layers’ position, visibility, and layer effects states, together or separately, and save them as a layer comp, so you can quickly switch between multiple states of an image — handy when the art director is looming over your shoulder (see Figure 5).

The Layer Comps palette lets you switch quickly between different layer states.
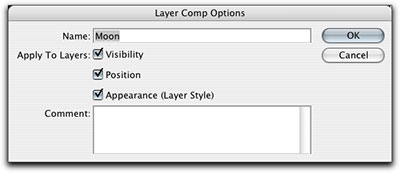
Layer comps can save any or all of layer visibility, layer position, and layer effects.
For the histogram-obsessed, the new Histogram palette lets you monitor the histogram at all times, including during edits, where it shows before-and-after states (see Figure 6). Note that the histogram that’s constantly displayed is the histogram of the on-screen cache, not of the actual image data (showing the image data would result in very slow performance indeed), so to see the true histogram, you have to click either of two controls placed about a quarter of an inch apart on the Histogram palette.

The histogram palette shows, in real time, the histogram of the image cache-the warning triangle indicates that the current histogram is of the cache rather than of the image data.

Click the warning triangle or the refresh control to see the actual histogram.
Usability Enhancements
Those of us who have to teach Photoshop will likely have mixed feelings about this, but you can now customize all your keyboard shortcuts. Fortunately, if things get out of hand you can easily restore the defaults. “Scrubby sliders” let you adjust values in many dialog boxes without having to grab the slider with the mouse (see Figure 7). In filter dialogs, for example, hovering over the slider’s label turns the cursor into a pointing finger with a two-headed horizontal arrow — the “scrubby slider” cursor. Whenever you see this cursor, you can simply click and drag to raise or lower the associated value.
 Figure 7: “Scrubby sliders” let you mouse down in the vicinity of a slider label, then drag to change the slider value without having to grab the slider exactly — the cursor changes to indicate that the scrubby slider is available.
Anyone who has to compare very similar images will love the new Arrange options on the Window menu. Finally, Photoshop lets us Tile or Cascade windows, but the fun doesn’t stop there. You can also synchronize panning and zooming across multiple windows, which makes comparing small details in different versions of an image a snap. (This feature would have saved me days of work back when the computer press used to run blockbuster reviews like 25 of the latest-and-greatest flatbed scanners compared, but even now, it’s very handy!)
The Not-so-good News
One of the more disastrous implications of Adobe’s Creative Suite strategy is that ship dates are set in stone regardless of the state of readiness of the application, and Photoshop CS definitely has some rough edges. Those hoping for performance improvements will be disappointed. A few things, notably the Healing Brush, actually run slower in Photoshop CS than they do in Photoshop 7, and we haven’t seen anything that runs significantly faster.
Then there are those features that behave in a way that one Photoshop engineer tactfully described as “as designed, but possibly less than optimal.” For example, Levels Adjustment layers don’t remember anything you did in the Levels Options dialog box, such as settings for Auto Color, Auto Levels, or Auto Contrast. Any attempt to edit these settings in the adjustment layer returns the settings in the adjustment layer to the current default, with no way other than using the History palette to get back to the old settings, and no way at all to find out what the correct settings actually were.
The Info palette now lets you display 16-bit numbers in high-bit files, from 0 (black) to 32,768 (white). I suspect that most users would find this capability a great deal more useful if you could display the 8-bit numbers as well — for example, relatively few of us can tell at the drop of a hat that 16,448 is the 16-bit equivalent of level 128 (the 8-bit value).
And while we can’t really blame the Photoshop team for this, we fervently wish that Photoshop CS were able to address more than 2GB of RAM, at least on Mac OS X 10.3, which in theory at least allows it to do so. Shipping schedules prevented any serious testing under a released version of Panther, and a user-level 64-bit Windows OS is still a ways out, so this limitation may persist for some time to come, but anyone who starts plumbing the depths of the high-bit capabilities in Photoshop CS will undoubtedly wish it were otherwise.
We heartily applaud Adobe’s decision to use XMP (extensible Metadata Platform) for all metadata — XMP is an open, well-documented standard that has been approved by the W3C — but a fair bit of third-party software has yet to support XMP, so you may find metadata being lost if your workflow involves pushing images through a third-party package on their way to Photoshop. Again, this isn’t something for which we can blame Adobe, but if metadata is important to you (and if it isn’t today, it will be at sometime in the future), it’s something you need to watch for.
One change that has caused far fewer headaches than many naysayers predicted is the online activation requirement, thus far for the Windows version only. Adobe has taken pains to avoid the glitches that have plagued other online activation schemes, and the predicted disasters have failed to materialize. We’re quite sure that once Adobe figures out how to implement an equally robust scheme on Mac OS X, Mac users will have to deal with online activation too.
None of these cavils are deal-breakers — the only way I’d give up Photoshop CS is if they were to pry it from my cold, dead hands — but they’re definitely issues any prospective buyer needs to consider. If you shoot digital, or do serious work with high-bit imagery, this upgrade is a must-have. For designers, the new File Browser and Layer Comp features are similarly compelling. It’s harder to make the case for prepress users to upgrade — there’s simply no killer feature for prepress, so those shops who continue to use Photoshop 4 will probably continue to do so.
Nevertheless, kudos to the Photoshop team for making an excellent upgrade under circumstances that were undoubtedly made more difficult by the CS strategy, and for making Photoshop CS the pre-eminent tool for the digital photographer.
This article was last modified on January 18, 2023
This article was first published on January 6, 2004
Commenting is easier and faster when you're logged in!

Recommended for you

Work That Text: The Power Behind Typographic Collages
Direct Impact The principal reason for the presence of copy in a piece of design...

How to Fill Text with Images in Photoshop
The next time you need to place an image inside text in Photoshop, try one of th...

Design How-To: Using Ghosted Backgrounds
A beautiful technique that's unusually easy to design: ghost and repeat a foregr...