
Photoshop 7: Using Brush Shapes and Textures

Now let’s look at Texture and Dual Brush panes of the Brushes palette.
Texture
Rather than a texture like those applied with the filter Texture> Texturizer, the Texture option in the Brushes palette applies a pattern to your stroke. Any pattern available in the Pattern picker for the command Edit> Fill or for the Paint Bucket is also available as a brush texture.

The Pattern picker menu enables you to load sets of patterns. Some of the patterns found in the set Artist Surfaces are especially appropriate for use as brush textures.
You can invert the pattern by checking the box to the right of the pattern sample. Inverting reverses the grayscale values of the pattern.
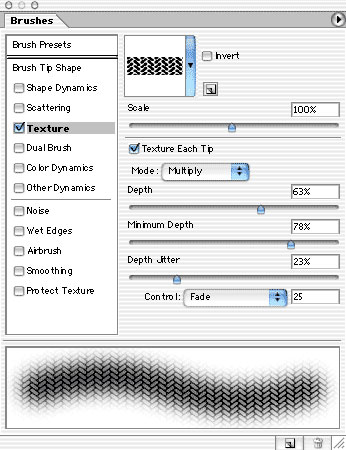
The next image shows the additional options available for texturing a brush. At the bottom are samples of the pattern Dark Coarse Weave at a variety of scale factors. From the left, the pattern is scaled to 15%, 30%, 50%, 100%, 150%, and 200%. The maximum scale factor is 1000%.

The Mode and the various Depth options are only available when Texture Each Tip is selected. The Texture Each Tip option applies the pattern individually to each instance of the brush tip. Rather than treating the brush stroke as a whole, this option treats each application of the brush tip separately. In this image, a single instance of the brush tip is shown to the upper-right. The pattern for the brush texture is Burlap.

The upper example shows how Photoshop applies a pattern to a stroke as a whole. Below, Texture Each Tip is activated. Note the areas of overlap from instance to instance. The pattern is applied over itself.
There are several options available for Texture Each Tip:
- Mode: The blending modes available for Texture are Multiply, Subtract, Darken, Overlay, Color Dodge, Color Burn, Linear Burn, Hard Mix. The blending mode affects how the overlapping brush instances interact, as well as how the brush itself interacts with other colors already on the layer. Note that the Hard Mix blending mode is only available in the Texture and Dual Brush panes of the Brushes palette. Each of the brush’s component color values is compared to the existing color on the layer. If the brush’s component color is darker, the existing color is darkened. If it’s lighter, the existing color is lightened.
- Depth: Depth looks at the texture as a three dimensional object, with the light and dark areas representing high and low points. Changing the Depth setting alters what grayscale values are affected. At 0%, the pattern is completely eliminated. At 100% Depth, the texture is reproduced normally.
- Minimum Depth: Used in conjunction with Depth Jitter, this slider restricts the lowest jitter value.
- Depth Jitter This slider regulates the amount of variation in depth over the course of the stroke. At 0%, there is no variation and the Depth slider determines the appearance of the brush. The Control options are discussed in the first part of this series.
This article was last modified on January 3, 2023
This article was first published on June 25, 2002
Commenting is easier and faster when you're logged in!

Recommended for you

CreativePro Tip of the Week: Using Resource Libraries in Illustrator
This CreativePro Tip of the Week for using resource libraries in Illustrator was...
Create a Vintage Logo in Illustrator
Those artisanal logos are all the rage, aren’t they? You know the ones: th...
How to Digitize a Film Archive with Adobe Lightroom or Adobe Camera Raw
Digitizing an archive of film images can be a time-consuming process. Instead of...